Rocket Stove Efficiently Heats Water

Rocket stoves are an interesting, if often overlooked, method for cooking or for generating heat. Designed to use biomass that might otherwise be wasted, such as wood, twigs, or other agricultural byproducts, they are remarkably efficient and perform relatively complete combustion due to their design, meaning that there are fewer air quality issues caused when using these stoves than other methods. When integrated with a little bit of plumbing, they can also be used to provide a large amount of hot water to something like an off-grid home as well.

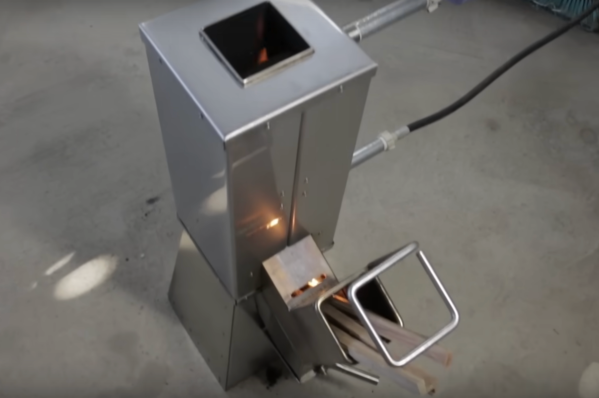
[Little Aussie Rockets] starts off the build by fabricating the feed point for the fuel out of steel, and attaching it to a chimney section. This is the fundamental part of a rocket stove, which sucks air in past the fuel, burns it, and exhausts it up the chimney. A few sections of pipe are welded into the chimney section to heat the water as it passes through, and then an enclosure is made for the stove to provide insulation and improve its efficiency. The rocket stove was able to effortlessly heat 80 liters of water to 70°C in a little over an hour using a few scraps of wood.

The metalworking skills of [Little Aussie Rockets] are also on full display here, which makes the video well worth watching on its own. Rocket stoves themselves can be remarkably simple for how well they work, and can even be built in miniature to take on camping trips as a lightweight alternative to needing to carry gas canisters, since they can use small twigs for fuel very easily. We’ve also seen much larger, more complex versions designed for cooking huge amounts of food.

Continue reading “Rocket Stove Efficiently Heats Water”

It’s Easy To Make Gears Out Of Wood

Typically, most of the gears we use in our life are made of plastic or metal. However, wood gears can do just fine in some simple roles, and they’re utterly pleasant to make, as this video from [botto bie] demonstrates.

With steady hands, it’s easy to make basic gears by hand with basic tools and a printer. You just need the help of a spur gear generator to produce the required outlines for you to follow. [botto bie] uses the online tool from Evolvent Design which will spit out DXF or SVG files as you desire.

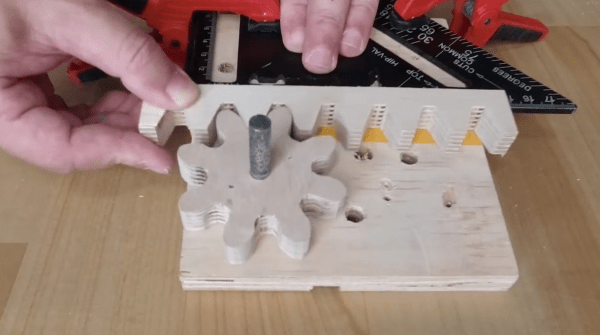
Basic woodworking techniques are used to produce the gears, and they prove simple and effective. A rack is produced by first applying a involute tooth template with paper to a rectangular piece of wood. A series of circular and table jigsaw operations are then used to cut out the required material to produce the rack. A variety of toothed gears are produced in a similar fashion.

If you’re lacking a CNC machine or a 3D printer, this can be a great way to experiment. Bonus points if you use your wooden geartrain as part of some kind of exciting mechanism, like an automated marble run or musical contraption. Video after the break.

Continue reading “It’s Easy To Make Gears Out Of Wood”

Exploring Woodworking Mysteries With Strain Gauges And Raspberry Pi

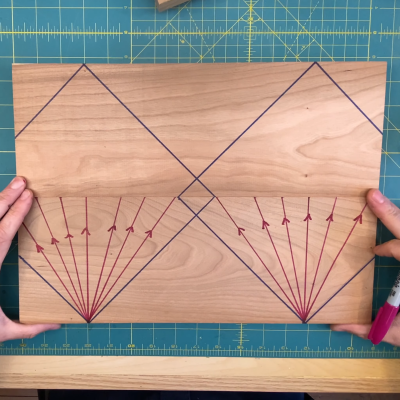
If you’re not a woodworker, you might not have heard of the “45-degree rule.” It goes like this: a clamp exerts a force that radiates out across a triangular region of the wood that forms a right angle — 45 degrees on each side of the clamp’s point of contact. So, to ensure that force is applied as evenly as possible across the entire glue joint, clamps should be spaced so that these force triangles overlap. It’s a handy rule, especially for the woodworker looking to justify the purchase of more clamps; you can never have too many clamps. But is it valid?

Myth busted?

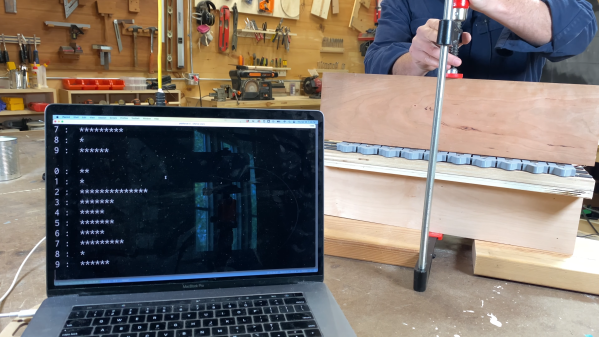
The short answer that [ari kardasis] comes up with in the video below is… sort of. With the help of a wonderfully complex array of strain gauges and a Raspberry Pi, he found that the story isn’t so simple. Each strain gauge lives in a 3D printed bracket that spaces the sensors evenly along the wood under test, with a lot of work going into making the test setup as stiff as possible with steel reinforcement. There were some problems with a few strain gauges, but once he sorted that out, the test setup went into action.

[ari] tested clamping force transmission through pieces of wood of various widths, using both hardwoods and softwoods. In general, he found that the force pattern is much broader than the 45-degree rule suggests — he got over 60 degrees in some cases. Softwoods seemed to have a somewhat more acute pattern than hardwoods, but still greater than the rulebook says. At the end of the day, it seems like clamp spacing of two board widths will suffice for hardwoods, while 1.5 or so will do for softwoods. Either way, that means fewer clamps are needed.

A lot of woodworking is seat-of-the-pants stuff, so it’s nice to see a more rigorous analysis like this. It reminds us a lot of some of the experiments [Matthia Wandel] has done, like load testing various types of woods and glues.

Continue reading “Exploring Woodworking Mysteries With Strain Gauges And Raspberry Pi”

Transistors That Grow On Trees

Modern technology is riddled with innovations that were initially inspired by the natural world. Velcro, bullet trains, airplanes, solar panels, and many other technologies took inspiration from nature to become what they are today. While some of these examples might seem like obvious places to look, scientists are peering into more unconventional locations for this transistor design which is both inspired by and made out of wood.

The first obvious hurdle to overcome with any electronics made out of wood is that wood isn’t particularly conductive, but then again a block of silicon needs some work before it reliably conducts electricity too. First, the lignin is removed from the wood by dissolving it in acetate, leaving behind mostly the cellulose structure. Then a conductive polymer is added to create a lattice structure of sorts using the wood cellulose as the structure. Within this structure, transistors can be constructed that function mostly the same as a conventional transistor might.

It might seem counterintuitive to use wood to build electronics like transistors, but this method might offer a number of advantages including sustainability, lower cost, recyclability, and physical flexibility. Wood can be worked in a number of ways once the lignin is removed, most notably when making paper, but removing the lignin can also make the wood relatively transparent as well which has a number of other potential uses.

Thanks to [Adrian] for the tip!

Automating The Most Analog Of HVAC Equipment

Burning wood, while not a perfect heating solution, has a number of advantages over more modern heating appliances. It’s a renewable resource, doesn’t add carbon to the atmosphere over geologic time scales like fossil fuels do, can be harvested locally using simple tools, and it doesn’t require any modern infrastructure to support it. That being said, wood stoves aren’t something that are very high-tech and don’t lend themselves particularly well to automation as a result, at least with the exception of this wood stove from [jotulf45v2].

While this doesn’t automate the loading or direct control of a modern pellet stove, it does help [jotulf45v2] know when the best times are for loading more wood into the stove and helps keep the stove in the right temperature range to avoid the dangerous formation of creosote on the inside of his chimney caused by low temperature burns. Two temperature sensors, one on the stovetop and the other on the stove pipe, monitor the stove exhaust temperature. They feed data to a Node-RED system running on a Raspberry Pi which automatically notifies the user by text message when certain stove temperatures are reached.

For anyone heating with wood, tools like this are indispensable to help avoid spending an otherwise unnecessary amount of time getting a fire up to temperature quickly without over-firing the stove. Modern pellet stoves have some more modern conveniences like this built in, but many of the perks of using cord wood are lost with these devices. There are plenty of other ways to heat with wood too; take a look at this custom wood boiler which serves as a hot water heater.

Custom Enclosure For 3D Printer

Having an enclosure around an FDM 3D printer is generally a good idea, even when printing only with PLA, as it keeps the noise in, and the heat (and smell, with ABS) inside. With all the available options for enclosures out there, however, [David McDaid] figured that it should be possible to make an enclosure that does not look like a grow tent and is not overly expensive. He also shared the design files on GitHub.

The essential idea is very simple and straightforward: the structural part is cut out of pine beams that are cut to size and joined into a cube by (3D-printed) corner brackets, with acrylic (Perspex) sheets filling in the space between the wooden beams. A door is formed using (also 3D-printed) hinges and door handles. The whole enclosure is rounded off with a lick of paint on the wooden elements, and a diffused set of LED lights for internal illumination.

It definitely has to be admitted that it makes for a very stylish enclosure, with a lot of modding potential. It can also easily be adapted to differently sized printers and filament material demands.

DIY Macro Keyboard Wood Be Nice

Editing video tends to involve a lot of keyboard shortcuts, and while this might be fine for the occasional edit, those who regularly deal with video often reach for a macro pad to streamline their workflow. There are plenty of macro keyboards available specifically meant to meet the needs of those who edit a lot of video, but if you want something tailored for your personal workflow you may want to design your own keyboard like this wooden macro pad from [SS4H].

The keyboard itself is built around an STM32 microcontroller, which gives it plenty of power to drive and read the keyboard matrix. It also handles an encoder that is typically included on macro keyboards for video editing, but rather than using a potentiometer-type encoder this one uses a magnetic rotary encoder for accuracy and reliability. There’s a display built into the keyboard as well with its own on-board microcontroller that needs to be programmed separately, but with everything assembled it looks like a professional offering.

[SS4H] built a prototype using 3D printed parts, but for the final version he created one with a wooden case and laser etched keys to add a bit of uniqueness to the build. He also open-sourced all of the PCB schematics and other files needed to recreate this build so anyone can make it if they’d like. It’s not the only macro keyboard we’ve seen before, either, so if you’re looking for something even more esoteric take a look at this keyboard designed to be operated by foot.

Continue reading “DIY Macro Keyboard Wood Be Nice”