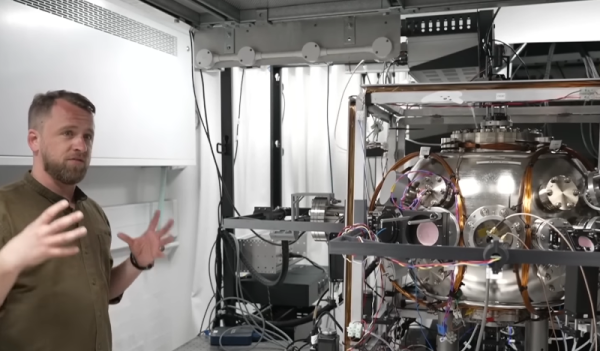
As you can see above, there is no wiimote in that accessory steering wheel. There is, instead, a home-made accelerometer controller that connects to the pc via USB. Based around a PIC 18F2550 and a 2 axis accelerometer, this device is detected by windows as a standard controller. The schematic and source code are available on his website. He says it can also be used as a “motion mouse”. You can see a video of that after the break.
What do gangs, territories, cities, and glowing blue balls have in common? No, not that one drunken night you can’t seem to remember, rather a new location aware game called Urban Defender.
The concept behind the game is simple. A player hold a ball that knows its current location and can notify you if needed via LEDs and a speaker of changes in its environment. He or she then runs around the city until the ball tells them of an unclaimed or enemy territory. Bounce the ball against a building and that territory is now claimed.
The ball itself is a prototype combination of an Arduino, Accelerometer, vibration motor, LEDs, XBee, batteries, and wire all packed inside of an industrial rubber gym ball. Unfortunately after testing the Urban Defender team found the GPS and a few other components would need to be kept outside of the ball and on the player.
Finally, a project that warrants the use of an Arduino. Anyone up for a game?
[Mark] wanted a Segway but why buy something if you can have more fun building it? His end product is an amazing homemade version of the self-balancing transportation package. We’ve seen several projects that include auto-balance, but this one is large enough to ride on and has a bit of an advantage in the design. The motors, batteries, and other components are mounted below the wheel hubs and are weight balanced. This means that the device wants to find balance naturally, even when the electronics are switched off.
The frame was modeled in CAD and then welded together. For propulsion [Mark] has installed two 750 Watt motors which will use sprockets and chains to turn the wheels. The machine balances based on data from both a gyroscope and an accelerometer, with the entire packaged tied together using an Arduino.
[Mark's] build log is well laid out and details each part of the build with a different post. His two most recent entries include video of the unit balancing and of him riding the 95% completed project. A big thanks to [Mark] for taking the time to document this so that we can share in the excitement of a well-executed project.
[etgalim] works in Solidworks extensively and wanted a more intuitive way of rotating objects onscreen. To do this, he created a mouse that responds to rotation. He put a 3D compass module inside an old mouse and wired it up to an Arduino. The Arduino then relays the I2C sensor data to the computer. So far, he has a Processing script that uses the mouse to rotate a cube, but eventually he wants to write a Solidworks plugin. It’s a bit shaky, and we think it would be a bit smoother (and cheaper) if he used gyros like the jedipad. Video after the jump.
The iPhone doesn’t have the market cornered on the use of accelerometers. The tiltphone project incorporates a three axis accelerometer into a set of headphones transforming them into a remote control for an iPod. A PIC16F690 reads in data from the analog sensor, translates specific movements into commands, and like the Arduino iPod Remote from last week, relays them to an iPod via the Apple Accessory Protocol. A quick nod left or right skips tracks, holding a sideways nod controls the volume, and setting the headphones down pauses.
This project is a bit older but we’re glad [anon] tipped us off as we hadn’t seen it before. There doesn’t seem to be any code or schematics available but because the Apple Accessory Protocol is known, it’s only a matter of working out how to interpret the sensor data. There is video after the break and if you pull off this hack yourself be sure to send in details for a followup.
Have you ever wondered how high or how fast a model rocket goes when you launch it? [sprite_tm] did, so he decided to build a low cost, lightweight data logger that he could fit into the nose cone of his rocket. To keep the circuit small, he built it around the popular ATtiny13 microcontroller. The microcontroller collects data from a Freescale MMA7260, a 3-axis accelerometer that he extracted from a third-party Wii nunchuck controller. After the microcontroller collects the data, it’s stored in 32K of EEPROM on a 24C256. All of this is powered by a small 3.6v Li-ion battery, which is the largest part of the circuit. If this sounds like something you’d like to make, he has detailed instructions along with the software used available on his site. While we don’t launch a lot of model rockets here, we may soon start just so that we have an excuse to build this.
[Perry's] awesome AcceLED Pong project gives new life to a classic game by adding acceleration-based control. The pong paddles are moved by tilting the circuit left or right. Motion is measured by an ADXL203 dual axis accelerometer, and an ATMEGA32 microcontroller converts acceleration into ball and paddle movement. The game display is a three-color SparkFun 8×8 LED matrix with serial interface.
This is probably the most entertaining “application note” I’ve ever seen. These things are usually a bit dry, ok, they make your eyes turn to a previously unknown state of matter. This one involves making your alarm clock snooze when you beat it. The trick? Wire an accelerometer to the snooze button. It takes a bit of supporting circuitry, but looks do-able for anyone worth of their soldering iron. Thanks to [Andy] for sending it in.
This one’s pretty simple, but anyone who’s ever spent time tweaking an engine will appreciate it. [Kevin]’s been using a wiimote to measure the acceleration of his car. He put together a script to dump the accelerometer output to a CSV file, then graphed it with Excel. He notes that the accelerometer output isn’t that precise, but it’s good enough to give you feedback on your mods.