Logic And EEPROMs Bring VGA To Life, Sans Microcontroller

For whatever reason, the Video Graphics Array standard seems to attract a lot of hardware hacks. Most of them tend to center around tricking a microcontroller into generating the signals needed to send images to a VGA monitor. We love those hacks, but this one takes a different tack – a microcontroller-free VGA display that uses only simple logic chips and EEPROMs.

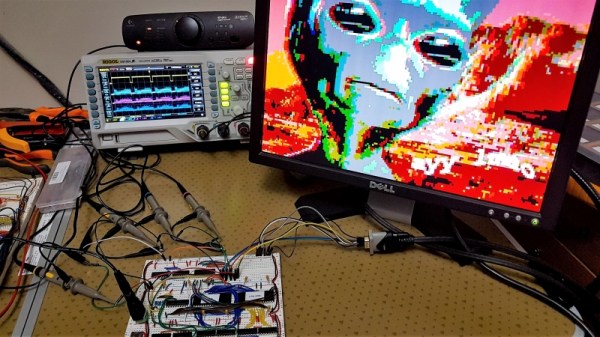
When we first spied this project, [PH4Nz] had not yet shared his schematics and code, but has since posted everything on GitHub. His original description was enough to whet our appetite, though. He starts with a 27.175-MHz clock and divides that by 4 with a 74HCT163, which has the effect of expanding the 160×240 pixels image stored in one of the EEPROMs to 640×480. Two 8-bit counters keep track of horizontal and vertical positions, while the other EEPROM takes care of generating the Hsync and Vsync signals. It’s all quite hackish, but it works. [PH4Nz] tells us that the whole thing is in support of a larger project: an 8-bit computer made from logic chips. We’re looking forward to seeing that one too.

This isn’t the first microcontroller-less VGA project we’ve seen, of course. Here’s a similar one also based on EEPROMs, and one with TTL logic chips. And we still love VGA on a microcontroller such as the ESP32; after all, there’s more than one way to hack.

Thanks to [John U] for the tip.

Mods Keep The WaveBird Kicking In The Switch Era

Nintendo made some questionable decisions during the early 2000’s, but developing the WaveBird certainly wasn’t one of them. Years before wireless controllers were the standard on home game consoles, the WaveBird gave GameCube owners a glimpse into the future. It managed to deliver lag-free gaming without resorting to easily-blocked infrared, and had a battery life and range long enough that there was really no downside to cutting the cord aside from the lack of rumble support.

In fact, the WaveBird was such a good controller that some fans just can’t put the thing down even in 2019. [Bill Paxton] loves his so much that he decided to modify it so he could use it on Nintendo’s latest money printing machine, the Switch, without having to fiddle with any adapters. While he was at it, he decided to fix the only serious drawback of the controller and hack in some rumble motors; arguably making his re-imagined WaveBird superior in just about every way to the original.

It might be counter-intuitive, but the trick here is that [Bill] actually took the internals from a standard wired GameCube controller and fitted it all into the case for the WaveBird. That’s how he got the rumble support back, but where does the signature wireless capability come from?

For that, he took apart a “GBros. Wireless Adapter” from 8BitDo. This gadget is intended to let you use your existing GameCube controllers on the Switch wirelessly, so all he had to do was shove its PCB inside the controller and wire it directly to the pads on the controller’s board. Thankfully, the WaveBird was rather husky to begin with, so there’s enough space inside to add all the extra hardware without much fuss.

Between modifications like this and efforts to reverse engineer the controller’s wireless protocol, hackers aren’t about to let this revolutionary accessory go gently into that good night. You might see a GameCube slaughtered for a meme, but WaveBirds never die.

Continue reading “Mods Keep The WaveBird Kicking In The Switch Era”

Eight Player GameCube Adapter Is Ready For Smash

With the release of Smash Ultimate fast approaching for the Nintendo Switch, [Patrick Hess] wanted to get ahead of the game and make sure his squad had the equipment they’d need. Namely, support for the GameCube controllers that serious Smash Bros players demand. But it wasn’t enough to have one or two of them hooked up, or even four. Not even six GameCube controllers could satiate his desire. No, he needed to have support for eight simultaneous GameCube controllers, and he wanted to look good doing it too.

Enter his meticulously designed eight player GameCube to USB adapter. Made out of dual official Nintendo GameCube to USB adapters (intended for the Wii U) merged together in a 3D printed case, the final result looks like something that could earn the coveted Nintendo Seal of Approval. Or at least, something that might pop up on the import sites in the next month or two for a few bucks.

[Patrick] started the project by recreating the official adapter PCBs and their housings in 3D using a pair of calipers. After a couple of test prints to make sure he had all the dimensions right, he could then move on to designing his final enclosure knowing he had accurate data to model around.

In addition to the two adapter boards, there’s also a four port USB hub inside the device’s case. Each adapter has two USB leads, here shortened to fit inside the case, which connect up to the hub. The integrated hub allows connecting all eight GameCube controllers through only a single USB connection. All controllers worked as expected during intense testing on the Wii U’s version of Smash Bros, though at this point [Patrick] can only assume it will work when the Switch version is released.

If there’s a downside to this project, it’s that the design for the 3D printed case is so intricate that [Patrick] was only able to print it on a machine that supported water-soluble PVA supports. A somewhat tall order for the average hacker; it would be interesting to see if somebody could make a second pass on the enclosure that is geared more towards printability than aesthetics.

While the design of the GameCube controller remains somewhat controversial after all these years, there’s no denying it retains an impressive following. Whether turning them into USB devices, shrinking them to preposterously small dimensions, or just finding increasingly creative ways to use them on Nintendo’s latest console, hackers are definitely in love with the gonzo little controller that’s now pushing 20 years old.

New Controller For Retro Console

In the world of retro gaming, when using emulators and non-native hardware it’s pretty common to use whatever USB controller happens to be available. This allows us to get a nostalgic look while using a  configurable controller. One thing that isn’t as common is using the original hardware while still finding a way to adapt a modern controller to an old console. This is exactly what you need though, when you’re retro gaming on a platform with notoriously terrible controllers.

[Scott] enjoys his Atari 5200 but the non-centering and generically terrible joystick wasn’t well received even in the early 80s when the console was in its prime. He decided that using a Dual Shock controller from a Playstation 2 would provide a much better gaming experience, and set about building an adapter. He found that in a way the Dual Shock controller was an almost perfect pairing for the Atari because it has two analog control sticks built-in already. There’s also an array of information on pairing the Dual Shock controller with AVR microcontrollers, so he wouldn’t have to reinvent the wheel. From there, it was just a matter of pairing communications protocols between the two pieces of hardware.

The project page goes into quite a bit of detail on SPI communication protocols and the needs of both the Atari and the Playstation controller. If you’re a retro gaming fan, really into communication protocols, or have always had a love-hate relationship with your Atari because the controllers were just that bad, it’s worth checking out. If this is too much, though, there are other ways to get that Atari nostalgia.

Thanks to [Baldpower] for the tip!

Continue reading “New Controller For Retro Console”

High Detail 3D Printing With An Airbrush Nozzle

On a fused deposition modeling (FDM) 3D printer, the nozzle size dictates how small a detail you can print. Put simply, you can’t print features smaller than your nozzle for the same reason you’d have trouble signing a check with a paint roller. If the detail is smaller than the diameter of your tool, you’re just going to obliterate it. Those who’ve been around the block a few times with their desktop 3D printer may have seen this come up in practice when their slicer refused to print lines which were thinner than the installed nozzle (0.4mm on the vast majority of printers).

Smaller nozzles exist for those looking to improve their printer’s detail on small objects, but [René Jurack] wasn’t happy with just putting a finer nozzle on a stock E3D-style hotend. In his opinion it’s still a hotend and arrangement intended for 0.4mm printing, and doesn’t quite fully realize the potential of a smaller diameter nozzle. After some experimentation, he thinks he’s found the solution by using airbrush nozzles.

As [René] sees it, the hotend is too close to the subject being printed when using nozzles finer than 0.4mm. Since you’re working on tiny objects, the radiant heat from the body of the hotend being only a few millimeters away is enough to deform what you’re working on. But using the long and tapered airbrush nozzle, the hotend is kept at a greater distance from the print. In addition, it gives more room for the part cooling fan to hit the print with cool air, which is another critical aspect of high-detail FDM printing.

Of course, you can’t just stick an airbrush nozzle on your E3D and call it a day. As you might expect, they are tiny. So [René] designed an adapter that will let you take widely available airbrush nozzles and thread them into an M6 threaded hotend. He’s now selling the adapters, and judging by the pictures he posted, we have to say he might be onto something.

If you’re more about brute strength than finesse, you might be interested in outfitting your E3D with a ruby nozzle instead.

Continue reading “High Detail 3D Printing With An Airbrush Nozzle”

ATX Adapter For The IBM PCJr Now Available

We’ve mentioned previously the challenges that come with maintaining vintage computers which in some cases are pushing 40 years old. Components, even high quality ones, eventually fail and need to be replaced. Now if it’s a fairly popular vintage machine, replacement parts usually aren’t too hard to come by. But what if you’re dealing with a machine that’s not just vintage, but was also such a commercial flop that parts are scarce?

Such is the life for anyone who owns one of the 500,000 IBM PCJrs that Big Blue managed to get out of the door during the year or so the product was on the market. As [AkBKukU] found, a replacement AC adapter for the odd-ball computer was going to cost more than what he paid for the thing, so he set to work on creating an adapter so he could use a modern ATX PSU on the machine. After a couple of months of ironing out the kinks, the design is finally ready for consumption.

In the end, the PCB design itself is quite simple. It’s really just a matter of switching around some pins from the standard ATX plug to the edge connector on the PCJr. There’s also a connector for powering a floppy drive, as well as headers for a fan and power switch.

[AkBKukU] has come up with two ways to use the adapter. You can either go with a standard ATX PSU, in which case it will need to sit outside the machine due to its size, or use a PicoPSU which allows you to keep the whole thing internal. If you don’t mind spending the cash, the PicoPSU method is a much cleaner installation that still provides plenty of power. Depending on which route you take, there are different 3D printed plates to adapt the computer’s rear panel to fit the new hardware.

All the files to build your own version are in the GitHub repository, and [AkBKukU] is doing some low volume runs of both kits and assembled adapter. If this project looks familiar, it’s because we reported on it back when it was still a hand-scratched PCB that didn’t always work as expected.

[Thanks to Gregg for the tip.]

Continue reading “ATX Adapter For The IBM PCJr Now Available”

Using Modern Nintendo Controllers On The C64

There are plenty of people out there who still enjoy playing games on vintage computers like the Commodore 64. But while they likely return to these classic games themselves out of a sense of nostalgia, the feeling doesn’t always extend to the hardware itself. For example, one can enjoy playing Impossible Mission without having to use a contemporary C64 joystick.

Thanks to an open source project developed by [Robert Grasböck], C64 owners who want to take advantage of the improvements made to gaming controllers in the nearly 40 years since the system’s release now have another option. Called Nunchuk64, it allows you to use various Nintendo controllers which make use of the Wii “Nunchuk” interface on original C64 hardware. This includes the controllers from the recent “Classic Edition” NES and SNES systems, which offer a decidedly retro feel with all the benefits of modern technology and construction techniques.

Both the hardware and software for Nunchuck64 are open source, and everything you need to build your own version is in the project’s repository. [Robert] even has assembly instructions, complete with images, which walk you through building your own copy of the hardware and flashing the firmware onto it. This is a nice touch that we very rarely see even in open source projects. The board is populated with a ATmega328P microcontroller and a handful of passive components, making assembly fairly straightforward assuming you are comfortable with SMD work.

Bringing more modern controllers to classic systems seems to be gaining popularity recently, within the last few months we’ve seen Xbox 360 controllers on the Nintendo 64, and newly manufactured pads for the Atari 5200.

Continue reading “Using Modern Nintendo Controllers On The C64”