Battery-Powered Watering Timer Converted To Solar On The Cheap

Watering the garden or the lawn is one of those springtime chores that is way more appealing early in the season than later. As the growing season grinds along, a chore that seemed life-giving and satisfying becomes, well, just another chore, and plants often suffer for it.

Automating the watering task can be as simple as buying a little electronic timer valve that turns on the flow at the appointed times. [A1ronzo] converted his water hose timer to solar power. Most such timers are very similar, with a solenoid-operated pilot valve in line with the water supply and an electronic timer of some sort. The whole thing is quite capable of running on a pair of AA batteries, but rather than wasting money on new batteries several times a season, he slipped a LiPo pack and a charge controller into the battery case slot and connected a small solar panel to the top of the controller.

The LiPo is a nominal 3.7-volt pack, so he did a little testing to make sure the timer would be OK with the higher voltage. The solar panel sits on top of the case, and the whole thing should last for years. And bonus points for never having to replace a timer that you put away at the end of the season with batteries still in it, only to have them leak. Ask us how we know.

Like the best of hacks, this one is quick, easy and cheap — $15 in parts, aside from the timer. There are more complicated irrigation solutions, of course, one of which even won the Hackaday Prize once upon a time. But this one has us ordering parts to build our own right now.

Why Won’t This Darn Thing Charge?

What is more fun than plugging in your phone and coming back to find your battery on empty? Stepping on a LEGO block with bare feet or arriving hungry at a restaurant after closing probably qualify. [Alex Sidorenko] won’t clean your floors or order you a pizza, but he can help you understand why cheap chargers won’t always power expensive devices. He also shows how to build an adapter to make them work despite themselves.

The cheapest smart device chargers take electricity from your home or car and convert it to five volts of direct current. That voltage sits on the power rails of a USB socket until you plug in a cable. If you’re fortunate, you might get a measly fuse.

Smart device manufacturers don’t make money when you buy an off-brand charger, and they can’t speak to the current protection of them, so they started to add features on their own chargers to protect their components and profit margins. In the case of dedicated chargers, a simple resistor across the data lines tells your phone it is acceptable power. Other devices are more finicky, but [Alex Sidorenko] shows how they work and provides Eagle files to build whatever flavor you want. Just be positive that your power supply is worthy of the reliability these boards promise to the device.

Now you know why connecting a homemade benchtop power supply to a USB cable seems good on paper but doesn’t always get the job done. Always be safe when you make your own power supplies.

Cross-Brand Adapter Makes For Blended Battery Family

Even though he’s a faithful DeWalt cordless tool guy, [Richard Day] admits to a wandering eye in the tool aisle, looking at the Ryobi offerings with impure thoughts. Could he stay true to his brand and stick with his huge stock of yellow tools and batteries, or would he succumb to temptation and add another set of batteries and chargers so he could have access to a few specialty lime green tools?

Luckily, we live in the future, so there’s a third way — building a cross-brand battery adapter that lets him power Ryobi tools with his DeWalt batteries. [Richard]’s solution is a pure hack, as in physically hacking battery packs and forcing them to work and play well together. Mechanically, this was pretty easy — a dead Ryobi pack from the recycling bin at Home Depot was stripped down for its case, which was glued to a Dewalt 20-v to 18-v battery adapter. The tricky part came from dealing with the battery control electronics. Luckily, the donor DeWalt line has that circuitry in the adapter, while Ryobi puts it in the battery. That meant simply transplanting the PCB from the adapter to the Ryobi battery shell would be enough. The video below shows the process and the results — Ryobi tools happily clicking away on DeWalt batteries.

While [Richard] took a somewhat brute-force approach here, we imagine 3D-printed parts might make for a more elegant solution and offer other brand permutations. After all, printing an adapter should be easier than whipping up a cordless battery pack de novo.

Continue reading “Cross-Brand Adapter Makes For Blended Battery Family”

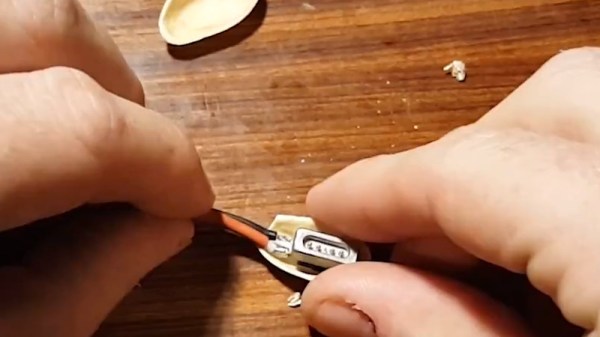
Repairing A Macbook Charger… With A Pistachio Nut

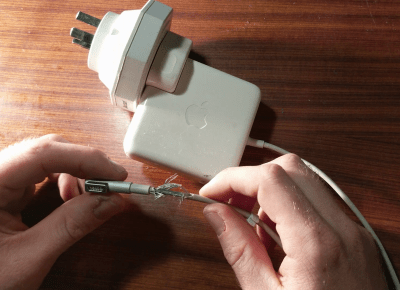
Laptop chargers face a hard life. They’re repeatedly plugged and unplugged, coiled up, stuffed into bags, thrown around, and just generally treated fairly poorly. Combine this with fairly lightweight design and it’s not uncommon for a laptop charger to fail after a few years. It’s usually the connector that goes first. Such was the case when I found myself face to face with a failed Macbook charger, and figured it’d be a simple fix. Alas, I was wrong.

Unlike most PC manufacturers, who rely on the humble barrel jack and its readily available variants, Apple liked to use the Magsafe connector on its Macbook line. This connector has many benefits, such as quick release in the event someone trips over the cable, and the fact that it can be plugged in without regard to orientation. However, it’s not the easiest to fix. When the charger began failing, I noticed two symptoms. The first was that the charger would only function if the cable was held just so, in exactly the right orientation. The other, was that even when it would charge, the connector would become very hot. This led me to suspect an intermittent connection was the culprit, and it was quite a poor one at that; the high resistance leading to the heat issue.

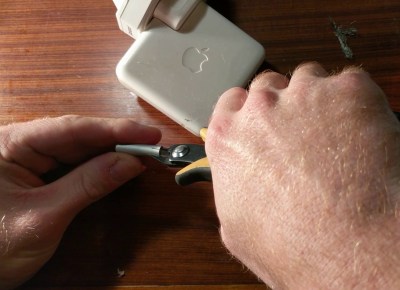
It’s at this point with any other charger that you get out your trusty sidecutters, lop the end off, and tap away at Digikey to get a replacement part on the way. With Magsafe? No dice. Replacement parts simply aren’t available — a common problem with proprietary connectors. I endeavoured to fix the problem anyway. I began to strip away the metal shell around the back of the connector with my sidecutters, and eventually an angle grinder. A Dremel would have been the perfect tool for the job, actually, but I persevered regardless. After much consternation, I had the connector peeled back and was able to identify the problem.

Continue reading “Repairing A Macbook Charger… With A Pistachio Nut”

Bluetooth Speaker In A Bag

[VanTourist] — irked by what he sees as complicated project videos — has demonstrated that you can build a high quality, multi-function Bluetooth speaker inside three hours.

Using simple hand tools — primarily a crimper, wire stripper, razor cutter and some glue — he’s packed this repurposed GoPro accessory bag with quite a bit of tech. The main components are a Bluetooth amplifier with a spiffy knob, and a pair of 15W speakers, but he’s also added a 1W LED flashlight, 1A and 2.1A charging ports, a battery charge monitor display, and pilot cover toggle switches for style points. Despite all that crammed into the bag, there’s still a bit of room left to pack in a few possessions! You can check out the build pictures here, or the video after the break.

Continue reading “Bluetooth Speaker In A Bag”

Metalworking Hacks Add Functionality To Snap-On Tool Chest

Problem: you’re a student mechanic and you’ve already poured a ton of money into a Snap-On roller cabinet loaded with the tools of the trade, but you still need sensible storage for your cordless tools. Solution: a DIY version of Snap-On’s PowerCab cordless tool station at a fraction of the cost.

rnqvgsoMechanics seem to have a love-hate relationship with Snap-On tools. Some love the brand, others hate it, but the majority seem to hate that they love the tools. It sounds like [GenTQ] reached her limit on brand loyalty when even her 50% student discount wasn’t enough to entice her to add Snap-On’s admittedly very cool KRL1099 cabinet for cordless drivers and chargers. So it was off to Harbor Freight for their seven-drawer side cabinet for less than $200. The cabinet was gutted of drawers, a frame for the new slide-out was welded up, and sheet steel was fabricated into organizer shelves and a new drawer front. A power strip and drag-chain were added to feed the chargers, and the new drawer went off to the powder coater for a matching paint job.

It may not have the Snap-On badge, and purists may cringe at the mixed-marriage with Horror Fright, but we like the results just fine. And she saved something like $1200 in the process. We think Harbor Freight gets a bad rap, deservedly so for some tools, but there are hidden gems amid the dross just ripe for the hacking, as [GenTQ] ably shows.

[via r/DIY]

Top Ten Reasons Not To Buy A Fake MacBook Charger. Number Eight Will Shock You.

Yesterday, Apple showed the world how courageous they are by abandoning their entire PC market. It’s not time for a eulogy quite yet, but needless to say, Apple hardware was great, and the charger was even better. It had Magsafe, and didn’t start fires. What more could you ask for?

When it comes to fake MacBook chargers, you can ask for a lot more. [Ken Shirriff] has torn apart a number of these chargers, and his investigations allowed for an obvious pun in this post. The fake ones will make sparks thanks to the cost-saving design, and shouldn’t be used by anyone.

A genuine Apple MacBook charger is a phenomenal piece of engineering, but the fake one is not. In fact, it’s almost the simplest possible AC to DC converter. The mains power comes in, it’s chopped up into pulses, and these pulses are turned into a high-current, low-voltage output in a flyback transformer. This output is converted into DC with a few diodes, filtered, and wired into a MagSafe adapter.

The genuine MacBook charger is much more complicated. Like the cheap copy, it’s a switching power supply, but has a few features that make it much better. The genuine charger does power factor correction, uses quality caps, has real isolation on the PCB, and uses a microcontroller that’s almost as powerful (and a direct architectural descendant) as the CPU in the original Macintosh. It’s this microcontroller that kept you safe that one time you decided to lick a Magsafe connector not allowing the full 20 Volts to go through until the connector has connected. Until then, the Magsafe connector only outputs 0.6 Volts. The fake charger doesn’t do this, and when you poke the connector with a paper clip, sparks fly.

This isn’t [Ken]’s first teardown of genuine and not Apple products. He’s done iPad chargers, iPhone chargers, and other small, square, white switching power supplies. The takeaway from these teardowns is that cheap chargers are a false economy, and you probably should pony up the cash for the real version.