MIDI Interface For NeXTcube Plugs Into The Past

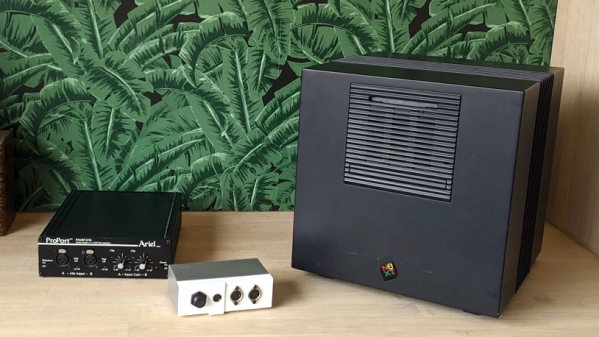
[Joren] recently did some work as part of an electronic music heritage project, and restored an 80s-era NeXTcube workstation complete with vintage sound card, setting it up with a copy of MAX, a graphical music programming environment. But there was one piece missing: MIDI. [Joren] didn’t let that stop him, and successfully created hardware to allow MIDI input and output.

The new panel provides all the connectors necessary to interface with either classic MIDI devices, or MIDI over USB (where it appears as a USB MIDI device to any modern OS.)

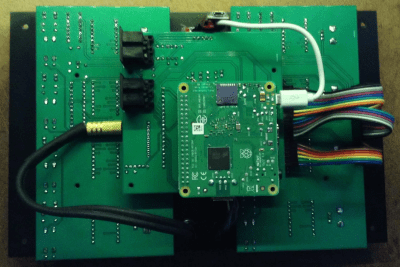
Interestingly, the soundcard for the NeXTcube has an RS-422 serial port and some 8-pin mini DIN connectors. They are not compatible with standard MIDI signals, but they’re not far off, either.

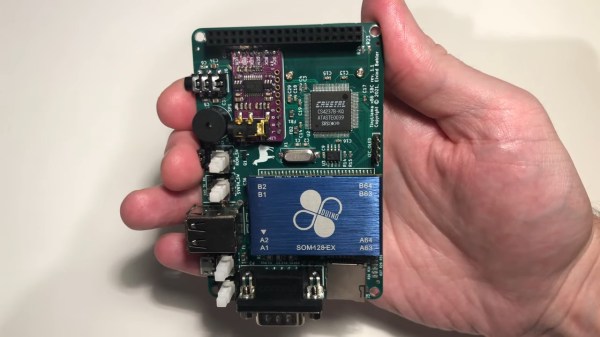
To solve this, [Joren] used a Teensy developer board to act as an interface between classic MIDI devices like keyboards or synthesizers (or even not-so-common ones like this strange instrument) while also being able to accommodate modern MIDI over USB connections thanks to the Teensy’s USB MIDI functionality.

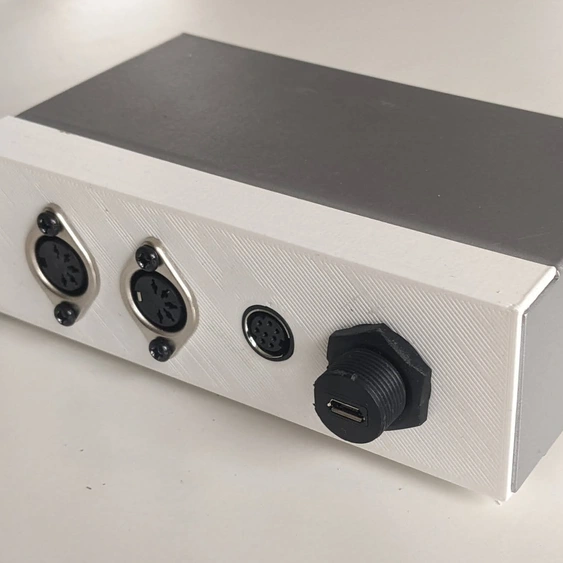
A metal enclosure with a 3D-printed panel rounds out the device, restoring a critical piece of functionality to the electronic music-oriented workstation.

MIDI as a protocol isn’t technically limited to musical applications, though that’s one place it shines. And just in case it comes in handy someday, you can send MIDI over I2C if you really need to.

An RPi-Powered Multi-DX7/TX816 Style Synth

[Kevin] over at Simple DIY ElectroMusic Projects has released a complete DIY modular design for simulating the classic 80s Yamaha TX816 DX/FM modular digital synthesizer. This beast of a synth was used by the cool bands of the 80s as well as TV studios, and ownership of the original machine is an expensive investment. But with the power of modern hackable electronics, and the MiniDexed firmware running bare-metal on a Raspberry Pi getting access to a compatible synth doesn’t have to break the bank.

[Kevin] wanted to emulate the look and feel of the original TX816 aesthetic, developing a custom PCB handling the user interface for four of the eight channels, and a second acting as an interface to the Raspberry Pi using a Pico. Also sitting on this PCB is the GY-PCM5102 I2S DAC, and the MIDI connectors needed to connect to the system controller. Both PCBs, including a PCB-based front panel, were developed with KiCAD. The firmware for the Pico part of the system can be found on the firmware GitHub. The video demo (embedded below) shows off the system running a very 80s-sounding rendition of Holst’s famous ‘Jupiter’ from the planet series, and we all agree it sounds pretty sweet. For a complete rundown of the build, here are the links for the blog series for ease of access: Intro, PCBs, Panel, Build Guide, Mechanical, Pico/TX816 IO code, and finally usage. Phew!

If MiniDexed sounds familiar, that is because we featured another of [Kevin’s] earlier MiniDexed projects a little while ago.

Continue reading “An RPi-Powered Multi-DX7/TX816 Style Synth”

Compose Any Song With Twelve Buttons

Limitations placed on any creative process often paradoxically create an environment in which creativity flourishes. A simple overview of modern pop, rock, or country music illustrates this principle quite readily. A bulk of these songs are built around a very small subset of music theory, often varying no more than the key or the lyrics. Somehow, almost all modern popular music exists within this tiny realm. [DeckerEgo] may have had this idea in mind when he created this tiny MIDI device which allows the creation of complex musical scores using a keyboard with only 12 buttons.

The instrument is based around the Adafruit MacroPad, which is itself built on the RP2040 chip. As a MIDI device, it needs to be connected to a computer running software which can support MIDI instruments, but once its assembled and given its firmware, it’s ready to rock. A musician can select one of any number of musical scales to operate within, and the 12 keys on the pad are mapped to the 12 chromatic notes within that scale. It can also be used to generate drum tracks or other backing tracks to loop before being used to create melodies as well.

[DeckerEgo] took a bit of inspiration from an even simpler macro pad we featured before which is based around the idea that a shockingly high number of songs use the same four chords. His macro pad includes creation of chord progressions as well, but expands on that idea to make more complete compositions possible. And, for those looking to build their own or expand on this project, he has also made all of the source code available on his GitHub page.

Continue reading “Compose Any Song With Twelve Buttons”

How To Restore A Musical Amiga

Despite the huge strides in computing power and functionality that have been achieved in the past few decades, there are still some things that older computers can do which are basically impossible on modern machines. This doesn’t just include the ability to use older hardware that’s now obsolete, either, although that is certainly a perk. In this two-part restoration of an Amiga 500, [Jeremy] shows us some of these features like the ability to directly modify the audio capabilities of this retro machine.

The restoration starts by fixing some damage and cleaning up the rest of the machine so it could be powered up for the first time in 30 years. Since it was in fairly good shape he then started on the fun part, which was working with this computer’s audio capabilities. It includes a number of amplifiers and filters in hardware that can be switched on or off, so he rebuilt these with new op-amps and added some new controls so that while he is using his MIDI software he can easily change how it sounds. He also restored the floppy disk drives and cleaned up the yellowing on the plastic parts to improve the overall appearance, as well as some other general improvements.

These old Amigas have a lot going for them, but since [Jeremy] is a musician he mostly focused on bringing back some of the musical functionality of his childhood computer, although he did build up a lot of extra features in this machine as well. These types of audio circuits are not something found in modern computers, though, so to get a similar sound without using original hardware you’ll need to build something like this NES audio processing unit programmed in Verilog.

Continue reading “How To Restore A Musical Amiga”

Beat Backing Box For Bassists

The soul of a rock band is its rhythm section, usually consisting of a drummer and bass player. If you don’t believe that, try listening to a band where these two can’t keep proper time. Bands can often get away with sloppy guitars and vocals (this is how punk became a genre), but without that foundation you’ll be hard pressed to score any gigs at all. Unfortunately drums are bulky and expensive, and good drummers hard to find, so if you’re an aspiring bassist looking to practice laying down a solid groove on your own check out this drum machine designed by [Duncan McIntyre].

The drum machine is designed to be as user-friendly as possible for someone who is actively playing another instrument, which means all tactile inputs and no touch screens. Several rows of buttons across the top select the drum sounds for the sequencer and each column corresponds to the various beats, allowing custom patterns to be selected and changed rapidly. There are several other controls for volume and tempo, and since it’s based on MIDI using the VS1053 chip and uses an STM32 microcontroller it’s easily configurable and can be quickly interfaced with other machines as well.

For anyone who wants to build their own, all of the circuit schematics and code are available on GitHub. If you have an aversion to digital equipment, though, take a look at this drum machine that produces its rhythms using circuits that are completely analog.

Continue reading “Beat Backing Box For Bassists”

Nanoaetherphone Is A Special MIDI Controller

MIDI controllers can be simple straightforward keyboards, or wild magical devices that seem to snatch notes from the very aether itself. As you might expect from the name, the Nanoaetherphone II is one of the latter.

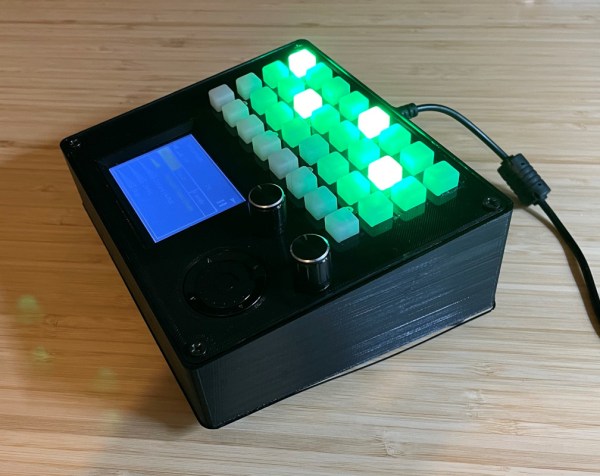
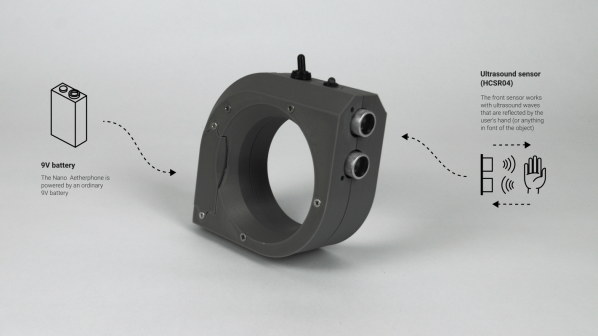
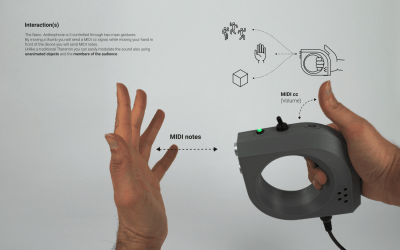
The device is inspired by the Theremin, and was built to celebrate its 100th anniversary. The Nanoaetherphone II is all about using sensors to capture data from wireless hand-wavey interactions, and turn it into MIDI messages. To this end, it has an LDR sensor for detecting light levels, which determines volume levels. This is actuated by the user’s thumb, blocking the sensor or allowing ambient light to reach it. At the front of the handheld unit, there is also an ultrasonic range sensor. Depending on how close the sensor is to the user’s hand or other object determines the exact note sent by the device. As a MIDI controller, it is intended to be hooked up to an external synthesizer to actually generate sound.

The overall concept isn’t too complicated, and the design makes it easy to pickup and play. We imagine it could even be foolproofed by programming it only to play notes from a given scale or mode, allowing for easy soloing without too many of those ill-tempered blue notes. Jazz enthusiasts might prefer it to just spit out any and all notes, of course.

We love a good MIDI controller around these parts, and we’ve seen everything from knitted models to those made out of old phones. Video after the break.

Continue reading “Nanoaetherphone Is A Special MIDI Controller”

A smartphone-sized PCB is in a person's hand. A large blue chip package houses a 486 and the board has a SoundBlaster card and a 40 PIN Raspberry Pi Connector along one edge for attaching a Raspberry Pi Zero.

TinyLlama Is A 486 In Your Pocket

We love retrocomputing and tiny computers here at Hackaday, so it’s always nice to see projects that combine the two. [Eivind]’s TinyLlama lets you play DOS games on a board that fits in your hand.

Using the 486 SOM from the 86Duino, the TinyLlama adds an integrated Crystal Semiconductor audio chip for AdLib and SoundBlaster support. If you populate the 40 PIN Raspberry Pi connector, you can also use a Pi Zero 2 to give the system MIDI capabilities when coupled with a GY-PCM5102 I²S DAC module.

Audio has been one of the trickier things to get running on these small 486s, so its nice to see a simple, integrated solution available. [Eivind] shows the machine running DOOM (in the video below the break) and starts up Monkey Island at the end. There is a breakout board for serial and PS/2 mouse/keyboard, but he says that USB peripherals work well if you don’t want to drag your Model M out of the closet.

Looking for more projects using the 86Duino? Checkout ISA Sound Cards on 86Duino or Using an 86Duino with a Graphics Card.

Continue reading “TinyLlama Is A 486 In Your Pocket”