When Unfolding An STL In Software, Math Isn’t The Tricky Part

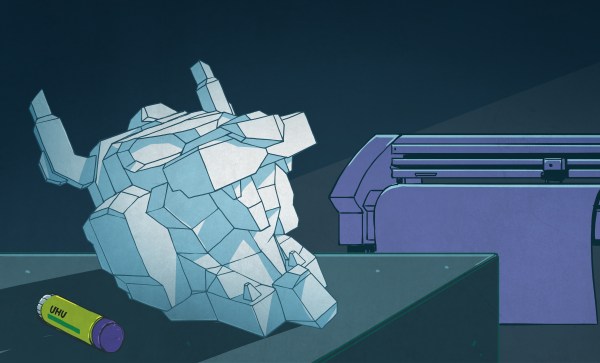
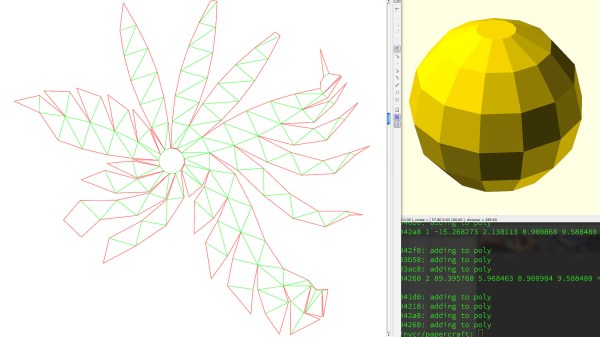
Some time ago, [Trammell Hudson] took a shot at creating a tool that unfolds 3D models in STL format and outputs a color-coded 2D pattern that can be cut out using a laser cutter. With a little bending and gluing, the 3D model can be re-created out of paper or cardboard.

There are of course other and more full-featured tools for unfolding 3D models: Pepakura is used by many, but is not free and is Windows only. There is also a Blender extension called Paper Model that exists to export 3D shapes as paper models.

What’s interesting about [Trammell]’s project are the things he discovered while making it. The process of unfolding an STL may be conceptually simple, but the actual implementation is a bit tricky in ways that have little to do with number crunching.

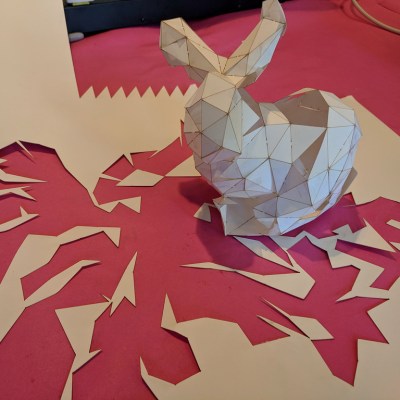
For example, in a logical sense it doesn’t matter much where the software chooses to start the unfolding process, but in practice some start points yield much tighter groups of shapes that are easier to work with. Also, his software doesn’t optimize folding patterns, so sometimes the software will split a shape along a perfectly logical (but non-intuitive to a human) line and it can be difficult to figure out which pieces are supposed to attach where. The software remains in beta, but those who are interested can find it hosted on GitHub. It turns out that it’s actually quite challenging to turn a 3D model into an unfolded shape that still carries visual cues or resemblances to the original. Adding things like glue tabs in sensible places isn’t trivial, either.

Tools to unfold 3D models feature prominently in the prop-making world, and it’s only one of the several reasons an economical desktop cutter might be a useful addition to one’s workshop.

Tiny Plotter Is Made Of Strings And Cardboard

If you’ve been hanging around Hackaday for any length of time, you’ve undoubtedly seen the work of [Niklas Roy]. A prolific maker of…everything, we’ve covered his projects for over a decade now. He’s one of an elite group of hackers who can say they’ve been around since Hackaday was still using black & white pictures. Yet sometimes projects fall through the cracks.

Thanks to a tip sent in from one of our beloved readers, we’re just now seeing this incredible cardboard plotter [Niklas] made for a workshop he ran at the University of Art and Design Offenbach several years ago. The fully manual machine is controlled with two rotary dials and a switch, and it even comes with a book that allows you to “program” it by dialing in specific sequences of numbers.

Not that it detracts from the project, but its worth mentioning that the “cardboard” [Niklas] used is what is known as Finnboard, a thin construction material made of wood pulp that looks similar to balsa sheets. The material is easy to work with and much stronger than what we’d traditionally think of as cardboard. Beyond the Finnboard, the plotter uses welding rods as axles and slide rails, with glue, tape, and string holding it all together.

The dials on the control panel correspond to the X and Y axes: turning the X axis dial moves the bed forward and backward, and the Y dial moves the pen left and right. The switch above the dial lowers and raises the pen so it comes into contact with the paper below. With coordination between these three inputs, the operator can either draw “freehand” or follow the sequences listed in the “Code Book” to recreate stored drawings and messages.

Believe it or not, this isn’t the first time we’ve seen somebody made a plotter out of cardboard. Though previous entries into this specific niche did use servos to move around.

Continue reading “Tiny Plotter Is Made Of Strings And Cardboard”

This Pinball Game Doesn’t Come In A Box… It Is The Box

Pinball still has that bit of magic that makes it stand out from first person shooters or those screen mashers eating up your time on the bus. The secret sauce is that sense of movement and feedback, and the loss of control as the ball makes its way through the play field under the power of gravity. Of course the real problem is finding a pinball machine. Pinbox 3000 is swooping in to fix that in a creative way. It’s a cardboard pinball machine that you build and decorate yourself.

We ran into them at Maker Faire New York over the weekend and the booth was packed with kids and adults all mashing flippers to keep a marble in play. The kit comes as flat-pack cardboard already scored and printed with guides for assembly which takes about an hour.

The design is quite clever, with materials limited to just cardboard, rubber bands, and a few plastic rivets. Both the plunger that launches the pinball and the flippers are surprisingly robust. They stand up to a lot of force and from the models on display it seems the friction points of cardboard-on-cardboard are the issue, rather than mechanisms buckling under the force exerted by the player.

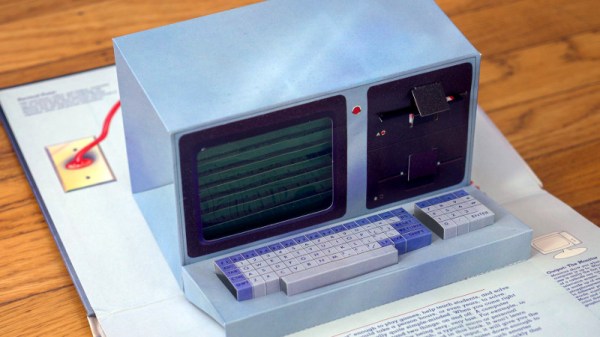
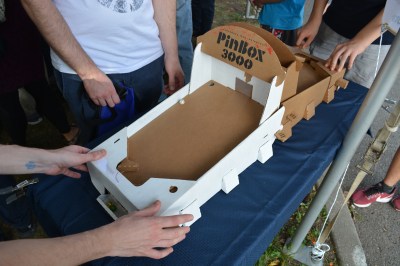
When first assembled the playfield is blank. That didn’t stop the fun for this set of kits stacked back to back for player vs. player action. There’s a hole at the top of playfields which makes this feel a bit like playing Pong in real life. However, where the kit really shines is in customizing your own game. In effect you’re setting up the most creative marble run you can imagine. This task was well demonstrated with cardboard, molded plastic packaging (which is normally landfill) cleverly placed, plus some noisemakers and lighting effects. The company has been working to gather up inspiration and examples for building out the machines. We love the multiple layers of engagement rolled into Pinbox, from building the stock kit, to fleshing out a playfield, and even to adding your own electronics for things like audio effects.

Check out the video below to see the fun being had at the Maker Faire booth.

Continue reading “This Pinball Game Doesn’t Come In A Box… It Is The Box”

It’s 1984, And You Can’t Afford A Computer. Never Mind, Have This Pop-Up Paper One Instead!

It’s an oft-derided sentiment from a Certain Type of Older Person, that the Youth of Today don’t know how lucky they are with their technology. Back when they were young they were happy with paper and string! Part of the hilarity comes from their often getting the technology itself wrong, for example chastising the youngsters for their iPods and Game Boys when in reality those long-ago-retired devices are edging into the realm of retrotechnology.

But maybe they have a point after all, because paper and string could be pretty good fun to play with. Take the example presented  in a Twitter thread by [Marcin Wichary]. A pop-up book from 1984 that presents the inner workings of a computer in an astounding level of detail, perhaps it stretches the pop-up card designer’s art to the limit, but along the way it makes a fascinating read for any retrocomputing enthusiast. Aside from the pop-up model of the computer with an insertable floppy disk that brings text onto the screen we see at  first, there is a pop-up keyboard with a working key, a peer inside the workings of a floppy disc, a circuit board complete with a paper chip that the reader can insert into a socket, and a simulation of a CRT electron bean using a piece of string. A Twitter thread on a book is not our normal fare, but this one is something special!

Did any of you have this book when you were younger? Perhaps you still have it? We’d love to hear from you in the comments. It’s probably not the type of book we normally review, but we’ve been known to venture slightly outside tech on that front.

Glorious Body Of Tracked ‘Mad Mech’ Started As Cardboard

[Dickel] always liked tracked vehicles. Taking inspiration from the ‘Peacemaker’ tracked vehicle in Mad Max: Fury Road, he replicated it as the Mad Mech. The vehicle is remote-controlled and the tank treads are partly from a VEX robotics tank tread kit. Control is via a DIY wireless controller using an Arduino and NRF24L01 modules. The vehicle itself uses an Arduino UNO with an L298N motor driver. Power is from three Li-Po cells.

The real artistic work is in the body. [Dickel] used a papercraft tool called Pepakura (non-free software, but this Blender plugin is an alternative free approach) for the design to make the body out of thin cardboard. The cardboard design was then modified to make it match the body of the Peacemaker as much as possible. It was coated in fiberglass for strength, then the rest of the work was done with body filler and sanding for a smooth finish. After a few more details and a good paint job, it was ready to roll.

There’s a lot of great effort that went into this build, and [Dickel] shows his work and process on his project page and in the videos embedded below. The first video shows the finished Mad Mech being taken for some test drives. The second is a montage showing key parts of the build process.

Continue reading “Glorious Body Of Tracked ‘Mad Mech’ Started As Cardboard”

A Case For The Desktop Vinyl Cutter

As far as desktop workbench fab tools go, it’s too easy to let 3D printers keep stealing the spotlight. I mean, who doesn’t appreciate that mechatronic “buzz” as our printer squirts a 3D CAD model into plastic life? While the 3D printer can take up a corner of my workbench, there’s still plenty of room for other desktop rapid-prototyping gadgets.

Today, I’d like to shed some light on vinyl cutters. Sure, we can start with stickers and perhaps even jumpstart an after-hours Etsy-mart, but there’s a host of other benefits besides just vinyl cutting. In fact, vinyl cutters might just be the unsung heroes of research in folding and papercraft.

Continue reading “A Case For The Desktop Vinyl Cutter”

Play With A Papercraft Electronics Activity Book

As conductive ink becomes readily available and in greater varieties, we’re starting to see some intriguing applications. [Marion Pinaffo] and [Raphaël Pluviange] created a book of papercraft projects that employ silver-based ink for making a circuit’s wires, carbon-based ink for resistance, as well as color-changing ink. Electronics components’ leads are slipped into slits cut into the paper, connected to conductive-ink traces.

[Marion] and [Raphaël] use 555s, ATtiny85s, watch batteries, and other hardware to make each activity or project unique. A number of projects use a rolling ball bearing to make beeps in a piezo speaker. They also created beautifully designed pages to go with the electronics.

It looks like a fun way for neophytes to play around with electronics, and once the paper part is kaput, the user would be left with the hardware. Imagine one of those beginners googling to find the pinout of the Tiny85 or discovering the Stepped Tone Generator and makes one with the 555.

If you like this project you’ll appreciate the working papercraft organ and papercraft resistor calculator we previously published.

Continue reading “Play With A Papercraft Electronics Activity Book”