We love watching 3D prints magically grow, through the power of timelapse videos. These are easier to make than ever, due in no small part to a vibrant community that’s continuously refining tools such as Octolapse. Most people are using some camera they can connect to a Raspberry Pi, namely a USB webcam or CSI camera module. A DSLR would arguably take better pictures, but they can be difficult to control, and their high resolution images are tougher for the Pi to encode.
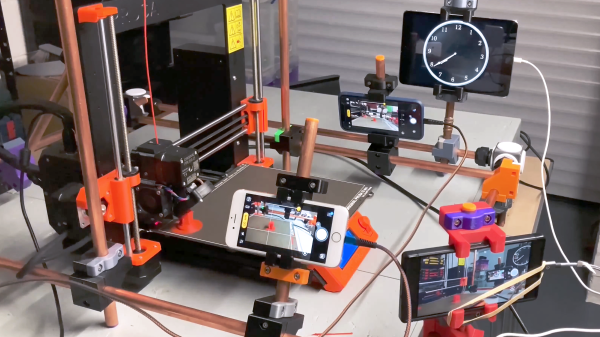
If you’re anything like us, you’ve got a box or drawer full of devices that can take nearly as high-quality images as a DSLR, some cast-off mobile phones. Oh, that pile of “solutions looking for a problem” may have just found one! [Matt@JemRise] sure has, and in the video after the break, you can see how not one but four mobile phones are put to work.
We’re used to time-lapse photography being merely a feature of our smartphone camera app, but of course it has its origins in film. A movie camera would be triggered frame by frame at fixed intervals, with the result being the timelapse. A dead art, you might wonder, were it not for [Kevin Santo Cappuccio], who is capturing his work in timelapse on 16mm film, with a vintage Bolex camera.
For those of us with a penchant for film the camera alone makes it worth a second look, but the actuation mechanism is at the heart of the project. It uses a slightly unusual but nevertheless strangely ubiquitous actuator, in the form of a car door central locking actuator. This in turn is triggered by an Arduino Nano, and he has the ultimate dream of using a 16mm film timelapse as part of a fully-16mm submission video for the Hackaday prize.
We think it’s a pity that more film-based projects don’t end up on these pages, so we’re very pleased indeed to see this one. If you’re curious about the other side of the 16mm system, well we’ve introduced you to the inner workings of a projector before, too.
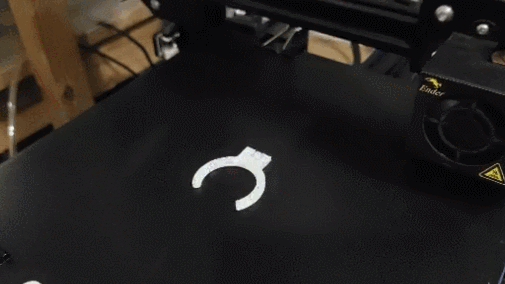
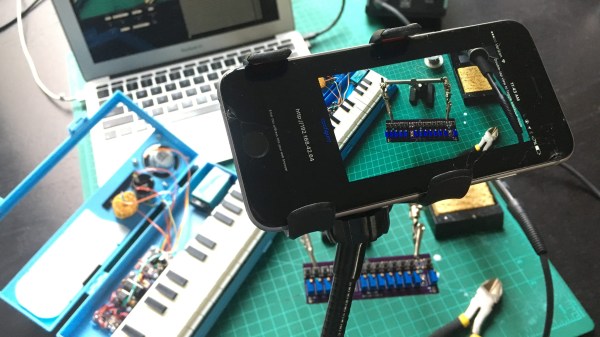
The trick to producing great 3D printing time-lapse animations is to ensure that the extruder has moved out of the frame each time a photo is taken — which usually requires OctoPrint to be controlling both the camera and printer. But [NirL] managed to bodge up a system to get the same result with a spare limit switch, a resistor, his mobile phone, and an old set of earbuds. Not bad for some spare parts and a little extra G-Code.
The print head hits a remote shutter button during a brief parking action after each layer.
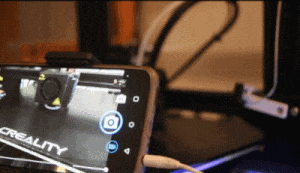
Inserting custom G-Code to park the print head at regular intervals takes care of standardizing the printer’s movements; there’s even a post-processing extension in Cura that makes this easy. As for triggering the camera, [NirL] was inspired by the remote shutter button on a selfie stick. By positioning a physical switch in such a way that the print head pushes it every time it (briefly) parks, a photo gets taken for every layer. Essentially the same thing Octolapse does, just with fewer parts.
To create the DIY remote shutter button, [NirL] used a spare limit switch, resistor, and cannibalized an old set of earbuds for the cable and 4-conductor 3.5 mm audio plug. Most phones and camera apps trigger the shutter when they receive a Vol+ signal through the audio plug, which is done by connecting MIC and GND through a 240 Ohm resistor.
In this way a photo is snapped for every layer, giving [NirL] all that is needed to assemble a smooth animation. Sure, it ties up a mobile phone for the duration of the print, but for just a few spare parts it does the job. You can see the project in action in the video, embedded just under the page break.
Timelapse fragment from an infrared sky camera watching cloud patterns.
There are plenty of ways to create timelapse videos, but [Andy] has an efficient method for ensuring up-to-date ones exist for his infrared sky camera, and he has it running thanks to some well-documented shell scripts on a spare Raspberry Pi. The resulting timelapse video is always available from the web, and always up-to-date for the current day.
The idea is to automatically fetch images from a remote source (in his case, an infrared sky camera) and turn them into a cumulative video that is regularly updated for the day in question. The resulting video file is either served from the same machine, or sent elsewhere. All that’s needed besides a source for the stills are two shell scripts and some common Linux utilities.
Since [Andy] is mainly interested in tracking clouds his system only runs during daylight hours, but it can be easily changed. In fact, [Andy]’s two shell scripts are great project resources, not only because they are easily modified and well documented, but because he doesn’t make assumptions about how well one might know the command line. He also provides tips from experience; for example he has found that a 120 second interval makes for the best timelapses.
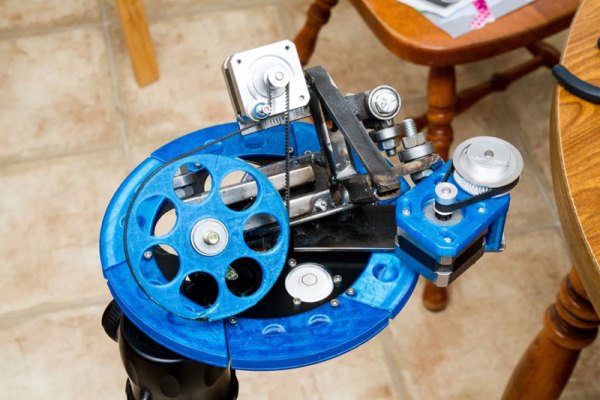
Timelapse rigs are awesome because you can spice up your videos with more interesting panning and tilting timelapse shots. So, why not build yourself one? That’s what [td0g] decided to do, and the result is IREnE, a rather nice homemade 3DOF rig that fits onto a standard tripod. 3DOF means that it has three degrees of freedom: the camera can be rotated on the tripod, moved linearly on an extending arm away from the tripod head and rotated around its own axis. In other words: it can pan past an object while rotating the camera to keep the object centered in the frame.
IREnE stands for Inverted Radial Extension Eggtimer, a play on the dual radial nature of the device and how photographers use egg timers for this sort of thing. It’s also a sneaky tribute to a foe of Sherlock Holmes. The rig is driven by three NEMA 17 motors and an ATMega328p, all powered by a Dewalt powertool battery and his own DeWatt power adapter. the rig also has a secondary function with minor modifications as a pancake printer.
Breakfast aside, there are a few caveats to this project. While a tripod is fine for stabilizing a camera on the top of it, offsetting the weight like this makes the tripod unstable. [td0g] did add a few welded stabilizer bars that brace it to more stable, but the whole thing should be used with some caution. The camera sits on a 1-inch square aluminium extruder that [td0g] claims is robust enough to hold his Canon D7, but I am not sure I would trust it with my expensive equipment.
Astrophotography is one of those things you naturally assume must be pretty difficult; surely something so awesome requires years of practice and specialized equipment which costs as much as your car. You shake your fist at the sky (since you have given up on taking pictures of it), and move on with your life. Another experience you’ll miss out on.
But in reality, dramatic results don’t necessarily require sticker shock. We’ve covered cheap DIY star trackers before on Hackaday, but this design posted on Thingiverse by [Tinfoil_Haberdashery] is perhaps the easiest we’ve ever seen. It keeps things simple by using a cheap 24 hour clock movement to rotate a GoPro as the Earth spins. The result is a time-lapse where the stars appear to be stationary while the horizon rotates.
Using a 24 hour clock movement is an absolutely brilliant way to synchronize the camera with the Earth’s rotation without the hoops one usually has to jump through. Sure you could do with a microcontroller, a stepper motor, and some math. But a clock is a device that’s essentially been designed from the ground up for keeping track of the planet’s rotation, so why not use it?
If there’s a downside to the clock movement, it’s the fact that it doesn’t have much torque. It was intended to move an hour hand, not your camera, so it doesn’t take much to stall out. The GoPro (and other “action” cameras) should be light enough that it’s not a big deal; but don’t expect to mount your DSLR up to one. Even in the video after the break, it looks like the clock may skip a few steps on the way down as the weight of the camera starts pushing on the gears.
A good time-lapse video can be useful visual documentation, and since [Tommy]’s phone is the best camera he owns he created two simple shell scripts to grab time-lapse images and assemble them into a video. [Tommy]’s work is just the glue between two other things: an app that turns the phone into an IP camera with a web server on the local network, and the ability to grab a still image from that server on demand.
The app he uses for his iPhone normally serves video but has an undocumented feature that allows single frames to be downloaded by adding ‘/photo’ to the end of the URL, but the ability to get a still image is a common feature on IP camera apps for smartphones. His capture script (GitHub repository here) should therefore need only minor changes to work with just about any IP camera app.
Perching a phone over a workspace and using it to create a time-lapse with a couple of shell scripts is a great example of combining simple tools to get better functionality. It could be a good way to get additional use out of an older smartphone, too. Heck, even older dumbphones can still get some use out of them; Shmoocon 2017 brought us details on rolling your own 1G network.