Caulking Gun Becomes Useful Press Tool For Fuel Line Fittings

The simple caulking gun is really useful when you’re working on some bathroom repairs or squirting construction adhesives about the place. However, with a few simple mods, it can become a great help in the mechanic’s workshop too.

It’s a great tool for cleanly pushing fittings into nylon fuel line.

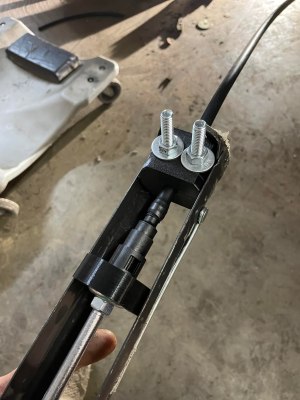
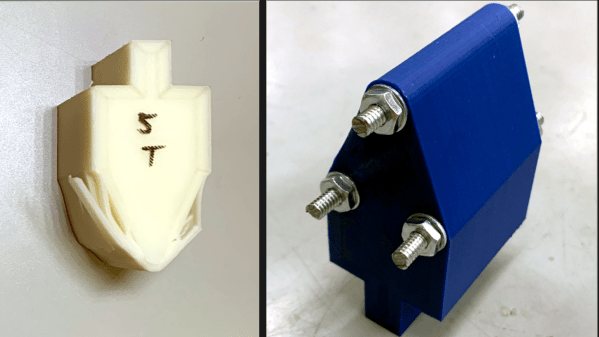
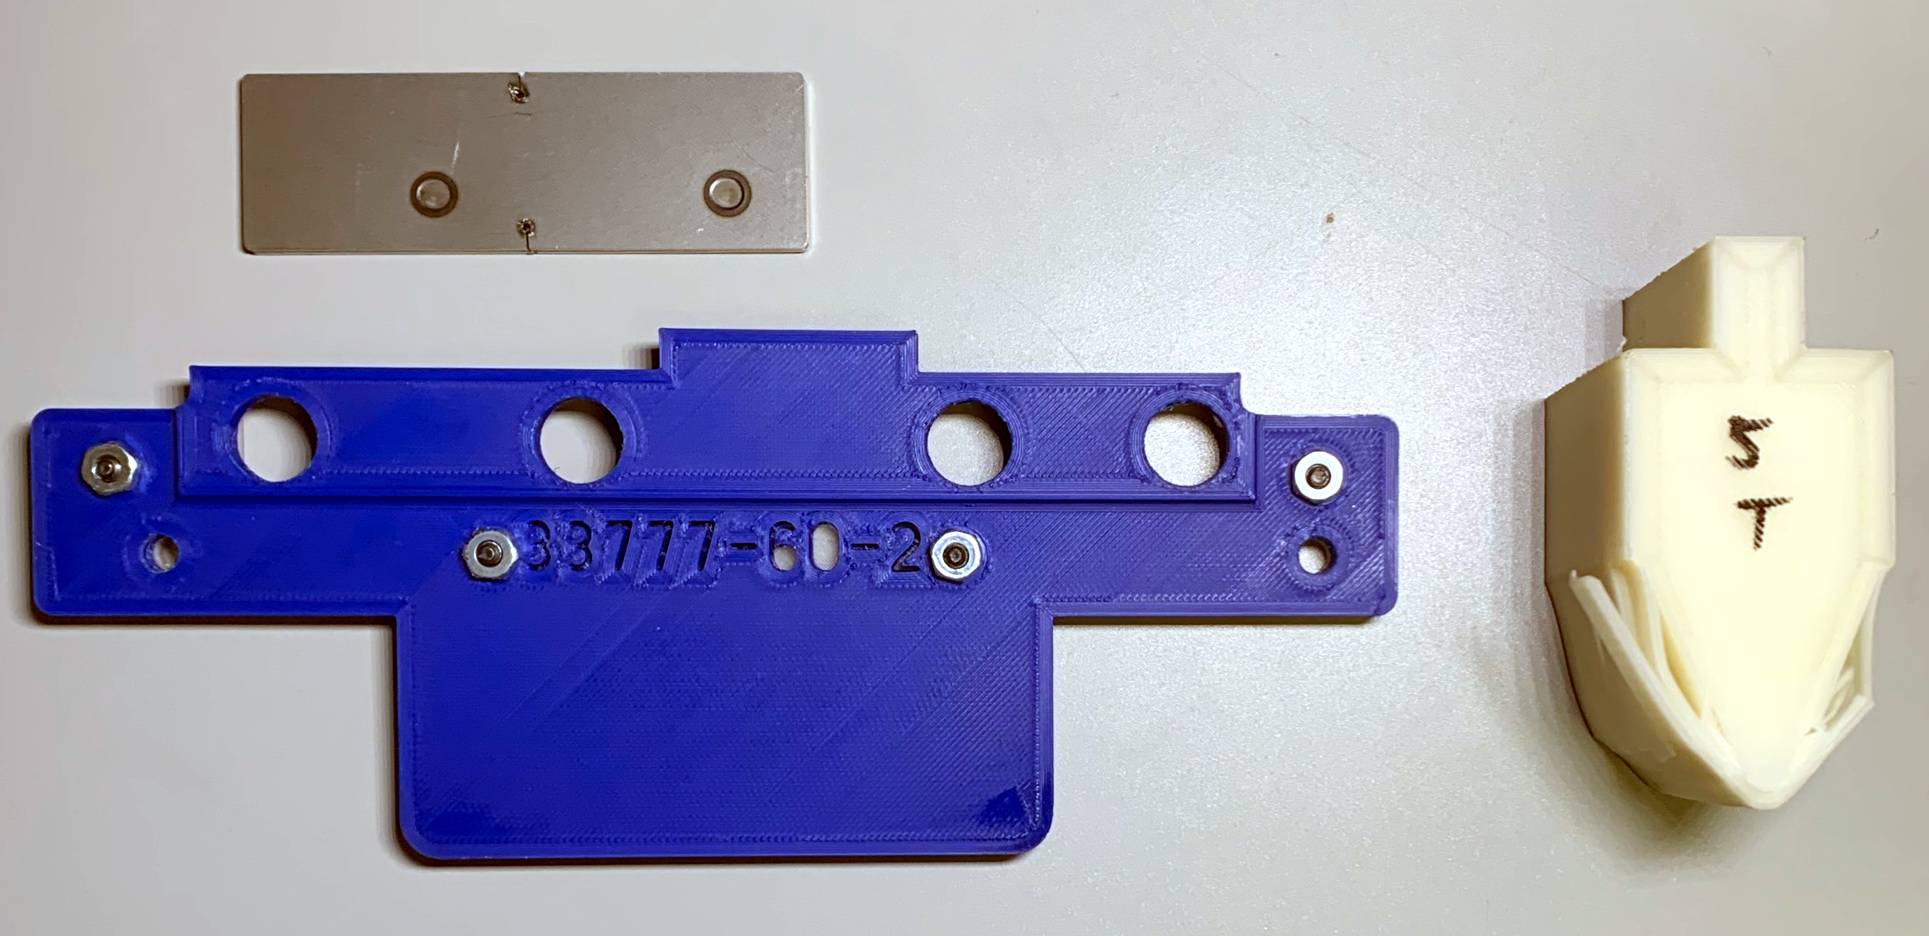
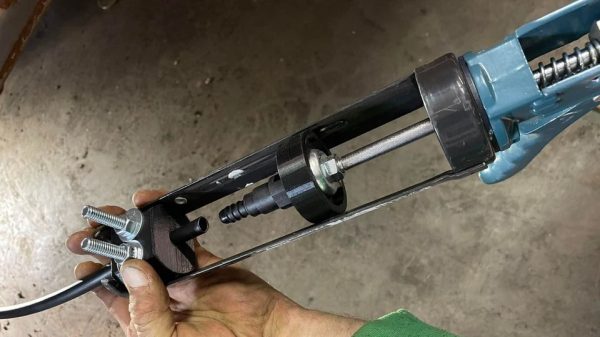
This build consists of a series of 3D-printed parts that can readily be adapted to a garden-variety caulking gun. First up are a pair of fuel line clamps which are fastened together with nuts and bolts, The nylon fuel line is inserted between these, and the bolts are tightened up to hold the line firmly in place at the end of the caulking gun. The fitting to be installed into the line is then placed on the caulking gun’s plunger. It’s then a simple matter of pulling the trigger on the caulking gun to slowly press the fitting into the nylon line.

It’s a great hack which creates a useful linear press with just a few cents of PETG filament. If you find yourself doing a one-off fuel line job on a modern car, this could be just the tool you need. Parts are available on Thingiverse for those eager to print their own. The design is made for 3/8ths inch line, but could readily be modified or recreated to suit other diameters.

3D-printed tools can be useful in all kinds of ways, even in heavy-duty applications like press tooling. It often doesn’t have the same longevity of traditional metal tooling, but for small one-off jobs, the price saving is often more important than the hardiness of the tooling itself. If you’ve whipped up some great 3D-printed tools of your own, don’t hesitate to drop us a line!

Used Facemasks Turned Into Rapid Antigen Tests With Injection Molding

Here’s a little eye-opener for you: next time you’re taking a walk, cast your eyes to the ground for a bit and see how far you can go without spotting a carelessly discarded face mask. In our experience, it’s no more than a block or two, especially if you live near a school. Masks and other disposal artifacts of the COVID-19 pandemic have turned into a menace, and uncounted billions of the things will be clogging up landfills, waterways, and byways for decades to come.

Unless they can be recycled into something useful, of course, like the plastic cases used for rapid antigen tests. This comes to us by way of [Ric Real] from the Design and Manufacturing Futures lab at the University of Bristol in the UK. If any of this sounds or looks familiar, refer back to October when the same team presented a method for turning old masks into 3D printer filament. The current work is an extension of that, but feeds the polypropylene pellets recovered from the old masks into a desktop injection molding machine.

The injection molding machine is fitted with 3D-printed molds for the shells of lateral flow devices (LFD) used for COVID-19 rapid antigen testing. The mold tooling was designed in Fusion 360 and printed on an Elegoo Mars MSLA printer using a high-strength, temperature-resistant resin. The molds stood up to the manual injection molding process pretty well, making good-quality parts in the familiar blue and white colors of the starting material. It’s obviously a proof of concept, but it’s good to see someone putting some thought into what we can do with the megatonnes of plastic waste generated by the pandemic response.

Building A Custom Branding Iron With Swappable Date Blocks

Branding can be done on wood with just about any old bit of hot metal, but if you want to do it well, properly-crafted tooling will go a long way. [Wesley Treat] has built just that with this modular branding iron design.

The branding tooling itself is machined out of brass on an X-Carve CNC router, using [Wesley]’s own logo. The part is sanded after machining to remove tooling marks. A smaller brass slug is then machined with the numerals for various years with which [Wesley] may wish to stamp his projects.

Rather than hacking something sloppy together, the iron itself is assembled with a beautifully wood-turned handle of his own creation and a steel backing plate to hold the tooling. The date is separately removable from the main logo itself for easy changes in future. Naturally, the tool graphics are done in reverse so as to register the right way around when burned onto wood.

The tool is used with a torch to heat the brass up such that it can leave its impression on wooden surfaces. The final results are solid, if not quite perfect; getting the temperature across the tool perfectly matched would be key to getting the cleanest results. An electric heating element running in closed loop could be a way to achieve this.

Fundamentally, it’s a tidy way to mark your wooden projects in a hurry. We’ve seen wood burning reach even greater heights, too, such as with this CNC pyrography machine. Video after the break.

Continue reading “Building A Custom Branding Iron With Swappable Date Blocks”

3D-Printed Press-Forming Tools Dos And Don’ts

Press-forming is a versatile metal forming technique that can quickly and easily turn sheet metal into finished parts. But there’s a lot of time and money tied up in the tooling needed, which can make it hard for the home-gamer to get into. Unless you 3D-print your press-form tooling, of course.

Observant readers will no doubt recall our previous coverage of press-forming attempts with plastic tooling, which were met with varying degrees of success. But [Dave]’s effort stands apart for a number of reasons, not least of which is his relative newbishness when it comes to hot-squirt manufacturing. Even so, he still came up with an interesting gradient infill technique that put most of the plastic at the working face of the dies. That kept print times in the reasonable range, at least compared to the days of printing that would have been needed for 100% infill through the whole tool profile.

The other innovation that we liked was the idea to use epoxy resin to reinforce the tools. Filling the infill spaces on the tools’ undersides with resin resulted in a solid, strong block that was better able to withstand pressing forces. [Dave] didn’t fully account for the exothermic natures of the polymerization reaction, though, and slightly warped the tools. But as the video below shows, even suboptimal tools can perform, bending everything he threw at them, including the hydraulic press to some extent.

It sure seems like this is one technique to keep in mind for a rainy day. And hats off to [Dave] for sharing what didn’t work, since it points the way to improvements.

Continue reading “3D-Printed Press-Forming Tools Dos And Don’ts”

3D Printed Tooling Punches Above Its Weight With Added Hardware

Reddit user [thetelltalehart] has been making brake press tooling with 3D printed PLA, and recently shared an interesting picture of a hybrid brake press punch, shown here on the right, in blue.

Printed in PLA, with 80% infill and 12 walls, the tool (right) failed at 5 tons.

In a press, material such as sheet metal is formed into a shape by forcing the material around the tooling. Some types of tooling can be 3D printed, and it turns out that printed tools are not only fast and economical, but can be surprisingly resilient. You can see such tools in action in our earlier coverage of this approach here and here.

[Thetelltalehart]’s previous work was printed at 80% infill and 12 walls, and failed at 5 tons. The new hybrid tool adds some common hardware that has the effect of reinforcing the tool for very little added expense or complexity. The new tool made it up to 7 tons before failure. It’s a clever idea, and an apparently effective one.

The goal with these 3D printed tools is twofold: doing short-run work, and reducing costly rework when developing “real” tooling. Having to re-cut a tool because it isn’t quite right in some way is expensive and costly, and it’s much easier and cheaper to go through that process with 3D printing instead of metal.

Stacks Of Spring Washers Power The Drawbar On This CNC Mill Conversion

With Tormach and Haas capturing a lot of the entry-level professional market for CNC machines, we don’t see too many CNC conversions of manual mills anymore. And so this power drawbar conversion for a Precision Matthews mill really caught our eye.

What’s that, you say? Didn’t [Physics Anonymous] already build a power drawbar for a mill? They did, and it was quite successful. But that was based on a pneumatic impact wrench, and while it worked fine on a manual mill, the same approach would be a bit slow and cumbersome on a CNC mill. For this build, they chose a completely different approach to providing the necessary upward force to draw the collet into the collet holder and clamp down on the tool: springs. Specifically, Belleville spring washers, which are shaped like shallow cups and can exert tremendous axial force over a very short distance.

[PA] calculated that they’d need to exert 2,700 pounds (12,000 Newtons) of force over a length of a couple of inches, which seems outside the Belleville washer’s specs. Luckily, the springs can be stacked, either nested together in “series” to increase the load force, or alternating in “parallel” to apply the rated force over a greater distance. To compress their stack, they used a nifty multi-stage pneumatic cylinder to squash down the springs and release the collet. They also had to come up with a mechanism to engage to machine’s spindle only when a tool change is called for. The video below details the design and shows the build; skip to 11:32 to see the drawbar in action.

We’re looking forward to the rest of [Physics Anonymous]’ conversion. They’re no strangers to modifying off-the-shelf machines to do their bidding, after all – witness their improvements to an SLA printer.

Continue reading “Stacks Of Spring Washers Power The Drawbar On This CNC Mill Conversion”

The How And Why Of Tungsten Carbide Inserts, And A Factory Tour

It seems a touch ironic that one of the main consumables in the machining industry is made out of one of the hardest, toughest substances there is. But such is the case for tungsten carbide inserts, the flecks of material that form the business end of most of the tools used to shape metal. And thanks to one of the biggest suppliers of inserts, Sweden’s Sandvik Coromant, we get this fascinating peek at how they’re manufactured.

For anyone into machining, the video below is a must see. For those not in the know, tungsten carbide inserts are the replaceable bits that form the cutting edges of almost every tool used to shape metal. The video shows how powdered tungsten carbide is mixed with other materials and pressed into complex shapes by a metal injection molding process, similar to the one used to make gears that we described recently. The inserts are then sintered in a furnace to bind the metal particles together into a cohesive, strong part. After exhaustive quality inspections, the inserts are ground to their final shape before being shipped. It’s fascinating stuff.

Coincidentally, [John] at NYC CNC just released his own video from his recent jealousy-inducing tour of the Sandvik factory. That video is also well worth watching, especially if you even have a passing interest in automation. The degree to which the plant is automated is staggering – from autonomous forklifts to massive CNC work cells that require no operators, this looks like the very picture of the factory of the future. It rolls some of the Sandvik video in, but the behind-the-scenes stuff is great.

Continue reading “The How And Why Of Tungsten Carbide Inserts, And A Factory Tour”