Beyond The Basics: Exploring More Exotic Scope Trigger Modes

Last time, we looked at some powerful trigger modes found on many modern scopes, including the Rigol DHO900 series we used as an example. Those triggers were mostly digital or, at least, threshold-based. This time, we’ll look at some more advanced analog triggers as well as a powerful digital trigger that can catch setup and hold violations. You can find the Raspberry Pi code to create the test waveforms online.

In addition to software, you’ll need to add some simple components to generate the analog waveform. In particular, pin 21 of the Pi connects to  2uF capacitor through a 10K resistor. The other side of the capacitor connects to ground. In addition, pin 22 connects directly to the capacitor, bypassing the 10K resistor. This allows us to discharge the capacitor quickly. The exact values are not especially important.

Runt Triggers

A runt pulse is one that doesn’t have the same voltage magnitude as surrounding pulses. Sometimes, this is due to a bus contention, for example. Imagine if you have some square waves that go from 0 to 5V. But, every so often, one pulse doesn’t make it to 5V. Instead, it stops at 3V.

Continue reading “Beyond The Basics: Exploring More Exotic Scope Trigger Modes”

Why Didn’t We Think Of Making A Remote Trigger Button?

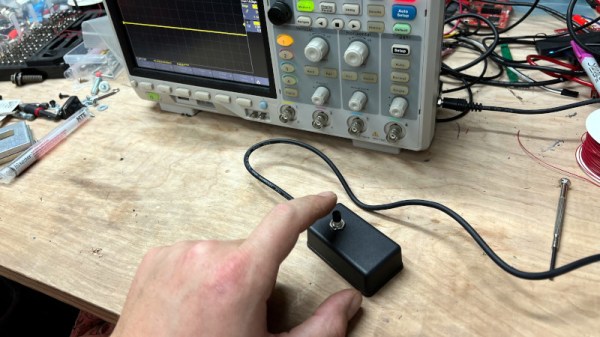
One of the many functions a digital oscilloscope offers over its analog ancestors is a trigger button. Alongside the usual electronic means of triggering the instrument, you can reach over and press a button to “freeze-frame” the action and preserve the trace. Sometimes doing it repeatedly it can become a chore to reach for the ‘scope. That’s where [Kevin Santo Cappuccio]’s remote trigger button comes in.

The button itself is about as simple a hack as it gets. The ‘scope was carefully dissected and some fine wires laid from the contacts within the front panel to a connector on the case. From there a cable goes to a box with a momentary action button switch. Plug in the box, and you can trigger the ‘scope from a distance!

We have to admit to rather admiring this hack, as needing to trigger the ‘scope is a well-known problem here. It’s easy to stab the wrong button and lose what you are looking for, so we’re rather surprised we didn’t think of this one ourselves. But then again from another viewpoint, it involves dissecting an expensive instrument which is best left unmolested. Perhaps manufacturers should consider adding this functionality.

This may be the most straightforward oscilloscope hack we’ve shown you, but it’s certainly not the first.

DIY Clapper Lets You Pick Your Components

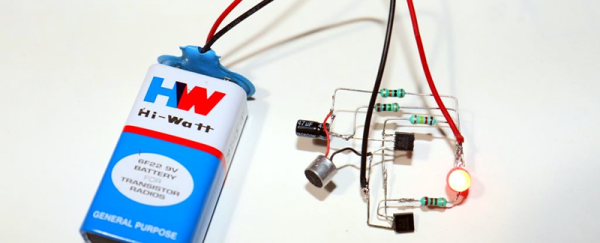
One thing that always means the end of the year is close is the reappearance of TV ads for “The Clapper.” After all, who needs home automation when you can clap on and clap off? While we’re partial to our usual home automation solutions, [Utsource123] shows us that building a clapper can be a fun and easy project using several similar circuits. One with a few transistors and another one with a 555 because, after all, what can’t a 555 do?

Of course, these circuits usually have a microphone. We were trying to think of how you could make a sound-sensitive element out of common parts. After all, you don’t care about the fidelity of the microphone pickup, just that it hears a loud noise. The circuits are about what you’d expect. The transistor version uses one to amplify the microphone and another to switch on the LED. You’d need a bit more to trigger a relay. The 555 uses an even simpler preamp transistor as a trigger.

While we aren’t bowled over with the idea of a clapper, we imagine these circuits aren’t far removed from the ones you buy in stores. For about $16 you also get enough switching to handle a simple AC load, though. Maybe Alexa and Google should allow making clapping a wake up word?

This is sure simpler than the last clapper clone we saw. Then there’s the deluxe DIY version.

Super Simple Sensor Makes DSLR Camera Motion Sensitive

Do you have a need to photographically document the doings of warm-blooded animals? If so, a game camera from the nearest hunting supplier is probably your best bet. But if you don’t need the value-added features such as a weather-resistant housing that can be chained to a tree, this DIY motion trigger for a DSLR is a quick and easy build, and probably loads more fun.

The BOM on [Jeremy S Cook]’s build is extremely short – just a PIR sensor and an optoisolator, with a battery, a plug for the camera’s remote jack, and a 3D-printed bracket. The PIR sensor is housed in a shroud to limit its wide field of view; [Jeremy] added a second shroud when an even narrower field is needed. No microcontroller is needed because all it does is trigger the camera when motion is sensed, but one could be added to support more complicated use cases, like an intervalometer or constraining the motion sensing to certain times of the day. The video below shows the build and some quick tests.

Speaking of intervalometers, we’ve seen quite a few of those over the years. From the tiny to the tinier to the electromechanical, people seem to have a thing for taking snapshots at regular intervals.

Continue reading “Super Simple Sensor Makes DSLR Camera Motion Sensitive”

Low-energy ESP8266-based Board Sleeps Like A Log Until Triggered

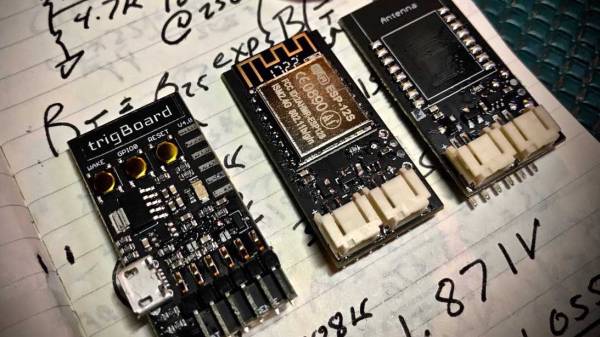
Given the popularity of hacking and repurposing Amazon Dash buttons, there appears to be a real need amongst tinkerers for a simple “do something interesting on the internet when a button is pressed” device. If you have this need but don’t feel like fighting to bend a Dash device to your will, take a look at [Kevin Darrah]’s trigBoard instead.

The trigBoard is a battery-powered, ESP8266-based board that includes some clever circuitry to help it barely sip power (less than one microamp!) while waiting to be triggered by a digital input. This input could be a magnetic reed switch, push button, or similar, and you can configure the board for either normally open or normally closed switches.

The clever hardware bits that allow for such low power consumption are explained in [Kevin]’s YouTube video, which we’ve also embedded after the break. To summarize: the EPS8266 spends most of it’s time completely unpowered. A Texas Instruments TPL5111 power timer chip burns 35 nanoamps and wakes the ESP8266 up every hour to check on the battery. This chip also has a manual wake pin, and it’s this pin – along with more power-saving circuitry – that’s used to trigger actions based on the external input.

Apparently the microcontroller can somehow distinguish between being woken up for a battery check versus a button press, so you needn’t worry about accidentally sending yourself an alert every hour. The default firmware is set up to use Pushbullet to send notifications, but of course you could do anything an EPS8266 is capable of. The code is available on the project’s wiki page.

The board also includes a standard micro-JST connector for a LiPo battery, and can charge said battery through a micro-USB port. The trigBoard’s full schematic is on the wiki, and pre-built devices are available on Tindie.

[Kevin]’s hardware walkthrough video is embedded after the break.

Continue reading “Low-energy ESP8266-based Board Sleeps Like A Log Until Triggered”

Shooting For The First Time With Help From A Raspberry Pi

Like many people, [Mike] has a list of things he wants to do in life. One of them is “fire a gun with a switch,” and with a little help from some hacker friends, he knocked this item off last weekend.

For those wondering why the specificity of the item, the backstory will help explain. [Mike] has spinal muscular atrophy, a disease that was supposed to end his life shortly after it began. Thirty-seven years later, [Mike] is still ticking items off his list, but since he only has voluntary control of his right eyebrow, he faces challenges getting some of them done. Enter [Bill] and the crew at ATMakers. The “AT” stands for “assistive technologies,” and [Bill] took on the task of building a rig to safely fire a Glock 17 upon [Mike]’s command.

Before even beginning the project, [Bill] did his due diligence, going so far as to consult the Bureau of Alcohol, Tobacco, and Firearms (ATF) and arranging for private time at a local indoor gun range. The business end of the rig is a commercially available bench rest designed to control recoil from the pistol, which is fired by a servo connected to the trigger. The interface with [Mike]’s system is via a Raspberry Pi and a Crikit linked together by a custom PCB. A PiCam allowed [Mike] to look down the sights and fire the gun with his eyebrow. The videos below show the development process and the day at the range; to say that [Mike] was pleased is an understatement.

We’re not sure what else is on [Mike]’s list, but we see a lot of assistive tech projects around here — we even had a whole category of the 2017 Hackaday Prize devoted to them. Maybe there’s something else the Hackaday community can help him check off.

Continue reading “Shooting For The First Time With Help From A Raspberry Pi”

Print Physical Buttons For Your Touch Screen

Modern handheld gaming hardware is great. The units are ergonomic powerhouses, yet many of us do all our portable gaming on a painfully rectangular smartphone. Their primary method of interaction is the index finger or thumbs, not a D-pad and buttons. Shoulder triggers have only existed on a few phones. Bluetooth gaming pads are affordable but they are either bulky or you have to find another way to hold your phone. Detachable shoulder buttons are a perfect compromise since they can fit in a coin purse and they’re cheap because you can make your own.

[ASCAS] explains how his levers work to translate a physical lever press into a capacitive touch response. The basic premise is that the contact point is always touching the screen, but until you pull the lever, which is covered in aluminum tape, the screen won’t sense anything there. It’s pretty clever, and the whole kit can be built with consumables usually stocked in hardware stores and hacker basements and it should work on any capacitive touch screen.

Physical buttons and phones don’t have to be estranged and full-fledged keyswitches aren’t exempt. Or maybe many capacitive touch switches are your forte.

Continue reading “Print Physical Buttons For Your Touch Screen”