Retrotechtacular: Making Porcelain Insulators

Here is a silent film produced by General Electric that depicts the making of many kinds of porcelain insulators for power lines. Skilled craftsmen molded, shaped, and carved these vital components of the electrical grid by hand before glazing and firing them.

Porcelain insulators of this time period were made from china clay, ball clay, flint, and feldspar. In the dry process, ingredients are pulverized and screened to a fine powder and then pressed into molds, often with Play-Doh Fun Factory-type effects. Once molded, they are trimmed by hand to remove fins and flashing. The pieces are then spray-glazed while spinning on a vertical lathe.

Other types of insulators are produced through the wet process. The clay is mixed in a pug mill, which is a forgiving machine that takes scrap material of all shapes, sizes, and moisture levels and squeezes out wet, workable material in a big log. Chunks of log are formed on a pottery wheel or pressed into a mold. Once they are nearly dry, the pieces get their final shape at the hands of a master. They are then glazed and fired in a giant, high-temperature kiln.

Continue reading “Retrotechtacular: Making Porcelain Insulators”

Phonographs Through The Eye Of An Electron Microscope

Hackaday Prize judge [Ben Krasnow] has been busy lately. He’s put his scanning electron microscope (SEM) to work creating an animation of a phonograph needle playing a record. (YouTube link) This is the same 80’s SEM [Ben] hacked back in November. Unfortunately, [Ben’s]  JSM-T200 isn’t quite large enough to hold an entire 12″ LP, so he had to cut a small section of a record out. The vinyl mods weren’t done there though. SEMs need a conductive surface for imagingphono_anim_1
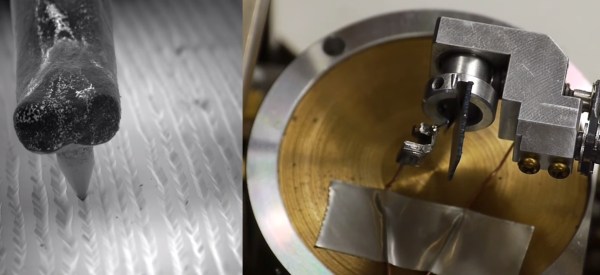
. Vinyl is an insulator. [Ben] dealt with this by using his vacuum chamber to evaporate a thin layer of silver on the vinyl.

Just imaging the record wouldn’t be enough; [Ben] wanted an animation of a needle traveling through the record grove. He tore apart an old phonograph needle and installed it in on a copper wire in the SEM. Thanks to the dual stage setup of the JSM-T200, [Ben] was able to move the record-chip and needle independently. He could then move the record underneath the needle as if it were actually playing. [Ben] used his oscilloscope to record 60 frames, each spaced 50 microns apart. He used octave to process the data, and wound up with the awesome GIF animation you see on the left. 

pits[Ben] wasn’t done though. He checked out a few other recording formats, including CD and DVD optical media, and capacitance electronic disc, an obscure format from RCA which failed miserably in the market. The toughest challenge [Ben] faced was imaging the CD media. The familiar pits of a CD are stored on a thin aluminum layer sandwiched between the lacquer label and the plastic disc. He tried dissolving the plastic with chemicals, but enough plastic was left behind to distort the image. The solution turned out to be double-sided tape. Sticking some tape down on the CD and peeling it off cleanly removed the aluminum, and provided a sturdy substrate with which to mount the sample in the SEM.

We’re curious if stereo audio data can be extracted from the SEM images.  [Oona] managed to do this with a mono recording from a toy robot.  Who’s going to be the first one to break out the image analysis software and capture some audio from [Ben’s] images?

Continue reading “Phonographs Through The Eye Of An Electron Microscope”

Prevent Failed Prints With A Filament Speed Sensor

If you have used a 3D printer for any length of time, you’ve probably experienced a failed print caused by a clogged nozzle. If you’re not around to stop the print and the nozzle stays hot and full of filament for hours, the clog gets even worse. [Florian] set out to solve this issue with an encoder that measures filament speed, which acts as an early warning system for nozzle clogs.

static1.squarespace.com
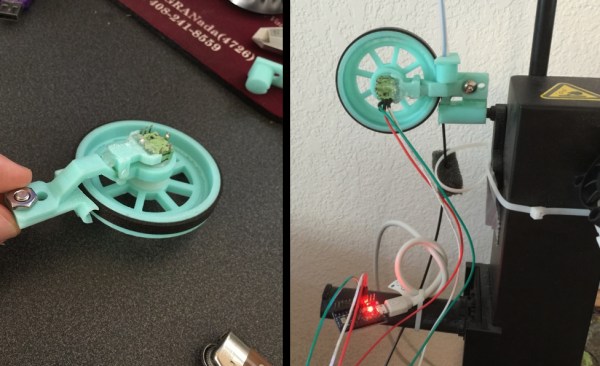
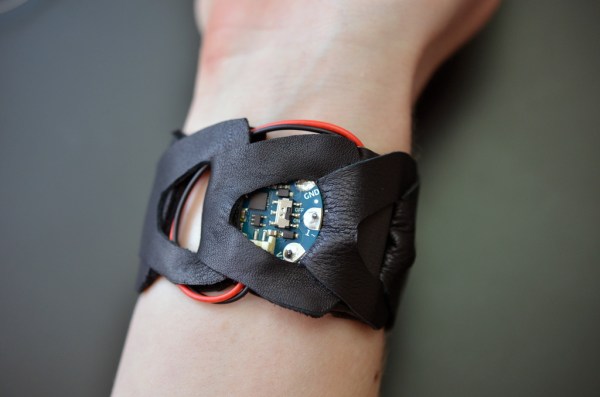
[Florian] designed a small assembly with a wheel and encoder that measures filament movement. The filament passes under the encoder wheel before it’s fed into the 3D printer. The encoder is hooked up to an Arduino which measures the Gray code pulses as the encoder rotates, and the encoder count is streamed over the serial port to a computer.

When the filament slows down or stops due to a nozzle clog, the Python script plays a notification sound to let you know that you should check your nozzle and that your print might fail. Once [Florian] works out some of the kinks in his setup, it would be awesome if the script could stop the print when the nozzle fails. Have any other ideas on how to detect print failures? Let us know in the comments.

Come To Our Shenzhen Meetup And Tell Your Friends

This Saturday we’ll be in Shenzhen hosting a meetup at Bionic Brew at 19:00. Join us there and bring along your own hardware projects to show around. Everyone loves hearing about that latest build!

Even if you’re not in the area you can help us out by spreading the word. Tell your friends, share on your social media, and let us know about anyone in town who you think we should reach out to. Here’ s a poster if you want to print it out and hang it at your hackerspace, workplace, or other area where awesome people congregate.

The things you can do at this meetup: Laugh, drink, eat, and be happy. Talk excitedly about datasheets and timing diagrams. Pretend you hate talking about timing diagrams while being secretly giddy that someone wants to hear what you think of them. Recount your epic battles to meet production deadlines. Show off that latest blinky LED project you just got working. Meet a ton of awesome people. You can RSVP here to tell us you’re coming. See you soon!

Get Up, Stand Up. With A Little Help From The Mindfulness Bracelet

[Becky Stern] has created the mindfulness bracelet, a wearable which looks great and serves an important purpose. The bracelet buzzes every hour to remind you to stand up and take a break from work, soldering, gaming, or whatever it is you may be doing. The bracelet is made up of interlinked figure 8 shapes of leather, though [Becky] says rubber from a bicycle inner tube works great as well. The final shape reminds us of the link belts sometimes found on lathes or other industrial equipment. The links are the perfect size to slip an Arduino Gemma in, along with a battery and vibrating motor. A NPN transistor, diode, and resistor round out the entire bill of materials for this design. This bracelet is a heck of a lot cheaper than the Apple watch feature which inspired it!

The time interval is set in the code to 1 hour, and can be adjusted by the user. Although the times are stored in milliseconds, the design does use the ATtiny85’s Watchdog Timer (WDT) to conserve power. This means the time can drift up to 30 seconds per hour, which is fine in this application.

Click past the break to see the bracelet in action!

Continue reading “Get Up, Stand Up. With A Little Help From The Mindfulness Bracelet”

Hackaday Prize Entry: An Open Source Graphics Card

For last year’s Hackaday Prize, [PK] tried to build a video card for microcontrollers and headless Linux systems. It was only 640×480 resolution VGA, but the entire project was designed around a CPLD communicating with a microcontroller over SPI. This prize entry was, by [PK]’s own admission, a failure. It was late, but now he’s had an entire year to perfect his design. That means he can enter version two of his VGATonic in The Hackaday Prize.

The VGATonic version 2 uses a Xilinx XC95144XL CPLD for the VGA timing, and an ATTiny 2313a to read the SPI bus. Video memory is four megabits of static RAM. That’ls pretty much all you need for the most basic VGA graphics card, and all of this is packed onto a 3×3 inch PCB.

You can do a lot with 640×480 8-bit graphics running at 25FPS. In the video below, [PK] has a ‘hello world’ of sorts, Doom, running on a Raspberry Pi 2 with his SPI graphics card. Yes, it’s a graphics card for the Raspberry Pi, and it looks really good.

Further refinements of the design will include some primitive graphics routines. Not OpenGL or anything fancy, just something to reduce the number of writes on the SPI bus. It’s a great project, and perfect if you want to add video out to an Intel Galileo or other microcontroller project. [PK] has a video demo, you can check that out below.


The 2015 Hackaday Prize is sponsored by:

Continue reading “Hackaday Prize Entry: An Open Source Graphics Card”

USB Switch

Reverse Engineering How A USB Switch Switches

[Daniel] found himself with a need to connect a single USB device to two Linux servers. After searching around, he managed to find an inexpensive USB switch designed to do just that. He noticed that the product description mentioned nothing about Linux support, but he figured it couldn’t be that hard to make it work.

[Daniel] started by plugging the device into a Windows PC for testing. Windows detected the device and installed an HID driver automatically.  The next step was to install the control software on the Windows system. This provided [Daniel] with a tray icon and a “switch” function. Clicking this button disconnected the HID device from the Windows PC and connected the actual USB device on the other side of the USB switch. The second computer would now have access to the HID device instead.

[Daniel] fired up a program called SnoopyPro. This software is used to inspect USB traffic. [Daniel] noticed that a single message repeated itself until he pressed the “switch” button. At that time, a final message was sent and the HID device disconnected.

Now it was time to get cracking on Linux. [Daniel] hooked up the switch to a Linux system and configured a udev rule to ensure that it always showed up as /dev/usbswitch. He then wrote a python script to write the captured data to the usbswitch device. It was that simple. The device switched over as expected. So much for having no Linux support!