Hackaday Prize Entry: From Q To NAND

The apocalypse is coming, and the last time I checked, not many people have a semiconductor fab in their garage. We’ll need computers after the end of the world, and [matseng]’s project for the Hackaday Prize is just that – a framework to build computers out of discrete components.

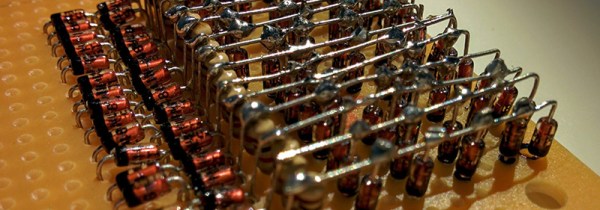
The apocalyptic spin on this project is slightly exaggerated, but there is a lot someone can learn by building digital devices out of transistors, resistors, and diodes. The building blocks of [matseng]’s computer are as simple as they come: he’s using three resistors, four diodes, and one NPN transistor to build a single NAND gate. These NAND gates can then be assembled into any form of digital logic. You’re never going to get a better visual example of functional completeness.

A project like this must be approached from both the top down and bottom up. To go from a high level to ones and zeros, [matseng] built an assembler and an emulator. Some ideas of what the instruction set will be are laid out in this project log, and for now [matseng] is going for a Harvard architecture with eight registers. It’s a lot of work for a computer that will be limited by how much memory [matseng] can be wired up, but as far as ambition goes, there aren’t many projects in the Hackaday Prize that can match this tiny, huge computer.

The 2015 Hackaday Prize is sponsored by:

Coffee Alarm

Alarm Notifies The Office When The Coffee Is Ready

[Stian] thought it would be nice if his coworkers could be electronically notified when the latest batch of coffee is ready. He ended up building an inexpensive coffee alarm system to do exactly that. When the coffee is done, the brewer can press a giant button to notify the rest of the office that it’s time for a cuppa joe.

[Stian’s] first project requirement was to activate the system using a big physical button. He chose a button from Sparkfun, although he ended up modifying it to better suit his needs. The original button came with a single LED built-in. This wasn’t enough for [Stian], so he added two more LEDs. All three LEDs are driven by a ULN2003A NPN transistor array. Now he can flash them in sequence to make a simple animation.

This momentary push button supplies power to a ESP8266 microcontroller using a soft latch power switch. When the momentary switch is pressed, it supplies power to the latch. The latch then powers up the main circuit and continues supplying power even when the push button is released. The reason for this power trickery is to conserve power from the 18650 li-on battery.

The core functionality of the alarm uses a combination of physical hardware and two cloud-based services. The ESP8266 was chosen because it includes a built-in WiFi chip and it only costs five dollars. The microcontroller is configured to connect to the WiFi network with the push of a button. The device also monitors the giant alarm button.

When the button is pressed, it sends an HTTP request to a custom clojure app running on a cloud service called Heroku. The clojure app then stores brewing information in a database and sends a notification to the Slack cloud service. Slack is a sort of project management app that allows multiple users to work on projects and communicate easier over the internet. [Stian] has tapped into it in order to send the actual text notification to his coworkers to let them know that the coffee is ready. Be sure to watch the demo video below. Continue reading “Alarm Notifies The Office When The Coffee Is Ready”

Astronaut Or Astronot: The Final Round Is Over

For the last few months, we’ve been asking the Hackaday.io community for their thoughts on what the best projects are in the 2015 Hackaday Prize. We’ve also been giving away some fabulous prizes to people who have voted, and we just wrapped up the last round of voting? Did anyone win? Check out the video below.

Continue reading “Astronaut Or Astronot: The Final Round Is Over”

It Keeps On Going And… Arduino Edition

How long can you keep an Arduino circuit running on three AA batteries? With careful design, [educ8s] built a temperature sensor that lasts well over a year on a single charge of three 2250 mAH rechargeable cells (or, at least, should last that long).

Like most long-life designs, this temperature sensor spends most of its time sleeping. The design uses a DS18B20 temperature sensor and a Nokia 5110 LCD display. It also uses a photoresistor to shut off the LCD display in the dark for further power savings.

During sleep, the device only draws 260 microamps with the display on and 70 microamps with the display off. Every two minutes, the processor wakes up and reads the temperature, drawing about 12 milliamps for a very short time.

Along with the code, [educ8s] has a spreadsheet that computes the battery life based on the different measured parameters and the battery vendor’s claimed self discharge rate.

Of course, with a bigger battery pack, you could get even more service from a charge. If you need a refresher on battery selection, we covered that not long ago. Or you can check out a ridiculously complete battery comparison site if you want to improve your battery selection.

Continue reading “It Keeps On Going And… Arduino Edition”

Hacklet 57 – CNC Hacks

Everyone’s first microcontroller project is making an LED blink. It’s become the de-facto “Hello World” of hardware hacking.  There’s something about seeing wires you connected and the code you wrote come together to make something happen in the real world. More than just pixels on a screen, the LED is tangible. It’s only a short jump from blinking LEDs to making things move. Making things move is like a those gateway drug – it leads to bigger things like robots, electric cars, and CNC machines. Computer Numerical Control (CNC) is the art of using a computer to control movement. The term is usually applied to machine tools, which cut, engrave, or perform other operations on wood, plastic, metal and other materials. In short, tools to make more things. It’s no surprise that hackers love CNCs. This week’s Hacklet is all about some of the best CNC projects on Hackaday.io!
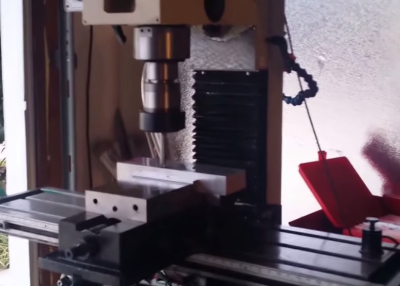
charliexWe start with [Charliex] and Grizzly G0704 CNC Conversion. [Charliex] wanted a stout machine capable of milling metal. He started with a Grizzly  G0704, which is small compared to a standard knee mill, but still plenty capable of milling steel. [Charliex] added a Flashcut CNC conversion kit to his mill. While they call them “conversion kits” there is still quite a bit of DIY ingenuity required to get a system like this going. [Charliex] found his spindle runout was way out of spec, even for a Chinese mill. New bearings and a belt conversion kit made things much smoother and quieter as well. The modded G0704 is now spending its days cutting parts in [Charliex’s] garage.
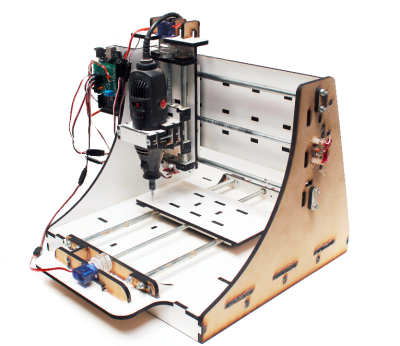
 

makesmithNext up is [brashtim] with Makesmith CNC. Makesmith was [brashtim’s] entry in the 2014 Hackaday prize. While it didn’t win the prize, Makesmith did go on to have a very successful Kickstarter, with all the machines shipping in December of 2014. The machine itself is unorthodox. It uses closed loop control like large CNC machines, rather than open loop stepper motors often found in desktop units. The drive motors are hobby type servos.  We’re not talking standard servos either – [brashtim] picked microservos. By using servos, common hardware store parts, and laser cut acrylic, [brashtim] kept costs down. The machine performs quite well though, easily milling through wood, plastic, foam, and printed circuit boards.
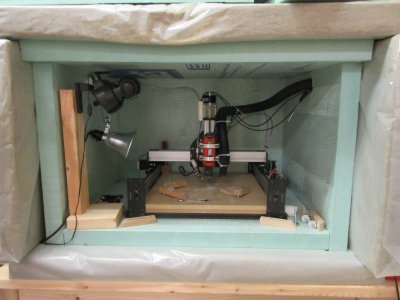
 

reactronNext we have [Kenji Larsen] with Reactron material processor: Wireless CNC mill. [Kenji] started with a  Shapeoko 2, and gave it the Reactron treatment. The stock controller was replaced with a Protoneer shield, which is connected to the Reactron network via a HopeRF radio module. The knockoff rotary tool included with the kit was replaced with a DeWalt DW660 for heavy-duty jobs, or a quieter Black and Decker RTX-6. A tool mounted endoscope keeps an eye on the work. [Kenji] mounted the entire mill in a custom enclosure of foam and Roxul insulation. The enclosure deadens the sound, but it also keeps heat in. [Kenji] plans to add a heat exchanger to keep things cool while maintaining relative quiet in his shop.
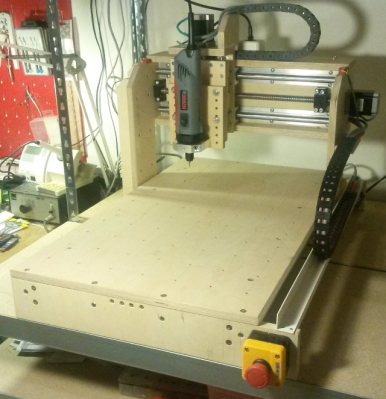
cnc2Finally we have a [hebel23] with DIY Multiplex Plywood CNC Router. [hebel23] wanted to build a big machine within a budget – specifically a working area of  400 x 600 x 100 mm and a budget of 800 Euro. As the name implies, [hebel23] used birch plywood as the frame of his machine. He chose high quality plywood rather than the cheap stuff found in the big box stores. This gives the machine a stable frame. The moving components of the machine are also nice – ball screws, linear bearings, and good stepper controllers. The stepper motors themselves are NEMA-23 units, which should give the CNC plenty of power to cut through wood, plastic, and even light cuts on metal. [hebel23] spent a lot of time on the little details of his CNC, like adding an emergency stop switch, and a wire-chain to keep his gantry control wires from ending up tangled up in the work piece. The end result is a CNC which would look great in anyone’s workshop.

If you want more CNC goodness, check out our brand new CNC project list! Did I miss your project? Don’t be shy, just drop me a message on Hackaday.io. That’s it for this week’s Hacklet, As always, see you next week. Same hack time, same hack channel, bringing you the best of Hackaday.io!

Self Built Interferometer Measures Nanometer Displacement

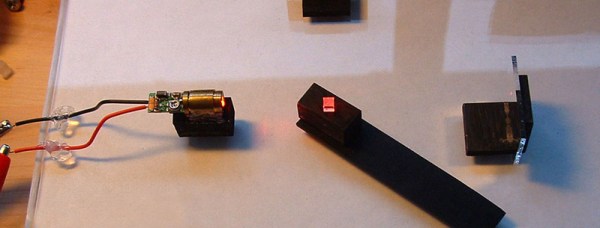
[jrcgarry] hacked together this awesome interferometer which is able to measure displacements in the nanometer range. Commercial interferometers are used in research labs to measure tiny displacements on the nanometer scale, and can cost tens of thousands of dollars. [jrcgarry] used beam splitters from BluRay drives, mirrors from ebay and a 5mw laser diode.

We’ve covered the use of interferometers before. But never an instrument built from scratch like this. Interferometers exploit the wave-like nature of a beam of light. The beam is split and sent down two separate paths, where the beams bounce off mirrors to return to the beam splitter to be recombined. Because of its wave light nature the beams will interfere with each other. And as the beams have traveled different distances they may be in or out of phase. Resulting in either constructive (brighter) or destructive (darker) interference.

Because the wavelength of light is on the order of 100s of nanometers, by observing the interference patterns you can monitor the displacement of the mirrors with respect to each other at nanometer resolution. [jrcgarry] doesn’t use the interferometer for any particular application in this tutorial but it’s a great demonstration of the technique!

Quantum Mechanics In Your Processor: Complementarity

Monday | 24 October 1927 | Brussels

While the official title of the 5th Solvay conference was “on Electrons and Photons”, it was abundantly clear amongst the guests that the presentations would center on the new theory of quantum mechanics. [Planck], [Einstein], [Bohr], [de Broglie], [Schrodinger], [Heisenberg] and many other giants of the time would be in attendance. Just a month earlier, [Niels Bohr] had revealed his idea of complementarity to fellow physicists at the Instituto Carducci, which lay just off the shores of Lake Como in Italy.

The theory suggested that subatomic particles and waves are actually two sides of a single ‘quantum’ coin. Whichever properties it would take on, be it wave or particle, would be dependent upon what the curious scientist was looking for. And asking what that “wave/particle” object is while not looking for it is meaningless. Not surprisingly, the theory was greeted with mixed reception by those who were there, but most were distracted by the bigwig who was not there – [Albert Einstein]. He couldn’t make it due to illness, but all were eager to hear his thoughts on [Bohr’s] somewhat radical theory. After all, it was he who introduced the particle nature of light in his 1905 paper on the photoelectric effect, revealing light could be thought of as particles called photons. [Bohr’s] theory reconciled [Einstein’s] photoelectric effect theory with the classical understanding of the wave nature of light. One would think he would be thrilled with it. [Einstein], however, would have no part of [Bohr’s] theory, and would spend the rest of his life trying to disprove it.

Complementarity – Wave , Particle or both?

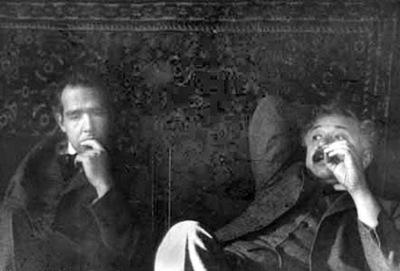
einstein and bohr
[Niels Bohr] contemplates one of [Einstein’s] many challenges to quantum theory.
For more than a century it was thought that light was a wave. In 1801, [Thomas Young] had discovered interference patterns when shining a light through two very close slits. Interference is a well known property of waves. This combined with [Maxwell’s] equations, which predicted the existence of electromagnetic radiation put little doubt into anyone’s mind that light was nothing more, or less, than a wave. There was a very odd issue, however, that puzzled physicists during the 18th century. When shining light upon a metallic surface, electrons would be ejected from that surface. Increasing the intensity of the light did not translate to an increase in speed of the expelled electrons, like classical mechanics says it should. Increasing the frequency of the light did increase the speed. The explanation of this phenomenon could not be had until 1900, when [Max Planck] realized that physical action could not be continuous, but must be a multiple of some small quantity. This quantity would lead to the “quantum of action”, which is now called [Planck’s] constant and birthed quantum physics. It would have been impossible for him to know that this simple idea, in less than two decades, would lead to a change in understanding of the nature of reality. It only took Einstein, however, a few years to use [Planck’s] quantum of action to explain that mind-boggling issue of electrons releasing from metal via light and not following classical law with the incredibly complex equation:

E = hv

Where E is the energy of the light quanta, h is Planck’s constant and v is the frequency of the light.  The most important item to consider here is this light quanta, later to be called a photon.  It is treated as a particle. Now, if you’re not scratching your head in confusion right about now, you haven’t been paying attention. How can light be a wave and a particle? Join me after the jump and we’ll travel further down this physics rabbit hole.

Continue reading “Quantum Mechanics In Your Processor: Complementarity”