Dedicated Button For Toggling Screens

Anyone who regularly presents to an audience these days has known the pain of getting one’s laptop to work reliably with projection hardware. It’s all the more fraught with pain when you’re hopping around from venue to venue, trying desperately to get everything functioning on a tight schedule. [Seb] found that the magic keystrokes they used to deal with these issues no longer worked on the Macbook Pro Touchbar, and so a workaround was constructed in hardware.

The build itself is simple – an Adafruit Trinket serves as the brains, with a meaty 12mm tactile button used for input. The Trinket emulates a USB keyboard and sends the Cmd-F1 keypress to the computer when the button is pressed. The button’s even mounted in a tidy deadbugged fashion.

While it’s not at all complicated from a build standpoint, the key to this project is that it’s a great example of using the tools available to solve real-life problems. When you’re in a rush with 300 people waiting for your talk to start, the last thing you need to be worrying about is a configuration issue. [Seb] now has a big red button to mash to get out of trouble and get on with the job at hand. It does recall this much earlier hack for emulating a USB keyboard with an Arduino Uno or Mega. It’s a useful skill to have!


Hackaday Prize Entry: Low Cost KVM

Back in the old days, when handing someone a DB serial cable when they asked for a DE serial cable would get you killed, KVM switchers were a thing. These devices were simple boxes with a few VGA ports, a few PS/2 ports, and a button or dial that allowed your input (keyboard and mouse) and output (video) to be used with multiple computers. Early KVMs were really just a big ‘ol rotary switch with far, far too many poles. Do you remember that PS/2 wasn’t able to be hot plugged? The designers of these KVMs never knew that.

Today, KVM switchers are a bit more complicated than a simple rotary switch. We’re not dealing with VGA anymore — we have HDMI muxes. We’re also not dealing with PS/2 anymore, and USB requires a bit of microelectronics to switch from one computer to another. For one of his many Hackaday Prize entries, [KC Lee] is designing a low-cost HDMI switch and USB mux. It works, it’s cheap, and if you need to switch a keyboard, mouse, and monitor between boxes, it’s exactly what you need.

First off, the HDMI switching. Designing a switch for HDMI would usually take some obscure parts, intricate routing, and a lot of prototyping time. [KC] found a way around this: just hack up a $5 HDMI switch. This cheap HDMI switch is as simple as it gets, with an HDMI mux doing the heavy lifting and an 8-pin microcontroller to handle the buttons and a selector LED.

For the USB, there are a few more design choices. For USB 1.x switching, [KC] figures he can get away with a 74HC4052 dual 4:1 analog mux. Yes, he’s doing digital with analog chips, the heathen. There are drawbacks to this: everything could break, and it’s only USB 1.x, anyway. For a USB 2.0 KVM, there are a few more professional options. The OnSemi NCN9252 is a proper USB 2.0 mux, and in the current design.

Know The Load With This Simple Microcontroller CPU Meter

How do you tell how much load is on a CPU? On a desktop or laptop, the OS usually has some kind of gadget to display the basics. On a microcontroller, though, you’ll have to roll your own CPU load meter with a few parts, some code, and a voltmeter.

We like [Dave Marples]’s simple approach to quantifying something as complex as CPU load. His technique relies on the fact that most embedded controllers are just looping endlessly waiting for something to do. By strategically placing commands that latch an output on while the CPU is busy and then turn it off again when idle, a PWM signal with a duty cycle proportional to the CPU load is created. A voltage divider then scales the maximum output to 1.0 volt, and a capacitor smooths out the signal so the load is represented by a value between 0 and 1 volt. How you display the load is your own choice; [Dave] just used a voltmeter, but anything from an LED strip to some kind of audio feedback would work too.

Still just looking for a load meter for your desktop? Take your pick: an LED matrixold-time meters, or even Dekatrons.

3D Printing Flexible Surfaces Out Of Non-Flexible Material

Here’s some interesting work shared by [Ben Kromhout] and [Lukas Lambrichts] on making flexible 3D prints, but not by using flexible filament. After seeing a project where a sheet of plywood was rendered pliable by cutting a pattern out of it – essentially turning the material into a giant kerf bend – they got interested in whether one could 3D print such a thing directly.

Inspiration for the project was this laser-cut plywood.

The original project used plywood and a laser cutter and went through many iterations before settling on a rectangular spiral pattern. The results were striking, but the details regarding why the chosen pattern was best were unclear. [Ben] and [Lukas] were interested not just in whether a 3D printer could be used to get a similar result, but also wanted to find out what factors separated success from failure when doing so.

After converting the original project’s rectangular spiral pattern into a 3D model, a quick proof-of-concept showed that three things influenced the flexibility of the end result: the scale of the pattern, the size of the open spaces, and the thickness of the print itself. Early results indicated that the size of the open spaces between the solid elements of the pattern was one of the most important factors; the larger the spacing the better the flexibility. A smaller and denser pattern also helps flexibility, but when 3D printing there is a limit to how small features can be made. If the scale of the pattern is reduced too much, open spaces tend to bridge which is counter-productive.

Kerf bending with laser-cut materials gets some clever results, and it’s interesting to see evidence that the method could cross over to 3D printing, at least in concept.

Electric LEGO Longboard Now Complete With Epic Road Test

We recently posted about [James Bruton]’s most excellent oversized LEGO electric longboard. Well, now he has completed the project by tidying a few things and building oversized versions of classic light-up bricks to serve as headlamps and the tail light. Most importantly, he’s hitting the road with it!

He built a LEGO-looking enclosure for the battery as well, based on a 2×6 brick. The battery pack sits behind the motor with the tail light on top and holds the radio control receiver as well the twin LiPos. The head and tail lights pack 24-LED discs and are controlled by [James]’ FS-GT2B 3-channel RC transmitter. Its third channel is just a button, and he can trip that button to activate the lights with the help of a Turnigy receiver-controlled switch.

For an added touch he printed some LEGO flowers and a minifig, suitably oversized, and took the skateboard on the road. The thing has some zip! [James] kept his balance while holding the controller in one hand and a selfie stick with the other. The headlamp housings fell off, and a while later the minifig fell off. Fortunately [James] was able to snap them back into place, in proper LEGO fashion.

[James] runs XRobots and also served as a judge for the 2016 Hackaday Prize. We wrote up his Star Wars builds a while back, as well as his tutorial on mixed reality filming without a green screen.

Continue reading “Electric LEGO Longboard Now Complete With Epic Road Test”

Add A Second SD Card To The Pi Zero

The Raspberry Pi Zero is a beautiful piece of hardware, fitting an entire Linux computer into a package the size of a pack of gum (don’t chew it, though). However, this size comes with limited IO options, which can be a complication for some projects. In this case, [Hugatry] wanted extra storage, and devised a smart method to add a second SD card to the Pi Zero.

The problem with the Pi Zero is that with only a single USB port, it’s difficult to add any other storage to the device without making things bulkier with hubs or other work arounds. Additionally, the main SD card can’t be removed while the Pi is running, so it makes sense to add an easy-to-use removable storage option to the Pi Zero.

It’s quite a simple hack – all that’s required to pull it off is a few resistors, an SD card connector, and some jumper wires. With everything hooked up, a small configuration change enables the operating system to recognise the new card.

Overall it’s great to see hacks that add further functionality to an already great platform. If you find it’s not powerful enough, you can always try overclocking one. 

Continue reading “Add A Second SD Card To The Pi Zero”

Bespoke Processors Might Soon Power Your Artisanal Devices

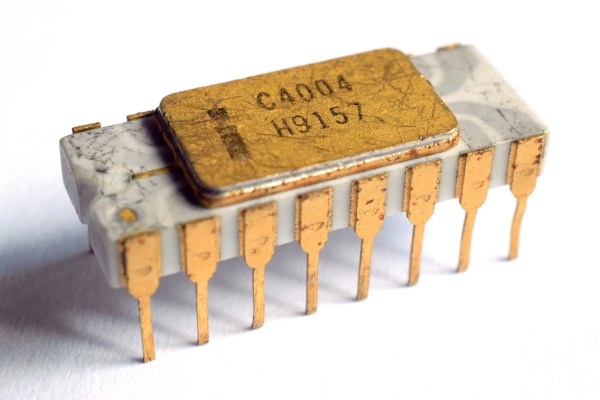
Modern microprocessors are a marvel of technological progress and engineering. At less than a dollar per unit, even the cheapest microprocessors on the market are orders of magnitude more powerful than their ancestors. The first commercially available single-chip processor, the Intel 4004, cost roughly $25 (in today’s dollars) when it was introduced in 1971.

The 4-bit 4004 clocked in at 740 kHz — paltry by today’s standards, but quite impressive at the time. However, what was remarkable about the 4004 was the way it shifted computer design architecture practically overnight. Previously, multiple chips were used for processing and were selected to just meet the needs of the application. Considering the cost of components at the time, it would have been impractical to use more than was needed.

That all changed with the new era ushered in by general purpose processors like the 4004. Suddenly it was more cost-effective to just grab a processor of the shelf than to design and manufacture a custom one – even if that processor was overpowered for the task. That trend has continued (and has been amplified) to this day. Your microwave probably only uses a fraction of its processing power, because using a $0.50 processor is cheaper than designing (and manufacturing) one tailored to the microwave’s actual needs.

Anyone who has ever worked in manufacturing, or who has dealt with manufacturers, knows this comes down to unit cost. Because companies like Texas Instruments makes millions of processors, they’re very inexpensive per unit. Mass production is the primary driving force in affordability. But, what if it didn’t have to be?

Professors [Rakesh Kumar] and [John Sartori], along with their students, are experimenting with bespoke processor designs that aim to cut out the unused portions of modern processors. They’ve found that in many applications, less than half the logic gates of the processor are actually being used. Removing these reduces the size and power consumption of the processor, and therefore the final size and power requirements of the device itself.

Of course, that question of cost comes back into play. Is a smaller and more efficient processor worth it if it ends up costing more? For most manufacturers of devices today, the answer is almost certainly no. There aren’t many times when those factors are more important than cost. But, with modern techniques for printing electronics, they think it might be feasible in the near future. Soon, we might be looking at custom processors that resemble the early days of computer design.