Kapton: Miracle Material With A Tragic History

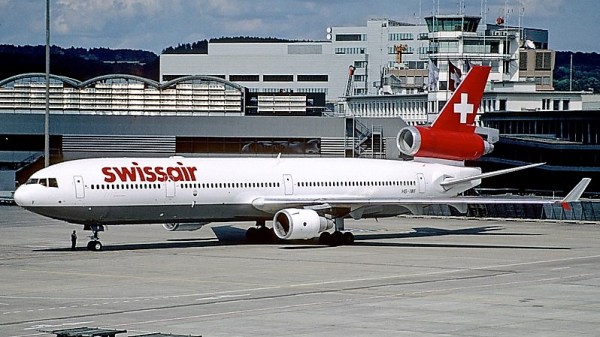
On a balmy September evening in 1998, Swissair flight 111 was in big trouble. A fire in the cockpit ceiling had at first blinded the pilots with smoke, leaving them to rely on instruments to divert the plane, en route from New York to Geneva, to an emergency landing at Halifax Airport in the Canadian province of Nova Scotia. But the fire raging above and behind the pilots, intense enough to melt the aluminum of the flight deck, consumed wiring harness after wiring harness, cutting power to vital flight control systems. With no way to control the plane, the MD-11 hit the Atlantic ocean about six miles off the coast. All 229 souls were lost.

It would take months to recover and identify the victims. The 350-g crash broke the plane into two million pieces which would not reveal their secrets until much later. But eventually, the problem was traced to a cascade of failures caused by faulty wiring in the new in-flight entertainment system that spread into the cockpit and doomed the plane. A contributor to these failures was the type of insulation used on the plane’s wiring, blamed by some as the root cause of the issue: the space-age polymer Kapton.

No matter where we are, we’re surrounded by electrical wiring. Bundles of wires course with information and power, and the thing that protects us is the thin skin of insulation over the conductor. We trust these insulators, and in general our faith is rewarded. But like any other engineered system, failure is always an option. At the time, Kapton was still a relatively new wonder polymer, with an unfortunate Achilles’ heel that can turn the insulator into a conductor, and at least in the case of flight 111, set a fire that would bring a plane down out of the sky.

Continue reading “Kapton: Miracle Material With A Tragic History”

Laser-Cut Mecanum Wheel For The Budget Roboticist

For the budding roboticist, omniwheels might be the next step in design patterns from your everyday “getting-started” robot kits. These wheels consist of tiny rollers that sit on the perimeter of the wheel and enable the wheel to freely slide laterally. With independent motor control of each wheel, a platform can freely locomote sideways by sliding on the rollers. You might think: “a wheel made of wheels? That sounds pricey…”–and you’d be right! Fear not, though; the folks at [Incubhacker] in Belgium have you covered with a laser-cut design that’s one-click away from landing on your workbench.

For anyone who’s tried to reliably mate flat laser-cut parts at an angle, we can tell you it’s no easy feat. The design here triumphs as both simple and reliable. Not only do they solve this problem elegantly, they also manage to create a design that will bear the load of a robot chassis that will travel with it. Laser-cut designs also usually suffer from a poor range of material options. Here the actual rollers need a bit more grip than what the plywood can provide. They also solve this problem effectively as well too, relying on heat-shrink tubing to provide the traction expected from a conventional wheel.

In the video below, [Incubhacker] takes you through the step-by process of making your own come to life. We’ve certainly seen some impressive laser-cut omniwheels in the past, but we like the simplicity of design combined with the composition of parts that probably already live on our workbenches.

Continue reading “Laser-Cut Mecanum Wheel For The Budget Roboticist”

The Era Of Orville Props Has Officially Begun

Over a decade after the last Star Trek show warped off of television, we finally have a new series in the form of Star Trek: Discovery. But much to the chagrin of many old school Trek fans, Discovery has gone all in on the gritty and hyper-serialized storytelling that’s taken over TV since Starfleet last patrolled the airwaves. But for those who are looking for somewhat more lighthearted space adventures, Seth MacFarlane (of Family Guy fame) has created a show which is essentially a love-letter to Star Trek: The Next Generation called The Orville. Some have gone as far as to claim that The Orville is the true continuation of the Trek legacy, though such discussion sounds awfully close to a Holy War to us so we’ll steer clear.

Unfortunately for The Orville fans, the series doesn’t have nearly the commercial draw of Trek. Accordingly, the market for things like replica uniforms and props from the show is still in its infancy, meaning fans of the show have to go the DIY route. [JohnSmallBerries] is one such fan, and his 3D printed “Comscanner” from The Orville is a shot across the bow to the well established Trek prop-making scene.

Without so much as an official toy version of the device, [John] was forced to do his initial 3D rendering based completely on screenshots from the show. Even the scale of the device had to be guessed, as it’s usually only seen being held in a crew member’s hand. In the end he reasoned it’s probably supposed to be about the size of a large smartphone.

Not content with just a static prop, [John] managed to integrate not only the spring-assisted retractable display of the scanner from the show, but also some LED backlit panels complete with a screen-accurate user interface. Judging by the internal shots of the scanner, it looks like there’s still plenty of room inside to add some more advanced electronics. The next evolution of this prop will surely be to add in a microcontroller and potentially even a real screen to add some more elaborate effects and (relatively) practical functions.

We’ve seen plenty of impressive builds of Star Trek gadgets, arguably bringing the devices much closer to reality than the original show runners ever did. It will be interesting to see if The Orville inspires a new generation of engineers to bring their favorite fictional pieces of kit into the real world.

Filter Your Pi And Be A Responsible Pirate

At this point it’s pretty well-known that you can tack a long wire to the Raspberry Pi’s GPIO, install some software, and you’ve got yourself the worlds easiest pirate FM radio station. We say that it’s a “pirate” station because, despite being ridiculously easy to do, broadcasting on these frequencies without a license is illegal. Even if you had a license, the Raspberry Pi with a dangling bit of wire will be spewing out all kinds of unintentional noise, making it a no-go for any legitimate purposes.

Unfiltered output of Pi broadcasting on 107.3 MHz

In an effort to address that issue, [Naich] has written up a couple posts on his blog which not only discuss why the Pi is such a poor transmitter, but shows how you can build a filter to help improve the situation. You’ll still be a lawless pirate if you’re transmitting on FM stations with your Pi, but you won’t be a filthy lawless pirate.

In the first post, [Naich] shows us exactly what’s coming out of the wire antenna when the Pi is broadcasting some tunes on the default 107.3 MHz, and it ain’t pretty. The Pi is blasting out signals up and down the spectrum from 50 MHz to 800 MHz, and incredibly, these harmonics are in some cases stronger than the intentional broadcast. Definitely not an ideal transmitter.

[Naich] then goes on to show how you can build a DIY filter “hat” for the Pi that not only cuts down a lot of the undesirable chatter, but even boosts the intended signal a bit. The design is surprisingly simple, only costs a few bucks in components, and conveniently is powered directly from the Pi’s GPIO. It even gives you a proper antenna jack instead of a bare wire wound around a header pin.

We’ve seen plenty of projects utilizing the Raspberry Pi FM transmission hack, and while this mod still doesn’t make it perfect, it’s always nice to see an awesome hack made even better.

The Lichtspiel: Not A Simple Child’s Toy.

For his niece’s second birthday, [Stefan] wondered what a toddler would enjoy the most? As it turns out, a box packed with lights, dials and other gadgets to engage and entertain.

For little Alma’s enjoyment, three potentionmeters control a central LED, a row of buttons toggle a paired row of more lights, a rotary encoder to scroll the light pattern of said row left and right, and some sockets to plug a cable into for further lighting effects. Quite a lot to handle, so [Stefan] whipped up a prototype using an Arduino — although he went with an ATmega 328 for the final project — building each part of the project on separate boards and connected with ribbon cables to make any future modifications easier.

[Stefan] attempted to integrate a battery — keeping the Lichtspiel untethered for ease of use — and including a standby feature to preserve battery life. A power bank seemed like a good option to meet the LED’s needed 5V, but whenever the Lichtspiel switched to standby, the power bank would shut off entirely — necessitating the removal of the front plate to disconnect and reconnect the battery every time. The simpler solution was to scrap the idea entirely and use the charging port as a power port instead — much to the delight of his niece who apparently loves plugging it in.

Continue reading “The Lichtspiel: Not A Simple Child’s Toy.”

Rotating Lithophane Box Turns With Time

If you wanted to make a rotating display box, what would you use to make it spin? A servo? A stepper motor? [ChrisN219] didn’t need his to move quickly by any means, and this opened up his options to something we probably wouldn’t have thought to use: a clock movement. Specifically, the hour minute part of the shaft.

Rotating lithophanes of your loved ones makes for a pretty cool project, and there isn’t a whole lot to this build to make it difficult. Much of it is 3D printed, including the tube in the center that the LED strip is wrapped around. The base is just big enough to hold the clock movement and the LED strip controller, so it would fit nicely on a desk or a mantel.

This is version two of [Chris]’ lithophane box, which gave him a chance to perfect the frame and design a thicker center post to withstand the heat from the LED strip. All the files are available if you want to print your own panels and take them for a spin. Since it’s so easy to change them out, you may end up with a big pile to choose from.

A Gif-Playing Top Hat For FRC 2018!

In gearing up to mentor a team at the 2018 FIRST Robotics Competition, redditor [dd0626] wanted to do something cool that resonated with this year’s 8-bit gaming theme. Over the course of a few days, they transformed a top hat into a thematically encapsulating marquee: a LED matrix display loaded with gifs!

The display is actually a sleeve — made from shipping foam, a pillow case, and an old t-shirt — that fits over the hat, leaving it intact and wearable for future events. A Teensy3.6 displays the gifs on four WS2812 16×16 RGB LED matrices, and while a sheer black fabric diffuses the light, it’s still best viewed from several feet away. This is decidedly not intended to be a stealthy hat display.

To mitigate current draw, [dd0626] is using a 5V 30A DC/DC converter and keeping the brightness at a minimum — otherwise, each panel can pull up to 15A! To offset any dip in performance, they’ve bundled in a massive 22,400mAh, 24V battery pack to keep the hat running for a while. Despite all the hardware, the hat weighs under two pounds — eminently wearable for a long day of competition. Continue reading “A Gif-Playing Top Hat For FRC 2018!”