Behold The Crimson Axlef*cker (Do Not Insert Finger)

Are your aluminum extrusions too straight? The Crimson Axlef*cker can help you out. It’s a remarkable 3D printed, 4-stage, 125:1 reduction gearbox driven by a brushless motor. Designer [jlittle988] decided to test an early prototype to destruction and while he was expecting something to break, he didn’t expect it to twist the 2020 aluminum extrusion shaft before it did. We suppose the name kind of stuck after that.

Internals of the first prototype, shaft of BLDC motor just visible at top. Twisted 2020 extrusion output shaft at bottom right.

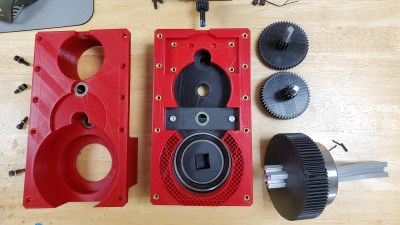
[jlittle988] has been documenting the build progress on reddit, and recently posted a fascinating video (embedded below) of the revised gearbox twisting the output shaft even further. He’s a bit coy about the big picture, saying only that the unit is part of a larger project. In fact, despite the showy tests, his goal is not to simply obtain maximum torque. We can only speculate on what his bigger project is, but in the meantime, seeing the gearbox results is some good clean fun. He first announced the gearbox test results here, and swiftly followed it up with some revisions, then the aforementioned video. There’s also an image gallery of the internals, so check that out.

The Crimson Axlef*cker is driven by an ODrive brushless dual-shaft motor and an ODrive controller as well; that’s the same ODrive whose open source motor controller design impressed us so much in the past.

Between projects like this one and other gearboxes like this cycloidal drive, it’s clear that custom gearbox design is yet another door that 3D printing has thrown wide open, allowing hobbyists to push developments that wouldn’t have been feasible even just a few years earlier.

Continue reading “Behold The Crimson Axlef*cker (Do Not Insert Finger)”

Echos Of The Cold War: Nuclear-Powered Missiles Have Been Tried Before

On August 8th, an experimental nuclear device exploded at a military test facility in Nyonoksa, Russia. Thirty kilometers away, radiation levels in the city of Severodvinsk reportedly peaked at twenty times normal levels for the span of a few hours. Rumors began circulating about the severity of the event, and conflicting reports regarding forced evacuations of residents from nearby villages had some media outlets drawing comparisons with the Soviet Union’s handling of the Chernobyl disaster.

Today, there remain more questions than answers surrounding what happened at the Nyonoksa facility. It’s still unclear how many people were killed or injured in the explosion, or what the next steps are for the Russian government in terms of environmental cleanup at the coastal site. The exceptionally vague explanation given by state nuclear agency Rosatom saying that the explosion “occurred during the period of work related to the engineering and technical support of isotopic power sources in a liquid propulsion system”, has done little to assuage concerns.

The consensus of global intelligence agencies is that the test was likely part of Russia’s program to develop the 9M730 Burevestnik nuclear-powered cruise missile. Better known by its NATO designation SSC-X-9 Skyfall, the missile is said to offer virtually unlimited flight range and endurance. In theory the missile could remain airborne indefinitely, ready to divert to its intended target at a moment’s notice. An effectively unlimited range also means it could take whatever unpredictable or circuitous route necessary to best avoid the air defenses of the target nation. All while traveling at near-hypersonic speeds that make interception exceptionally difficult.

Such incredible claims might sound like saber rattling, or perhaps even something out of science fiction. But in reality, the basic technology for a nuclear-powered missile was developed and successfully tested nearly sixty years ago. Let’s take a look at this relic of the Cold War, and find out how Russia may be working to resolve some of the issues that lead to it being abandoned. Continue reading “Echos Of The Cold War: Nuclear-Powered Missiles Have Been Tried Before”

Putting The Coanda Effect To Work On A Quadcopter

The Coanda effect is an aerodynamic principle regarding the way fluids tend to flow along curved surfaces. This can be used to direct a flow, and [Tom Stanton] wanted to try out its application on a quadcopter. (Video embedded below.)

The project began by firing up the 3D printer, which made experimenting with a variety of different aerodynamic forms easy. Wishing to avoid simply putting a large obstruction in the way of an otherwise efficient propeller, the experiment first used impellers to direct flow sideways, over the edge of the Coanda domes. The impellers, combined with the Coanda domes, were a factor of 5 less efficient at generating thrust compared to a standard prop setup, but [Tom] persevered.

In testing, the drone was unable to fly outside of ground effect, with its weight exceeding its maximum thrust. However, [Tom] noted that the Coanda domes helped create a cushion of air when flying in this ground effect region that was far more than experienced with a typical prop drone.

Wanting some further success, [Tom] then replaced the impellers with standard drone props. This greatly improved performance, with the drone now able to fly out of ground effect and use far less power. However, its performance was still worse than a standard drone without Coanda domes fitted. [Tom] suspects that this is due to the weight penalty most of all.

While it’s unlikely you’ll see Coanda effect drones going mainstream anytime soon, [Tom]’s project goes to show that you can perform viable aerodynamic research at home with little more than a 3D printer and a fog machine. There’s plenty more fun you can have with the Coanda effect, too. Video after the break.

Continue reading “Putting The Coanda Effect To Work On A Quadcopter”

Game On With These Open Source Arduino Buzzers

Planning a game of Hacker Jeopardy at your next meetup? You’re going to want some proper buzzers to complete the experience, but why buy when you can build? [Flute Systems] has released an open source DIY game buzzer system based on the Arduino that will help instantly elevate your game. Certainly beats just yelling across the room.

The design has been made to be as easily replicable as possible: as long as you’ve got access to a 3D printer to run off the enclosures for the buzzers and base station, you’ll be able to follow along no problem. The rest of the project consists of modular components put together with jumper wires and scraps of perfboard. Granted it might not be the most elegant solution, but there’s something to be said for projects that beginners and old salts alike can complete.

Each buzzer consists of an Arduino Pro Mini 3.3 V, a nRF24L01, and of course a big pushbutton on the top. Each one is powered by a 110 mAh 3.7 V LiPo battery, though [Flute Systems] notes that the current version of the buzzer can’t actually recharge it. You’ll need to pull the pack out and charge it manually once and awhile. Thankfully, the printed enclosure features a very clever twist-lock mechanism which makes it easy to open anytime you need to poke at the internals.

The base station uses the 5 V version of the Pro Mini, with a Adafruit PowerBoost 1000C to step up the voltage from its 2,000 mAh battery. Of course it also has a nRF24L01, and also adds a buzzer and twin four digit seven-segment LED displays. [Flute Systems] says you can expect about five hours of runtime for the base station.

An especially nice feature of this setup is that the eight digit display allows the base station to show the number of each button in the order it was received. So rather than just getting a display of who buzzed in first, you can see the chronological order in which all eight buttons were pressed. Coming up with clever applications for this capability is left as an exercise for the reader.

Of course, there’s more than one way to build a buzzer. If you don’t like the way [Flute Systems] did it, then check out this version that uses 900 MHz radios and an OLED to show the results.

Fail Of The Week: How Not To Light Pipe

You’d think that something made out of glass and epoxy would transmit a decent amount of light. Unfortunately for [Jeremy Ruhland], it turns out that FR4 is not great light pipe material, at least in one dimension.

The backstory on this has to do with #badgelife, where it has become popular to reverse mount SMD LEDs on areas of PCBs that are devoid of masking, allowing the light to shine through with a warm, diffuse glow – we’ve even featured a through-PCB word clock that uses a similar technique to wonderful effect. [Jeremy]’s idea was to use 0603 SMD LEDs mounted inside non-plated through-holes to illuminate the interior of the board edgewise. It seems like a great idea, almost like the diffusers used to illuminate flat displays from the edge.

Sadly, the light from [Jeremy]’s LEDs just didn’t make it very far into the FR4 before being absorbed – about 15 mm max. That makes for an underwhelming appearance, but all is certainly not lost. Valuable lessons about PCB design were had, like exactly how to get a fab to understand what you’re trying to do with non-plated holes and why you want to fence the entire edge of the board in vias. But best of all, [Jeremy] explored what’s possible with Oreo construction, and came away with ideas for other uses of the method. That counts as a win in our book.

A Friendly Reminder That You Might Be In Danger

Product recalls are one of those things that most people don’t pay attention to until things get really bad. If it’s serious enough for somebody to get hurt or even die, then the media will pick it up, but most of the time they simply pass by in silence. In fact, there’s a decent chance that you own a recalled product and don’t even know it. After all, it’s not like anyone is actually watching the latest product recalls in real-time.

Well actually, there might be one guy. [Andrew Kleindolph] has created a cute and cuddly gadget using CircuitPython on the Adafruit PyPortal to display the latest release from the United States Consumer Product Safety Commission (USCPSC). In a wonderfully ironic touch, the child’s unicorn boot that the device lives in is itself a recalled product; apparently kids could pull off the “horn” and choke on it.

The PyPortal is basically built for this kind of thing, allowing you to easily whip up a display that will scrape data from whatever online source you’re willing to write the code for. All [Andrew] had to do was pair it with a battery so the boot could go mobile occasionally (we’re told they’re made for walkin’), and design some 3D printed accoutrements such as a screen bezel and charging port.

As these recalls (thankfully) don’t come out quite so fast that you need it to update more than once or twice a week, it seems like this could also be an excellent application for an Internet-connected e-ink display.

DIY Geiger Counter Is Sure To Generate Clicks

On the outside, a Geiger counter seems like a complicated thing. And you might think a device that detects a dangerous, mostly invisible threat like radiation should be complicated. But they’re actually pretty simple. The Geiger-Muller tube does most of the work, which boils down to detecting brief moments of conductivity caused by chain reactions of charged particles in radioactive materials.

[Prabhat_] wanted to build a unique-looking Geiger counter, and we’d say that this slick, Star Trek-esque result succeeds. A well-organized display shows the effective dose rate, counts per minute, and cumulative dose, which can be displayed in either microsieverts or millirems. We dig the 3D printed case design, because we like to see form follow function.

The counter is powered by an 18650 cell that’s DC-to-DC boosted to 400+ volts. A NodeMCU processes the signal coming in from the G-M tube and expresses it in both clicks and LED blinks, both of which can be toggled on or off from the home screen. The alert threshold can be customized in the settings, which means the point at which green changes to red.

Click-click-click past the break for [prabhat_]’s great walk-through video, where he tests it with uranium ore and a thoriated gas lantern mantle.

If you want to take the opposite approach and get to clicking ASAP, well, fire up your hot glue gun and dump out your scrap bin.

Continue reading “DIY Geiger Counter Is Sure To Generate Clicks”