Rebuilding The First Vocal Encryption System

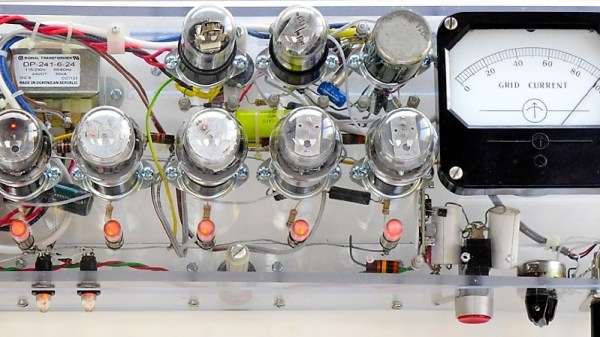
Back in the early days of radio, it was quickly apparent that the technology would revolutionize warfare, but only if some way could be found to prevent enemies from hearing what was said. During World War II, the Allies put a considerable amount of effort into securing vocal transmissions, resulting in a system called SIGSALY – 50 tons of gear developed by Bell Laboratories with the help of Alan Turing that successfully secured communications between the likes of Churchill and Roosevelt during the war.

Now, a small piece of the SIGSALY system lives again, in the form of a period-faithful reproduction of the vocal quantizer used in the system. It’s the work of [Jon D. Paul], who undertook the build to better understand how the SIGSALY system worked. [Jon] also wanted to honor the original builders, who developed a surprisingly sophisticated system given the technology of the day.

SIGSALY was seriously Top Secret in the day, and most of the documentation was destroyed when the system was decommissioned. Working from scant information, [Jon] was able to recreate the quantizer from period parts, including five vintage VT-109/2051 thyratrons scrounged from eBay. The vacuum tubes are similar in operation to silicon-controlled rectifiers (SCRs) and form the core of the ADC, along with a resistor divider ladder network. Almost every component is period correct, and everything is housed in a nice acrylic case. It’s a beautiful piece of work and a great homage to a nearly forgotten piece of cryptographic history.

Interestingly, Bell Labs had a bit of a head start on the technology that went into SIGSALY, by virtue of their work on the first voice synthesizer in the 1930s.

Continue reading “Rebuilding The First Vocal Encryption System”

The Voice Of Dave, Now In Toy Form

Dave Jones is something of a celebrity in the hacker and maker communities, bringing his considerable knowledge and experience to bear on a wide variety of electronic and engineering topics. His unique voice and candor have endeared him to many, and he’s one of the more quotable YouTubers currently on the scene. With that in mind, [Andrei Aldea] decided to build a Speak ‘n’ Say in his honor.

The build was inspired by an earlier effort by [Ben Heck]. [Andrei] started by disassembling the Speak ‘n’ Say, and determined that there was a simple button matrix that would allow the toy’s position to be read easily. These buttons were wired into an Arduino Nano, which then reads an SD card and plays sound samples using the MP3 Module from DFR Robot.

[Andrei] made sure the toy was replete with custom graphics, which complete the look. Additionally, each Dave quote on the board has a series of soundbites, chosen randomly by the Arduino, giving a little more variety than the original toy.

It’s a fun build, and we’d love to see a version with line-out or some bigger speakers to blast the Gospel of Dave at a truly impressive volume. We’ve seen other speaking Arduinos, too – like this imposing HAL build. Video after the break.

Continue reading “The Voice Of Dave, Now In Toy Form”

WiFi Controlled Finger

WiFi Controlled Finger Dims Lights Over UDP

While WiFi controlled lights are readily available, replacing your lighting fixtures or switches isn’t always an option. [Thomas] ran into this issue with his office lights. For the developers in the office, these lights always seemed to run a little too bright. The solution? A 3D printed, WiFi controlled finger to poke the dimmer switch.

This little hack consists of a servo, a 3D printed arm and finger assembly, and a Wemos D1 Mini development board. The Wemos is a low cost, Arduino compatible development board based on the ESP8266. We’ve seen it used for a wide variety of hacks here on Hackaday.

For this device, the Wemos is used to listen for UDP packets on the company’s WiFi network. When it receives a packet, it tells the servo to push the dimming button for a specified amount of time. [Thomas] wrote a Slack bot to automatically send these packets. Now, when the lights are too bright, a simple message to the bot allows anyone to dim the lights without ever leaving the comfort of their desk. Sure, it’s not the most secure or reliable method of controlling lights, but if something goes wrong, the user can always get up and flip the switch the old fashioned way.

Arduino And The Other Kind Of Homebrew

Usually, when we are talking about homebrew around here, we mean building your own equipment. However, most other people probably mean brewing beer, something that’s become increasingly popular as one goes from microbreweries to home kitchen breweries. People have been making beer for centuries so you can imagine it doesn’t take sophisticated equipment, but a little automation can go a long way to making it easier. When [LeapingLamb] made a batch using only a cooler, a stock pot, and a propane burner, he knew he had to do something better. That’s how Brew|LOGIC was born.

There are many ways to make beer, but Brew|LOGIC focuses on a single vessel process and [LeapingLamb] mentions that the system is akin to a sous vide cooker, keeping the contents of the pot at a specific temperature.

Honestly, though, we think he’s selling himself a bit short. The system has a remote application for control and is well-constructed. This isn’t just a temperature controller thrown into a pot. There’s also a pump for recirculation.

The common stock pot gets some serious modifications to hold the heating element and temperature probe. It also gets some spring-loaded clamps to hold the lid down. Expect to do a lot of drilling.

The electronics uses an Arduino, a Bluetooth board, and some relays (including a solid state relay). The finished system can brew between 5 and 15 gallons of beer at a time. While the system seems pretty good to us, he did list some ideas he has for future expansion, including valves, sensors for water level and specific gravity, and some software changes.

After reading that the system was similar to a sous vide cooker, we wondered if you could use a standard one. Turns out, you can. If you want to make better beer without electronic hacking, there’s always the genetic kind.

Sorter Uses Cardboard To Organize Card Hoard

If you collect trading cards of any kind, you know that storage quickly becomes an issue. Just ask [theguymasamato]. He used to be really into trading cards, and got back into it when his kids caught the bug. Now he’s sitting on 10,000+ cards that are largely unorganized except for a few that made it into sleeve pages.  They tried to go through them by hand, but only ended up frustrated and overwhelmed. Then he found out about [Michael Portera]’s Pi-powered LEGO card sorter and got all fired up to build a three-part system that feeds cards in one by one, scans them, and sorts them into one of 22 meticulously-constructed cardboard boxes.

[theguymasamato]’s card sorter is the last stop for a card after the feeder has fed it in from the pile and the scanner has scanned it. The sorter lazy Susans around on a thrust bearing, which is driven by a 3D printed drive wheel attached to a stepper. The stepper is controlled with an Arduino.

Here’s where it gets crazy: the drive wheel and timing belt are made from the flutes of corrugated cardboard. As in, he used that wavy bit in the middle as gear teeth. Every one of those cardboard teeth is fortified with wood glue, a time-consuming process he vows to never repeat. Instead, [theguymasamato] recommends using shims to shore them up as he did in the card feeder. The whole thing was originally going to be made from cardboard. It proved to be too mushy to support the thrust bearing, so [theguymasamato] switched to MDF.

Right now, the sorter is homed via button press, but future plans for the device include an IR break beam switch. We’re excited for the scanner and can’t wait to see the whole system put together. While [theguymasamato] works on that, position yourself past the break to watch the build video.

Continue reading “Sorter Uses Cardboard To Organize Card Hoard”

3D Printed Microscope Stage Offers Precise Movement

3D printing isn’t something you would usually associate with a high precision device, but this one shows that it can be used to create rather intricate things when needed. The Openflexure is a microscope stage that offers a mechanical stage that can be maneuvered precisely. The optics can be swapped out so it uses anything from a webcam to a very high-powered 100x magnification lens, but still move the stage smoothly and precisely. It can be driven by turning a knob or by three small motors. The plan is that the motors will eventually be driven by the software that is being written for the device.

Continue reading “3D Printed Microscope Stage Offers Precise Movement”

7-Segment Display Is 3D Printed And Hand Cranked

[Peter Lehnér] has designed a brilliant 7-segment flip-segment display that doesn’t really flip. In fact, it doesn’t use electromagnets at all. This one is 3D printed and hand cranked. It’s a clever use of a cam system to set the segments for each digit (0-9) makes it a perfect entry in the Hackaday 3D Printed Gears, Pulleys, and Cams contest.

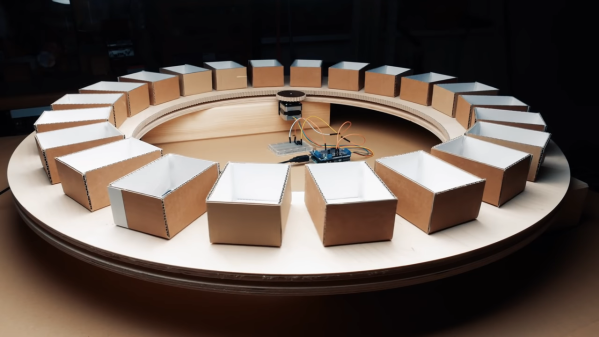
We find the nomenclature of these displays to be a bit confusing so let’s do a quick rundown. You may be most familiar with flip-dot displays, basically a dot-matrix grid of physical pixels that are black on one side and brightly colored (usually chartreuse) on the other. We saw a giant flip-dot display at CES four years ago. Akin to flip-dots are flip-segment displays which do the same thing but with segments of a digit rather than dots. We featured a 3D printed version of these last week. The common aspect of most flip displays is an electromagnet used to change the state of the dot or segment.

The version [Peter] designed gets rid of the magnets and coils, replacing them with mechanical logic instead. Each segment sits in a track on the frame of the digit. When slid to one position it is hidden by the bezel, in the other position it slides into view. A cleverly designed set of cams move the segments at each of 10 positions. The animated graphic here shows three cams which are responsible for moving just two of the segments. More cams are added to complete assembly, a process shown in the second half of the demo video found below.

We’re delighted to see this as an entry in the contest and can’t wait to see what kind of gear, cam, or pully scheme is built into your projects!

Continue reading “7-Segment Display Is 3D Printed And Hand Cranked”