Sharpie Mount Brings Some Color To Your 3D Prints

The average cost of a desktop 3D printer has dropped like a stone over the last few years. They went from a piece of equipment you had to wait your turn to use at the hackerspace to something you can pick up on Prime Day, which has definitely been a good thing for our community. But to get the price down, these printers are almost exclusively running single extruder setups with no provision for multi-material printing other than swapping the filament manually.

From a practical standpoint, that’s not much of a problem. But wanting to add a little visual flair to his prints, [Devin Montes] came up with a simple 3D printed mount that holds the tip of up to three Sharpie permanent markers against the filament as it enters the top of the extruder. When used with white or translucent filaments, these markers can give the final print an interesting splash of color. Obviously it’s not true multi-color 3D printing, but it can certainly make for some attractive decorative objects.

The mount is designed for the Snapmaker 3-in-1 3D printer, which is relatively well suited to such a contraption as it has a direct drive extruder and there’s plenty of clearance for the markers to stick up. The concept could certainly be adapted to other printers, but it might be a little trickier in the case of a Bowden extruder or an i3 clone that has frame components running over the top. It sounds like [Devin] is working on a generic version of the marker holder that can work on other printers, so it should be interesting to see how he addresses these issues.

Technically this isn’t a new concept, as makers were pulling off similar tricks back in the earliest days of desktop 3D printing. But this is an especially well-implemented version of the idea, and if [Devin] can really come up with a mount that will work on a wider array of hardware, we could certainly see it becoming a popular way to make printed projects a bit more exciting.

Raspberry PI 4 Now Supported By Risc OS In Latest Update

Students of ARM history will know that the origins of the wildly popular processor architecture lie in the British computer manufacturer Acorn (the original “A” in “ARM”). The first mass-market ARM-based products were their Archimedes line of desktop computers. A RISC-based computer in a school or home was significantly ahead of the curve in the mid 1980s and there was no off-the-shelf software, so alongside the new chips came a new operating system that would eventually bear the name Risc OS.

It’s since become one of those unexpected pieces of retrocomputing history that refuses to die, and remains in active development with a new version 5.28 of its open-source variant just released. Best of all, after supporting the Raspberry Pi since the earliest boards, it now runs on a Raspberry Pi 4. The original ARM operating system has very much kept up with the times, and can now benefit from the extra power of the latest hardware from Cambridge. The new release deals with a host of bugs, as well as bringing speed increases, security fixes, and other improvements. For those whose first experience of a GUI came via the Archimedes in British schools, the news that the built-in Paint package has received a thorough update will bring a smile.

The attraction of Risc OS aside from its history and speed lies in its being understandable in operation for those wishing to learn about how an OS works under the hood. It’s likely that for most of us it won’t replace our desktops any time soon, but it remains an interesting diversion to download and explore. If you’d like to read more about early ARM history then we’d like to point you at our piece on Sophie Wilson, the originator of the ARM architecture.

Hackaday Links Column Banner

Hackaday Links: November 1, 2020

We normally chuckle at high-profile auctions where people compete to pay as much as possible for items they clearly don’t need. It’s easy to laugh when the items on the block are things like paint-spattered canvases, but every once in a while some genuine bit of history that really piques our interest goes on sale. Such is the case with what is claimed to be an original Steve Wozniak-built Blue Box, going on sale November 5. The prospectus has an excellent summary of the history of the “Two Steves” and their early business venture making and selling these devices to Berkeley students eager to make free long distance phone calls. The item on sale is a very early rev, most likely assembled by Woz himself. The current owner claims to have bought it from Woz himself in the summer of 1972 while on a roadtrip from Sunnyvale to Los Angeles. Estimated to go for $4,000 to $6,000, we really hope this ends up in a museum somewhere — while we’ve seen attempts to recreate Woz’s Blue Box on Hackaday.io, letting a museum study an original would be a great glimpse into our shared technological history.

Not in the market for old tech? No problem — Digilent wants to get rid of 3,000 PCBs, and quickly. They posted the unusual offer on reddit a couple of days ago; it seems they have a huge stock of populated boards for a product that didn’t quite take the market by storm. Their intention is likely not to flood the market with scopes cobbled together from these boards, but rather to make them available to someone doing some kind of art installation or for educational purposes. It’s a nice gesture, and a decent attempt to keep these out of the e-waste stream, so check it out if you have a need.

Speaking of PCBs, SparkFun has just launched an interesting new service: SparkFun À La Carte. The idea is to make it really easy to design and build prototype boards. Instead of using traditional EDA software, users select different blocks from a menu. Select your processor, add components like displays and sensors, and figure out how you want to power it, and SparkFun will do the rest, delivering a fully assembled board in a few weeks. It certainly stands to suck the fun out of the design process while also hoovering up your pocketbook: “A $949 design fee will be applied to all initial orders of a design”. You can get your hands on the design files, but that comes with an extra fee: “they can be purchased separately for $150 by filling out this form”. But for someone who just needs to hammer out a quick design and get on with the next job, this could be a valuable tool.

Another day, another IoT ghost: Reciva Radio is shutting down its internet radio service. A large banner at the top of the page warns that the “website will be withdrawn” on January 31, 2021, but functionality on the site already appears limited. Users of the service are also reporting that their Reciva-compatible radios are refusing to stream content, apparently because they can’t download anything from the service’s back end. This probably doesn’t have a huge impact — I’d never heard of Reciva before — but it makes me look at the Squeezebox radio we’ve got in the kitchen and wonder how long for the world that thing is. It’s not all bad news, though — owners of the bricked radios will now have a great opportunity to hack them back into usefulness.

By the time this article is published, Halloween will be history and the hordes of cosplaying candy-grubbers who served as welcome if ironic respite from this non-stop horror show of a year will be gone. Luckily, though, if it should come to pass that the dead rise from their graves — it’s still 2020, after all — we’ll know exactly how to defeat them with this zombie invasion calculator. You may remember that last year Dominik Czernia did something similar, albeit with vampires. Switching things up from the hemophagic to the cerebrophagic this year, his calculator lets you model different parameters, like undead conversion percentage, zombie demographics, and attack speed. You’ve also got tools for modeling the response of the living to the outbreak, to see how best to fight back. Spoiler alert: everyone will need to bring Tallahassee-level badassery if we’re going to get through this.

Bodge Wire Saves A Vintage Mac SE/30 From The Heap

Anyone who pokes around old electronics knows that age is not kind to capacitors. If you’ve got a gadget with a few decades on the clock, there’s an excellent chance that some of its capacitors are either on the verge of failure or have already given up the ghost. Preemptively swapping them out is common in retrocomputing circles, but what do you do if your precious computer has already fallen victim to a troublesome electrolytic?

That’s the situation that [Ronan Gaillard] recently found himself in when he booted up his Mac SE/30 and was greeted with a zebra-like pattern on the screen. The collected wisdom of the Internet told him that some bad caps were almost certainly to blame, though a visual inspection failed to turn up anything too suspicious. Knowing the clock was ticking either way, he replaced all the capacitors on the Mac’s board and gave the whole thing a good cleaning.

Unfortunately, nothing changed. This caught [Ronan] a bit by surprise, and he took another trip down the rabbit hole to try and find more information. Armed with schematics for the machine, he started manually checking the continuity of all the traces between the ROM and CPU. But again, he came up empty handed. He continued the process for the RAM and Glue Chip, and eventually discovered that trace A24 wasn’t connected. Following the course it took across the board, he realized it ran right under the C11 axial capacitor he’d replaced earlier.

Suddenly, it all made sense. The capacitor must have leaked, corroded the trace underneath in a nearly imperceptible way, and cut off a vital link between the computer’s components. To confirm his suspicions, [Ronan] used a bodge wire to connect both ends of A24, which brought the 30+ year old computer roaring back to life. Well, not so much a roar since it turns out the floppy drive was also shot…but that’s a fix for another day.

It seems like every hardware hacker has a bad capacitor story. From vintage portable typewriters to the lowly home router, these little devils and the damage they can do should always be one of the first things you check if a piece of hardware is acting up.

Brassy, Classy WiFi Clock Shows Weather, Too

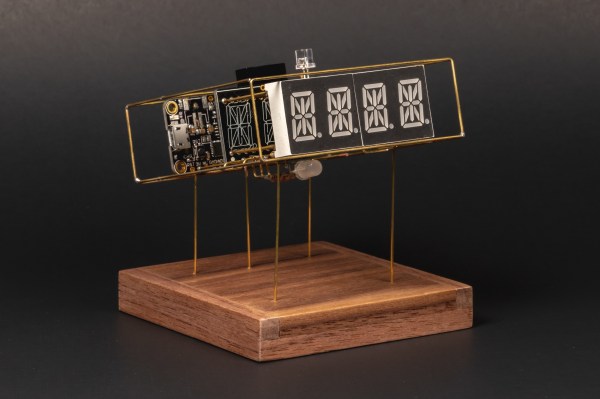
Circuit sculpture is a great way to elevate your soldering and electronics skills to the realm of three-dimensional art. In this case, art can be practical, too. Take [romaindurocher]’s interactive WiFi clock for example. Left alone, the clock cycles through showing the time, temperature, and if applicable, the precipitation forecast.

But [romain] doesn’t have to watch and wait for the info they want. Thanks to an IR proximity sensor, [romain] can interrupt the cycle and get the date, time, temperature, or even a smiley animation depending on the number of hand passes over the sensor. The clock itself is based on an Adafruit Feather HUZZAH ESP8266 and a Featherwing display. It uses the OpenWeather API to retrieve all the information.

We really like the way this looks, and the angle reminds us of oscilloscopes and other lab equipment. If you want to make your own version, this project is wide open, though the hardest part would be making it look as clean as [romain] did. Take a second and check out the brief demo after the break. It’s a wonderful entry in our Circuit Sculpture Challenge which is accepting entries for ten more days.

Not so much into straight lines and utility? Circuit sculpture takes many forms, some of them human.

Continue reading “Brassy, Classy WiFi Clock Shows Weather, Too”

Flexible Actuators Spring Into Action

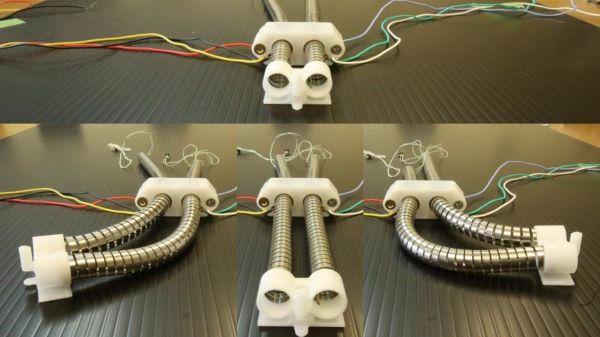
Most experiments in flexible robot actuators are based around pneumatics, but [Ayato Kanada] and [Tomoaki Mashimo] has been working on using a coiled spring as the moving component of a linear actuator. Named the flexible ultrasonic motor (FUSM), [Yunosuke Sato] built on top of their work and assembled a pair of FUSM into a closed-loop actuator with motion control in two dimensions.

A single FUSM is pretty interesting by itself, its coiled spring is the only mechanical moving part. An earlier paper published by [Kanada] and [Mashimo] laid out how to push the spring through a hole in a metal block acting as the stator of this motor. Piezoelectric devices attached to that block minutely distorts it in a controlled manner resulting in linear motion of the spring.

For closed-loop feedback, electrical resistance from the free end of the spring to the stator block can be measured and converted to linear distance to within a few millimeters. However, the acting end of the spring might be deformed via stretching or bending, which made calculating its actual position difficult. Accounting for such deformation is a future topic for this group of researchers.

This work was presented at IROS2020 which like many other conferences this year, moved online and became IROS On-Demand. After a no-cost online registration we can watch the 12-minute recorded presentation on this project or any other at the conference. The video includes gems such as an exaggerated animation of stator block deformation to illustrate how a FUSM works, and an example of the position calculation challenge where the intended circular motion actually resulted in an oval.

Speaking of conferences that have moved online, we have our own Hackaday Remoticon coming up soon!

Continue reading “Flexible Actuators Spring Into Action”

Big Workshop Clock Is 3D Printing Done Right

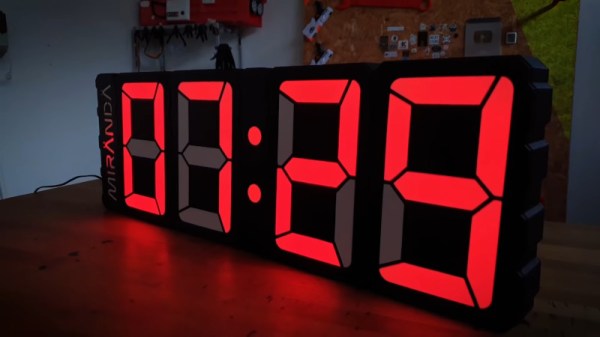
Time is something uniquely important to humans, and they remain the only creatures on the planet to build devices to regularly track its progress. [Ivan Miranda] is one such creature, and built a giant 7-segment clock for his workshop that really ties the room together.

The clock is a testament to [Ivan]’s design skills in the 3D printed space. Taking advantage of his large format printer, each segment consists of a front panel, large single-piece diffuser, LED carrier, and backing plate. There are plenty of nice touches, from the interlocking ridges between each digit, to integral printed arrows on the inside that guide installation of the LED strips. Fit and finish approaches the level of a commercial product, a reward for [Ivan]’s years of practice in the field.

Electronically, an ESP8266 runs the show, synchronizing the time over its in-built WiFi connection. Each segment contains 9 WS2812B LEDs, wired up in a single long strip that’s addressed by the microcontroller. This means that the segments can be lit up to any color of the rainbow, though [Ivan] is a man who best appreciates the look of classic red.

[Ivan]’s long been a proponent of big 3D-printed builds — his tank-tracked electric skateboard is a particularly good example. Video after the break.

Continue reading “Big Workshop Clock Is 3D Printing Done Right”