First Space Cookies: Cosmic Cooking Is Half-Baked

For decades, astronauts have been forced to endure space-friendly MREs and dehydrated foodstuffs, though we understand both the quality and the options have increased with time. But if we’re serious about long-term space travel, colonizing Mars, or actually having a restaurant at the end of the universe, the ability to bake and cook from raw ingredients will become necessary. This zero-gravity culinary adventure might as well start with a delicious experiment, and what better than chocolate chip cookies for the maiden voyage?
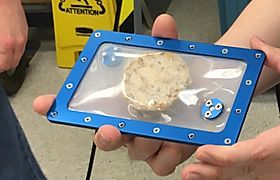
That little filtered vent lets steam out and keeps crumbs in. Image via Zero-G Kitchen

The vessel in question is the Zero-G Oven, built in a collaboration between Zero-G Kitchen and Nanoracks, a Texas-based company that provides commercial access to space. In November 2019, Nanoracks sent the Zero-G oven aloft, where it waited a few weeks for the bake-off to kick off. Five pre-formed cookie dough patties had arrived a few weeks earlier, each one sealed inside its own silicone baking pouch.

The Zero-G Oven is essentially a rack-mounted cylindrical toaster oven. It maxes out at 325 °F (163 °C), which is enough heat for Earth cookies if you can wait fifteen minutes or so. But due to factors we haven’t figured out yet, the ISS cookies took far longer to bake.

Continue reading “First Space Cookies: Cosmic Cooking Is Half-Baked”

Xbox Controller Provides Intro To SWD Hacking

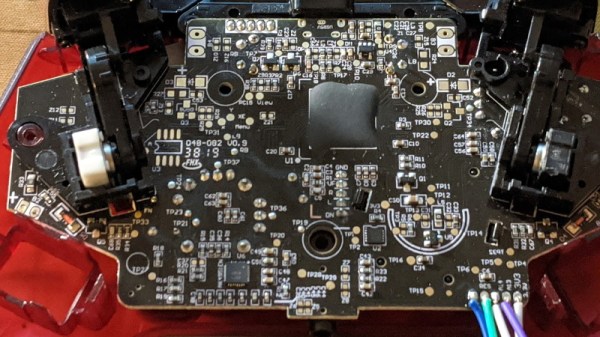
It’s amazing to see how much technology is packed into even the “simple” devices that we take for granted in modern life. Case in point, the third party Xbox controller that [wrongbaud] recently decided to tear into. Not knowing what to expect when he cracked open its crimson red case, inside he found an ARM Cortex microcontroller and a perfect excuse to play around with Serial Wire Debug (SWD).

Though even figuring out that much took a bit of work. As is depressingly common, all the interesting components on the controller’s PCB were locked away behind a black epoxy blob. He had no idea what chip was powering the controller, much less that debugging protocols it might support. But after poking around the board with his multimeter, he eventually found a few test points sitting at 3.3 V which he thought was likely some kind of a programming header. After observing that pulling the line labelled “RES” low reset the controller, he was fairly sure he’d stumbled upon a functional JTAG or SWD connection.

The Serial Wire Debug architecture.

As [wrongbaud] explains in his detailed blog post, SWD is something of a JTAG successor that’s commonly used by ARM hardware. Using just two wires (data and clock), SWD provides hardware debugging capabilities on pin constrained platforms. It allows you to step through instructions, read and write to memory, even dump the firmware and flash something new.

For the rest of the post, [wrongbaud] walks the reader through working with an SWD target. From compiling the latest version of OpenOCD and wiring an FTDI adapter to the port, all the way to navigating through the firmware and unlocking the chip so you can upload your own code.

To prove he’s completely conquered the microcontroller, he ends the post by modifying the USB descriptor strings in the firmware to change what it says when the controller is plugged into the computer. From here, it won’t take much more to get some controller macros like rapid fire implemented; a topic we imagine he’ll be covering in the future.

This post follows something of a familiar formula for [wrongbaud]. As part of his continuing adventures in hardware hacking, he finds relatively cheap consumer devices and demonstrates how they can be used as practical testbeds for reverse engineering. You might not be interested in changing the ROM that a Mortal Kombat miniature arcade cabinet plays, but learning about the tools and techniques used to do it is going to be valuable for anyone who wants to bend silicon to their will.

Classic Toy Helicopter Flies Again As DIY Version

For many of us who grew up in the 1970s, “VertiBird”, the fly-it-yourself indoor helicopter, was a toy that was begged for often enough that it eventually appeared under the Christmas tree. And more than a few of the fascinating but delicate toys were defunct by Christmas afternoon, victims of the fatal combination of exuberant play and price-point engineering. But now a DIY version of the classic toy flies again, this time with a more robust design.

To be fair to the designers at Mattel, the toy company that marketed VertiBird, the toy was pretty amazing. The plastic helicopter was powered by a motor located in the central base, which rotated a drive rod that ran through a stiff tether. Small springs in the base and at the copter acted as universal joints to transmit power to the rotor. These springs were the weak point in the design, especially the one in the base, often snapping in two.

[Luke J. Barker]’s redesign puts a tiny gear motor in the aircraft rather than in the base, something that wouldn’t have been feasible in the original. To address the problem of getting electrical power from the base to the aircraft, [Luke] eschewed an expensive slip ring and instead used a standard 3.5-mm audio jack and plug. The plug serves as an axle for the main gear in the base that powers the copter’s rotation; sadly, this version doesn’t tilt the aircraft mechanically to control backward and forward flight like the original. A pair of pots with 3D-printed levers control throttle and flight direction through an Arduino; see it in action in the video below.

These pages abound with rotorcraft builds, both helicopters and multirotor. We appreciate all manner of flying machines, but this one really takes us back.

Continue reading “Classic Toy Helicopter Flies Again As DIY Version”

Fake That Fireplace Flicker With Flame Bulbs

Ask anyone who’s ever tuned into Fireplace TV on a cold winter’s night — even though you can’t feel the heat or roast a marshmallow with it, fake fire is almost as soothing as the real thing. And if you have kids or pets, it’s a whole lot safer. But why go to the expense of buying a lighted insert when you could just make your own?

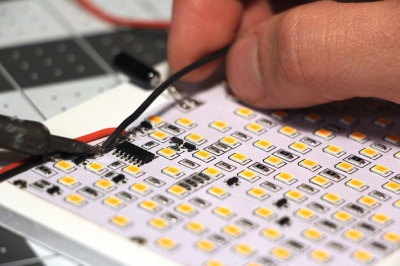
You don’t even need to get fancy with a microcontroller and RGB LEDs, either — just do what [Ham-made] did and dismantle some LED flame bulbs. They already have everything you need, and the flex PCB makes them easy to work with.

[Ham-made] adhered three bulbs’ worth to a piece of foam board with double-stick tape, soldered all the leads together, and wired in a toggle switch and a 2xAA battery pack. The bulbs each had a tilt switch so that the “flames” flow upward regardless of orientation, but [Ham-made] removed those to avoid flickering connectivity and fights with the toggle switch.

Once it was all wired up, [Ham-made] hot-glued some magnets to the foam board and attached it to the underside of the grate to keep it safe from the logs and the ash pit, while still allowing the glow to emanate from the right spot for realism. The only thing missing are the crackles and pops, and [Ham-made] is burning to hear your implementation ideas.

[Ham-made] wasn’t using his fireplace in the traditional way because the house is smallish and centrally heated. But if you rely on yours to keep you warm and cozy, why not make it voice-activated?

Welcome To McDonald’s; Would You Like 3D Printing Resin With That?

University of Toronto researchers have succeeded in converting used cooking oil — from McDonald’s, no less — into high-resolution 3D printing resin. Your first response might be: “Why?”, but thinking about it there are several advantages. For one thing, waste oil is a real problem for the food industry, and thus it can be acquired rather cheaply. An even bigger benefit is that the plastic that originates from this oil is biodegradable. Their 3d-printed butterfly, of course, is made from the recycled resin.

We aren’t chemists, but apparently 3D resin has a lot in common with cooking oil already. The team used a one-step chemical process to convert one liter of McDonald’s greasiest into a little more than 400 milliliters of resin.

Continue reading “Welcome To McDonald’s; Would You Like 3D Printing Resin With That?”

Converted Car Lets Toddlers Tool Around

A few years ago, a professor at the University of Delaware started a project called Go Baby Go. It’s designed to bring fun and affordable mobility to small children with disabilities. The idea is to modify Power Wheels cars to make them easier for disabled kids to operate, and to teach as many people as possible how to do it in the process. The [South Eugene Robotics Team] is taking this a step further by replacing the steering wheel with a joystick that controls two motors with an Arduino Nano.

In the first instance you replace the foot pedal with a push button. The plans also call for a PVC frame, a high-backed seat, and a seat belt to make it safer. The end result is a fun ride the kid can control themselves that functions a lot like a power wheelchair, but is much more affordable. It has the added bonus of being a fun conversation piece for the other kids instead of a weird scary thing.

They also replace the front wheels with 5″ casters, because being able to spin around in circles is awesome. Their project shows how to do the entire conversion in great detail, starting with a standard ride-on car that comes with some assembly required. Motor past the break to check out a short demo with an extremely happy child tooling around in a fire truck.

If these kids get too wild, they’re gonna need traction control for these things.

Continue reading “Converted Car Lets Toddlers Tool Around”

Huge Seven Segment Display Made From Broken Glass

A staple of consumer devices for decades, seven segment displays are arguably one of the most recognizable electronic components out there. So it’s probably no surprise they’re cheap and easy to source for our own projects. But that doesn’t mean there isn’t room for personal interpretation.

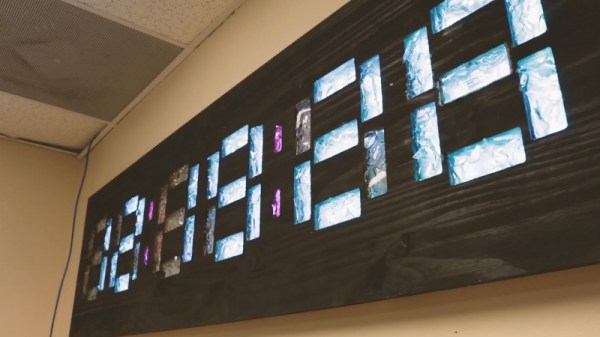
[MacCraiger] wanted to build a wall clock with the classic seven segment LED look, only his idea was to make it slightly larger than average. With RGB LED strips standing in for individual LEDs, scaling up the concept isn’t really a problem on a technical level; the tricky part is diffusing that many LEDs and achieving the orderly look of a real seven segment display.

All those segments perfectly cut out of a sheet of plywood come courtesy of a CNC router. Once the rectangles had been cut out, [MacCraiger] had to fill them with something that could soften up the light coming from the LEDs mounted behind them. He decided to break up a bunch of glass bottles into small chunks, lay them inside the segments, and then seal them in with a layer of clear epoxy. The final look is unique, almost as though the segments are blocks of ice.

At first glance the use of a Raspberry Pi Zero to control the LED strips might seem overkill, but as it turns out, [MacCraiger] has actually added in quite a bit of extra functionality. The purists might say it still could have been done with an ESP8266, but being able to toss some Python scripts on the Linux computer inside your clock certainly has its appeal.

The big feature is interoperability with Amazon’s Alexa. Once he tells the digital home assistant to set an alarm, the clock will switch over to a countdown display complete with digits that change color as the timer nears zero. He’s also written some code that slowly shifts the colors of the digits towards red as the month progresses, a great way to visualize at a glance how close you are to blowing past that end of the month deadline.

We’ve seen something of a run on custom multi-segment displays recently. Just last month we saw a clock that used some incredible 25-segment LED displays, complete with their own unique take on the on epoxy-filled diffusers.

Continue reading “Huge Seven Segment Display Made From Broken Glass”