Non-Arduino Powered By A Piece Of Computing History

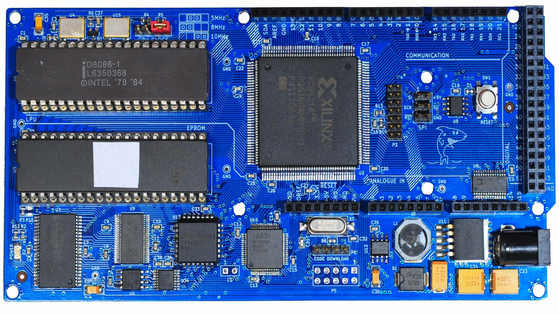
Sometimes it is a blessing to have some spare time on your hands, specially if you are a hacker with lots of ideas and skill to bring them to life. [Matt] was lucky enough to have all of that and recently completed an ambitious project 8 months in the making – a Non-Arduino powered by the giant of computing history – Intel’s 8086 processor. Luckily, [Matt] provides a link to describe what Non-Arduino actually means; it’s a board that is shield-compatible, but not Arduino IDE compatible.

He was driven by a desire to build a single board computer in the old style, specifically, one with a traditional local bus. In the early days, a System Development Kit for Intel’s emerging range of  microprocessors would have involved a fair bit of discrete hardware, and software tools which were not all too easy to use.

Back in his den, [Matt] was grappling with his own set of challenges. The 8086 is a microprocessor, not a microcontroller like the AVR, so the software side of things are quite different. He quickly found himself locking horns with complex concepts such as assembly bootstrapping routines, linker scripts, code relocation, memory maps, vectors and so on. The hardware side of things was also difficult. But his goal was learning so he did not take any short cuts along the way.

[Matt] documented his project in detail, listing out the various microprocessors that run on his 8OD board, describing the software that makes it all run, linking to the schematics and source code. There’s also an interesting section on running Soviet era (USSR) microprocessor clones on the 8OD. He is still contemplating if it is worthwhile building this board in quantities, considering it uses some not so easy to source parts. If you are interested in contributing to the project, you could get lucky. [Matt] has a few spares of the prototypes which he is willing to loan out to anyone who can can convince him that they could add some value to the project.

Continue reading “Non-Arduino Powered By A Piece Of Computing History”

Library Upgrade To PRU Gives Fast IO On Beaglebone

The BeagleBone Black has a powerful featureset: decent clock speed, analog inputs, multiple UART, SPI and I2C channels and on-board memory, to name a few. One missing feature seems to be the lack of support for the two on-board Programmable Real-time Units (PRU’s). Each of these 32-bit processors run independently of the main processor, but are able to interface with the main processor through the use of shared RAM and some interrupts. Unfortunately, PRU’s are not supported and in the absence of information, difficult to program. Enabling the PRU’s will allow them direct access to external sensors via the GPIO pins, for example. Perhaps most enticing is the idea that the PRU’s add real-time processing capability to the BBB.

[Thomas Freiherr] is working on the libpruio project to allow PRU support on the BBB. It is “designed for easy configuration and data handling at high speed. libpruio software runs on the host (ARM) and in parallel on a Programmable Realtime Unit SubSystem (= PRUSS or just PRU) and controls the subsystems”. Additional information about the project is available on the libpruio wiki, and files can be downloaded from here (German Page).

This paper presented at inter.noise2014 (PDF) a couple of months ago has a nice comparison of various small computer/controller boards and outlines the advantages of the BBB once its PRUs are enabled. If readers come across applications of the BBB with PRUs enabled, let us know in the comments. If you want to work your way into the world of the PRU we highly recommend this tutorial series.

Thanks for sending in the tip, [Patrick]

[Image Source: libpruio stepper motor example]

Using MATLAB And SDR To Reverse Engineer 433MHz Messages

Hackers everywhere are having a lot of fun with SDR – as is obvious from the amount of related posts here on Hackaday. And why not, the hardware is cheap and easily available. There are all kinds of software tools you can use to dig in and explore, such as SDR# , Audacity, HDSDR and so on. [illias] has been following SDR projects for a while, which piqued his interest enough for him to start playing with it. He didn’t have any real project in mind so he focused on studying the methodology and the tools available for analyzing 433MHz RF transmission. He describes the process of using MATLAB to recover the transmissions being received by the SDR

He started off by studying the existing tools available to uncover the details of the protocol. The test rig uses an Arduino UNO with the rc-switch library to transmit via a common and inexpensive 433MHz module. SDR# is used to record the transmissions and Audacity allows [illias] to visualize the resulting .wav files. But the really interesting part is where he documents the signal analysis using MATLAB.

He used the RTL-SDR package in conjunction with the Communications System Toolbox to perform spectrum analysis, noise filtering and envelope extraction. MATLAB may not be the easiest to work with, nor the cheapest, but its powerful features and the fact that it can easily read data coming from the SDR makes it an interesting tool. For the full skinny on what this SDR thing is all about, check out Why you should care about Software Defined Radio.

Hack Your Phone: Turn Your Volume Buttons Into GPIO Ports

Internet connected cameras are mighty useful, specially in situations requiring some form of remote monitoring. An always-on camera that is available over an internet connection, is cheap, and uses re-purposed  hardware – that’s what the Gonzo project hopes to achieve. To accommodate these requirements, the Exploratory Engineering program team in Telenor Digital are using off-the-shelf phone hardware running on top of a fork of Firefox OS. You hang the Gonzo where you want to monitor a situation, after which it will function for up to one month before needing a recharge, sending data to a designated public URL over the 2G network.

A big downside with using such hardware is that it is not designed for the task at hand, and offers no expansion ports that may be needed for certain functions. In this particular case, the designers needed a couple of output ports to drive some LED’s. The hardware guys got a bit creative,  and re-mapped the volume buttons of the phone into generic GPIO ports. On the software side, they looked at where the button GPIO’s were referenced, and located how they are mapped to a keymap. They then added a device driver that maps the GPIO ports to be generic ports instead. Modding the hardware needed a little bit more hard work, figuring out which traces connected to the two volume buttons, adding series resistors, and then wiring the LED’s in place. The project itself is still a work in progress, and you can read more about it at the Gonzo website.

If you’re like one of us and have a box full of old phones lying around, take a look at some creative suggestions here for some Arduino controlled robots.

Thanks for the tip [pb] !

Slick Bathroom Mirror Is All Tricked Out

A Mirror surrounded by a string of brightly lit lamps is something you usually get to see in a Movie Star’s dressing room. [pickandplace] was inspired by the Movies, and a dark bathroom, to come up with a Bathroom Mirror equipped with some bells and whistles. To start with, his planning was quite detailed, sketching out the features and constraints for his design. He chose to use a round mirror with 12 LED bulbs (which are safer than 220V bulbs) so it can work as a clock. User input is handled by a motion sensor to automatically switch it on/off and a capacitive touch dimmer. Under the hood there’s an RTC (for clock and brightness adjustment based on time of day), simple boost PWM LED driver, thermal management for the LEDs which are 10W, temperature sensor to pipe down the current if the LEDs get too hot, and even an anti-fogging heater strip – phew!

His execution is no less brilliant. Starting with building the wooden frame and ending with the code for driving all the electronics. Along the way, you will find detailed notes on the LED’s, PWM Driver, Heat sinking, and capacitive Touch dimmer using Atmel’s AT42QT2160 Qslide – Matrix Sensor IC. He had some trouble with the Motion Sensor PIR module, and hasn’t yet written the code to implement it. His first version used a PIC18F87J50, and the next iteration had an ATXmega256A3BU – but he asks us not to get into the Microchip vs. Amtel debate. We have to agree on that. Sharp readers will point out that neither of the two micro’s can provide 12 PWM channels. Well, worry not, he has it all figured out. He also coded up a simple control interface which is handy when the unit is hooked up over USB to a computer. To top it off, he built a miniature LED ring to use as a “Simulator” while working on the code so he didn’t have to lug the heavy Mirror in and out of the bathroom. How’s that for doing a good job better! Source files are on his Github repo, and links to the hardware schematics are peppered throughout his blog.

If you don’t want to build something so fancy, look up the Bathroom Mirror with HUD which displays Time and Weather

Continue reading “Slick Bathroom Mirror Is All Tricked Out”

Clocked 8-Bit Random Pattern Generator For A CMOS Synth

A random noise generator is pretty handy when working with music, and building one using a micro-controller can be pretty trivial. So it’s nice when someone comes along and builds it from a few analog and digital parts. [acidbourbon] built his Clocked 8-BIT Random Pattern Generator for  CMOS Synth  inspired and motivated by the recent article Logic Noise: Sweet, Sweet Oscillator Sounds by [Elliot Williams]. It’s 8-bit output can be used as a random sequencer for DIY CMOS synths.
This pattern generator is suited to to be used in combination with a 4051 8-channel analog multiplexer. But it sounds quite interesting on it’s own (best enjoyed in stereo, check out the video after the break). After building some CMOS synth circuits, [acidbourbon] moved on to make some sequencers and multiplexers which then let him to devise this random pattern generator which could be gated using a clock signal.

The basic principle is straight forward – generate noise, amplify it, apply a clock to get the gated noise output. His design choices for the various sections are well explained, based on constraints that he had to work with. Everything needs to work at 5V, but his noise generator circuit requires 12V to work. He choose to use a charge pump to generate -5V, resulting in a 10V supply, which was barely enough, but worked. A boost regulator might probably have served better to generate 12V, but maybe he already had the ICL7660 charge pump IC lying around in his parts bin. The rest of the circuit uses standard CMOS/TTL devices, and [acidbourbon] provides all of the design files for what looks like a neat, single sided PCB that can easily be made using the toner-transfer method.

Video below.

Continue reading “Clocked 8-Bit Random Pattern Generator For A CMOS Synth”

Castellated Breakout Is Pitchin’ Brilliant!

Radio, WiFi and similar modules are getting smaller by the day. Trouble is, they end up having non-DIY-friendly, odd pitch, mounting pads. Sometimes, though, simple hacks come around to help save the day.

[Hemal] over at Black Electronics came up with a hack to convert odd-pitch modules to standard 2.54mm / 0.1″. The process looks simple once you see the detailed pictures on his blog. He’s using the technique to add 2mm pitch modules like the ESP8266 and XBee by soldering them to standard perf board. Once they are hooked to the board, just add a row of male header pins, trim the perf board and you’re done. Couldn’t get simpler.

Another technique that we’ve seen is to solder straight across the legs and cut the wire afterward. That technique is also for protoyping board, but custom-sized breakout boards are one good reason to still keep those etchants hanging around. If you have other techniques or hacks for doing this, let us know in the comments.