BlocksCAD Is Browser-Based 3D Modeling That Teaches You CAD

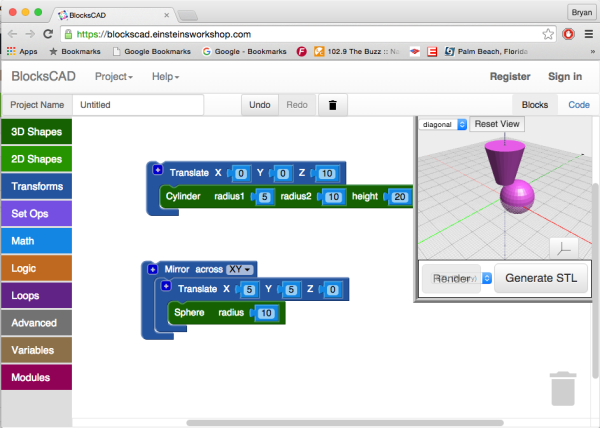
Considering all of the projects the Raspberry Pi is used for now, the fact that it was originally envisioned to be an educational tool is sometimes forgotten. One of the tools commonly available with it is Scratch, a programming language that is easy to learn and can be seen as a gateway into other computer science realms. Building on this principle, MIT has come up with a new block-based educational tool called BlocksCAD.

BlocksCAD is essentially Scratch combined with OpenSCAD and allows the user to use blocks (similar to Scratch) to build a 3D model. The interface is fairly intuitive, and with some practice even complex shapes can be created using the tools available. Also, everything runs in a browser like the 3D modeling tool we featured a few days ago, so there isn’t anything to download or install.

The key to this project (like the key to Scratch) is that the user isn’t bogged down by syntax, which is often one of the largest hurdles for anyone who is just starting to learn to program. Since it’s possible to avoid syntax but still develop 3D models, this new tool should help anyone interested in the field of 3D modeling or CAD get a start without getting scared away too easily. Of course, if you do end up deep in the field of computer science and want to learn more about this project, the developers have opened up the source code as well.

Thanks for the tip, [Matt]!

Simplest Electricity Monitoring Solution Yet

Monitoring your home’s energy use is the best way to get a handle on your utility bills. After all, you can’t manage what you can’t measure! The only problem is that most home energy monitoring systems are cumbersome, complicated, or expensive. At least, until now. [Kevin] has created a new electricity meter based on Particle Photons which should alleviate all of these problems.

The Particle Photon (we get confused on the naming scheme but believe this the new version of what used to be called the Spark Core) is a WiFi-enabled development board. [Kevin] is using two, one to drive the display and one to monitor the electricity usage. This part is simple enough, each watt-hour is accompanied by a pulse of an LED on the meter which is picked up by a TLS257 light-to-voltage sensor. The display is a Nextion TFT HMI (touch screen) which is pretty well suited for this application. The data is corralled by emoncms, part of the OpenEnergyMonitor platform, which ties everything together.

For a project that has been done more than a few times, this one does a great job of keeping the price down while maintaining a great aesthetic. Make sure to check out the video below to see it in action.

Continue reading “Simplest Electricity Monitoring Solution Yet”

RaspiDrums Uses Expensive Sensors

Piezoelectric sensors are great for monitoring mechanical impacts with a microcontroller. Whether you’re monitoring knocks on a door or watching a heartbeat, they are a cheap way to get the job done. They do have their downsides, though, so when [Jeremy] wanted to build an electronic drum set, he decided to use more expensive accelerometers to measure the percussive impacts instead.

Even though piezo sensors are cheap, they require a lot of work to get them working properly. The ADXL377 3-axis accelerometer that [Jeremy] found requires much less work, plus provides more reliable data due to a 1kHz low-pass filter at the output. In his setup, a Raspberry Pi handles all of the heavy lifting. An ADC on each drum sends data about each impact of the drum, and the Raspberry Pi outputs sound via the native Alsa driver and a USB sound card.

This project goes a long way to show how much simpler a project like this is once you find the right hardware for the job. [Jeremy]’s new electronic drums are very well documented as well if you are curious about using accelerometers on your newest project rather than piezo sensors. And, if you’re into drums be sure to see how you can have drums anywhere, or how you can build your own logic drums.

Continue reading “RaspiDrums Uses Expensive Sensors”

Update: What You See Is What You Laser Cut

If there’s one thing about laser cutters that makes them a little difficult to use, it’s the fact that it’s hard for a person to interact with them one-on-one without a clunky computer in the middle of everything. Granted, that laser is a little dangerous, but it would be nice if there was a way to use a laser cutter without having to deal with a computer. Luckily, [Anirudh] and team have been working on solving this problem, creating a laser cutter that can interact directly with its user.

The laser cutter is tied to a visual system which watches for a number of cues. As we’ve featured before, this particular laser cutter can “see” pen strokes and will instruct the laser cutter to cut along the pen strokes (once all fingers are away from the cutting area, of course). The update to this system is that now, a user can import a drawing from a smartphone and manipulate it with a set of physical tokens that the camera can watch. One token changes the location of the cut, and the other changes the scale. This extends the functionality of the laser cutter from simply cutting at the location of pen strokes to being able to cut around any user-manipulated image without interacting directly with a computer. Be sure to check out the video after the break for a demonstration of how this works.

Continue reading “Update: What You See Is What You Laser Cut”

Two-Axis Solar Tracker

Solar panels are an amazing piece of engineering, but without exactly the right conditions they can be pretty fickle. One of the most important conditions is that the panel be pointed at the sun, and precise aiming of the panel can be done with a solar tracker. Solar trackers can improve the energy harvesting ability of a solar panel by a substantial margin, and now [Jay] has a two-axis tracker that is also portable.

The core of the project is a Raspberry Pi, chosen after [Jay] found that an Arduino didn’t have enough memory for all of the functionality that he wanted. The Pi and the motor control electronics were stuffed into a Pelican case for weatherproofing. The actual solar tracking is done entirely in software, only requiring a latitude and longitude in order to know where the sun is. This is much easier (and cheaper) than relying on GPS or an optical system for information about the location of the sun.

Be sure to check out the video below of the solar tracker in action. Even without the panel (or the sun, for that matter) the tracker is able to precisely locate the panel for maximum energy efficiency. And, if you’d like to get even MORE power from your solar panel, you should check out a maximum power point tracking system as well.

Continue reading “Two-Axis Solar Tracker”

Hackaday Prize Entry: The 70s Called. They Want This Calculator

For those of us who grew up during TI’s calculator revolution, the concept of reverse polish notation (RPN) might be foreign. For other more worldly calculator users, however, the HP calculator was ubiquitous. Hewlett-Packard peaked (at least as far as calculators are concerned) decades ago and the market has remained dominated by TI since. Lucky for those few holdouts there is now a new microcode emulator of these classic calculators.

Called the NP25 (for Nonpariel Physical), the calculator fully emulates the HP-21, HP-25C and HP-33C. It’s a standalone microcode emulator, which means that these calculators work exactly as well as the original HP calculators of the 70s did. The new calculators, however, are powered by a low power MSP430G2553 processor and presumably uses many, many fewer batteries than the original did. It has an LED display to cut power costs as well, and was built with the goal of being buildable by the average electronics hobbyist.

Even if you didn’t grow up in the 70s with one of these in your desk drawer, it’d still be a great project and would help even the most avid TI user appreciate the fact that you don’t have to use RPN to input data into calculators anymore. Not that there’s anything wrong with that. This isn’t the only calculator we’ve featured here, either, so be sure to check out another free and open calculator for other calculator-based ideas.

Continue reading “Hackaday Prize Entry: The 70s Called. They Want This Calculator”

3D Printed Vice Holds Dev Boards Beside Breadboard

The Stickvise has been a staple of the Hackaday community for a while now. If you need something held for soldering there’s no better low-cost helping hand. But if you’re just using a breadboard and a dev board of some sort, there’s another vice on the horizon that uses similar spring clamping to hold everything in place while you build something awesome.

BreadboardVise1-cropped
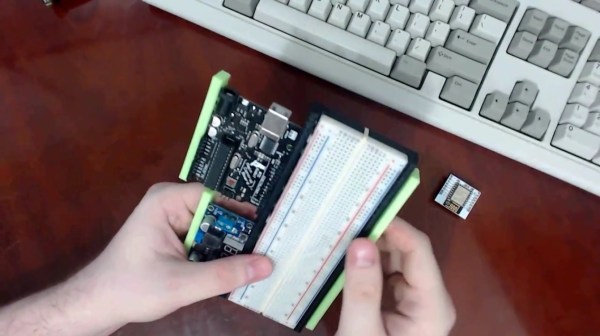
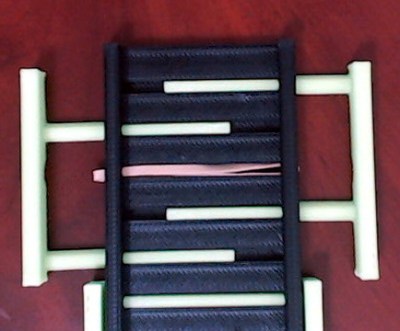
While [Pat]’s inspiration came from the aforementioned Stickvise, the new 3d-printed vice is just what you’ll need before you’re ready to do the soldering. The vice is spring-loaded using rubber bands. The base is sized to fit a standard breadboard in the center with clamping arms on either side to hold dev boards such as an Arduino. This innovative yet simple de”vice” grips boards well enough that you won’t be chasing them around your desk, knocking wires out of place, anymore.

There are some nuances to this board, so be sure to check out the video below to see it in action. As we mentioned, it uses rubber bands instead of springs to keep it simple, and it has some shapes that are easily 3d printed such as the triangular rails. If you want to 3d print your own, the files you’ll need are available on the project’s site. If you want to get even simpler, we’ve seen a few other vices around here as well.

The Stickvise is available for sale in the Hackaday Store.

Continue reading “3D Printed Vice Holds Dev Boards Beside Breadboard”