Delicious Dash Pi Driving Data

A few weeks ago, [sentdex] described how Python has changed his life. In particular, it has allowed him to mine Bitcoin automatically, teach other people programming, and realize a full in-car computer for less than $100 using a Raspberry Pi.

It’s based on a model B, which he’s enclosed in a beefy Pi camera case  that sits on the dash of his Honda S2000. The screen is a $17 internet special with composite in, which keeps the BOM way down. A 3A switch wired into the ignition ensures that power to the Pi is not rudely interrupted.

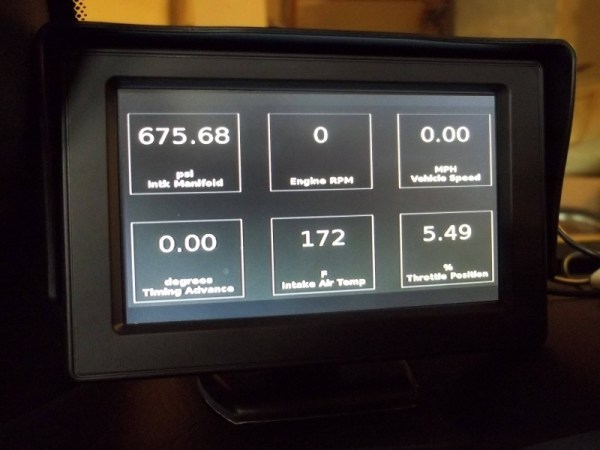
A script takes the Pi directly into desktop mode when [sentdex] starts the car. His main goals for the project were setting up a dash cam and communicating with the OBD computer. The Pi pulls various data points including the throttle position, and the user moves through the list with the arrow keys of one of those roll-up keyboards.

In the future, he’d like to upgrade it to live graph the throttle position and add a sensor to show the brake position. Be sure to check out the walk-through/demonstration video after the break.

Continue reading “Delicious Dash Pi Driving Data”

Push Button, Receive Candy (or Death)

Will you be handing out candy on Halloween? Maybe you have a party to attend or kids to take around the neighborhood and can’t be home to answer the bell. You don’t want to be The Dark House With No Candy, ’cause that’s a good way to get TP’d. We’re not exactly sure what [Ben]’s catalyst was aside from trying to avoid tempting would-be thieves with an unattended bowl on the porch. Whatever the reason, we’re happy to present Candy or Death, his gamified candy (or death)-dispensing machine.

Okay, so it only dispenses candy for now. [Ben] hasn’t quite worked the kinks out of his death ray. He designed it to sit behind a porch-facing window so it can’t be messed with. All trick-or-treaters can do is push the button and take the candy. It’s built around a cereal dispenser that’s modified to be cranked by a piece of round rod driven with a NEMA-17 stepper motor and an Arduino Uno with a motor shield. The candy slides down a length of aluminium rain gutter into a plastic stacking bin, and the whole thing is built into a nice wood frame.

A few adjustments were necessary to keep it from jamming. The dispenser’s hopper uses rubber blades to govern the flow, and he ended up removing a few and trimming the others. [Ben] has an album up of all his build pics and put his code on the gits. Stick around to see videos of the machine from the front and rear.

Continue reading “Push Button, Receive Candy (or Death)”

Retrotechtacular: Fire Control Computers In Navy Ships

Here is a two-part Navy training film from 1953 that describes the inner workings of mechanical fire control computers. It covers seven mechanisms: shafts, gears, cams, differentials, component solvers, integrators, and multipliers, and does so in the well-executed fashion typical of the era.

Fire control systems depend on many factors that occur simultaneously, not the least of which are own ship’s speed and course, distance to a target, bearing, the target’s speed and course if not stationary, initial shell velocity, and wind speed and direction.

The mechanisms are introduced with a rack and pinion demonstration in two dimensions. Principally speaking, a shaft carries a value based on revolutions. From this, a system can be geared at different ratios.

Cams take this idea further, transferring a regular motion such as rotation to an irregular motion. They do so using a working surface as input and a follower as output. We are shown how cams change rotary motion to linear motion. While the simplest example is limited to a single revolution, additional revolutions can be obtained by extending the working surface. This is usually done with a ball in a groove.

Continue reading “Retrotechtacular: Fire Control Computers In Navy Ships”

Build A Better Something During The Deconstruction 2014

Couldn’t make it to Detroit for the Red Bull Creation Contest? Its founder, [Jason Naumoff], has a separate event called The Deconstruction and 2014 marks the second year of this lively, worldwide competition.

The Deconstruction is taking place November 14-16th and will be broadcast live online. That’s right, you can participate from anywhere in the world, and your team’s progress will be live streamed from The Omni Commons in Oakland, CA. Registration began October 16th and the friendly competition is absolutely free to enter.

Creativity is the name of this game. The idea is to build something awesome using what you already have access to, including teamwork skills. Ideally, what you build will be a deconstruction of something you’d like to see rethought, though there is no stated topic. There are no age limits, no boundaries, and very few rules. A number of great things came out of last year’s event, more of which you can check out at their site. What are you waiting for? Go show the world how you’d make it better.

Fail Of The Week: Project Frosty Mug Is Merely Chilly

Like many of us, [C] enjoys an ice-cold, refreshing soda while coding. Driven by a strong desire to keep a soda ice-cold indefinitely without using ice, [C] started Project Frosty Mug.

[C]’s stated goal is to keep a 20oz plastic bottle of soda at ~35F indefinitely while it sits in a room temperature environment. He started with a thermoelectric unit to cool an aluminium disc, like a cold coaster. Builds one and two made him realize that dealing with the generated heat was a big issue: it got so hot that it deformed the PLA frame. [C] also realized that bottom-only cooling wasn’t going to get the job done.

This project is now in its third build, which is pictured above. As you can see, it’s more koozie than coaster. That 3-D printed holster is lined with aluminium sheeting. Another flat piece covers the opening and attaches to the cooling element. A beefy CPU heat sink does its best, and a couple of U-brackets hold it all together.

[C]’s tested it with a glass bottle of Diet Sun Drop chilled to 38F. After 30 minutes in an ambient temperature of ~70F, the soda measured 45F. [C] lamented having not used a control bottle for comparison and reports that the power supply became quite warm. [C] isn’t going to give up that easily. Do you have any ideas for the fourth build?

Editor’s Note: This is one of the last Fail of the Week tips we have stored up. If you want to see the series continue on a weekly basis, we need help finding more documented fails! Please look back through your projects and document the ones that didn’t go quite right. We also encourage you to send in links to other fails you’ve found. Just drop the links in our tips line. Thanks!


2013-09-05-Hackaday-Fail-tips-tileFail of the Week is a Hackaday column which runs every Thursday. Help keep the fun rolling by writing about your past failures and sending us a link to the story — or sending in links to fail write ups you find in your Internet travels.


What’s Next On The Raspberry Pi Front

Raspberry Pi founder [Eben Upton] recently sat in an uncomfortable chair in London to discuss all things Pi. Having sold about four million units over the last 2.5 years, he feels the future is bright for his original vision of inspiring and helping kids to learn programming.

[Eben] is quite pleased with the Pi-Top, a B+ based laptop kit that’s pulling in backers left and right while completely unaffiliated with the Pi foundation. The kit includes a 13.3″ HD LCD screen, keyboard, trackpad, and an injection molded case, though you can print your own with the included STL files. Kits start at $249 without a Pi and $285 with a B+ included. Robot and home automation HATs are also available separately or bundled with the Pi-Top kit.

The most exciting news is that the $600,000 spent on DSI connectors for those four million Raspis is about to pay off. [Eben] hopes that an official touchscreen will be available for purchase before the end of 2014 or in early 2015. He showed off a 7″ capacitive touch panel that will attach to a display board stacked on a Pi, effectively turning it into a tablet.

[Eben] said that they will not be making a Model C and instead are working on revision A+. He hopes to make an official announcement in the near future.

Finally, [Eben] discussed the importance of community, which played a large part in the birth and evolution of the Pi. He also spoke of Pi Academy, a sort of professional workshop for teachers in the UK who’ve recently been tasked with teaching computer science as demanded by changes in the mandatory UK school curriculum. He hopes that these 2-day seminars will help educators achieve the high expectations recently laid out for students to achieve by age ten.

Ceci N’est Pas Une Clock

[Justin] tipped us about his slick custom OBD-II gauge that could easily pass for an OEM module. He was able to use the clock area of his Subaru BRZ to display a bunch of information including the oil and coolant temperatures and the battery voltage.

The forum post linked above has a good FAQ-based explanation of what he did, but so many people have told him to shut up and take their money that he created an Instructable for it. Basically, he’s got a Sparkfun OBD-II UART board communicating with a pro Trinket. The display is an Adafruit OLED, which he found to be an ideal choice for all the various and sundry light conditions inside the average car.

[Justin] was able to reuse the (H)our and (M)inute buttons and reassigned them to (H)igh to show the peak reading and (M)ode to, well, switch between modes. The (:00) now resets the peak readings. He offers suggestions for acquiring the specific CAN codes for your car to make the data more meaningful. [Justin]’s code is safe in the many tentacles of Octocat, and you can check out his demo video below.

Continue reading “Ceci N’est Pas Une Clock”