Vizy “AI Camera” Wants To Make Machine Vision Less Complex

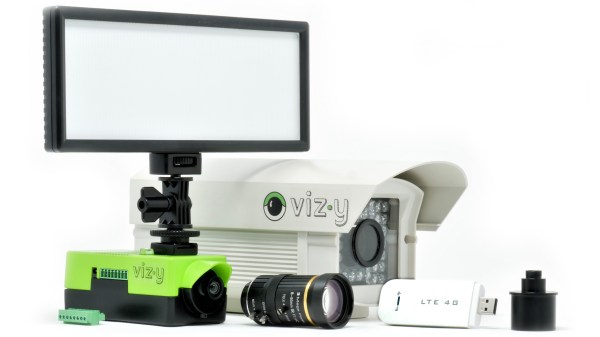
Vizy, a new machine vision camera from Charmed Labs, has blown through their crowdfunding goal on the promise of making machine vision projects both easier and simpler to deploy. The camera, which starts around $250, integrates a Raspberry Pi 4 with built-in power and shutdown management, and comes with a variety of pre-installed applications so one can dive right in.

The Sony IMX477 camera sensor is the same one found in the Raspberry Pi high quality camera, and supports capture rates of up to 300 frames per second (under the right conditions, anyway.) Unlike the usual situation faced by most people when a Raspberry Pi is involved, there’s no need to worry about adding a real-time clock, enclosure, or ensuring shutdowns happen properly; it’s all taken care of.

‘Birdfeeder’ application can automatically identify and upload images of visitors.

Charmed Labs are the same folks behind the Pixy and Pixy 2 cameras, and Vizy goes further in the sense that everything required for a machine vision project has been put onboard and made easy to use and deploy, even the vision processing functions work locally and have no need for a wireless data connection (though one is needed for things like automatic uploading or sharing.) For outdoor or remote applications, there’s a weatherproof enclosure option, and wireless connectivity in areas with no WiFi can be obtained by plugging in a USB cellular modem.

A few of the more hacker-friendly hardware features are things like a high-current I/O header and support for both C/CS and M12 lenses for maximum flexibility. The IR filter can also be enabled or disabled via software, so no more swapping camera modules for ones with the IR filter removed. On the software side, applications are all written in Python and use open software like Tensorflow and OpenCV for processing.

The feature list looks good, but Vizy also seems to have a clear focus. It looks best aimed at enabling projects with the following structure:

Detect Things (people, animals, cars, text, insects, and more) and/or Measure Things (size, speed, duration, color, count, angle, brightness, etc.)

Perform an Action (for example, push a notification or enable a high-current I/O) and/or Record (save images, video, or other data locally or remotely.)

The Motionscope application tracking balls on a pool table. (Click to enlarge)

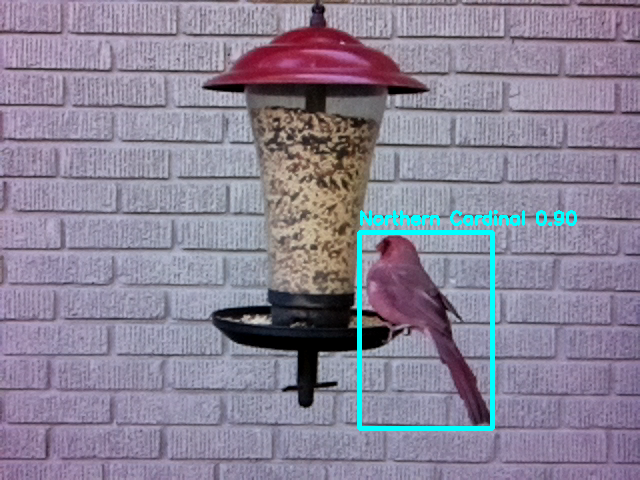
A good example of this structure is the Birdfeeder application which comes pre-installed. With the camera pointed toward a birdfeeder, animals coming for a snack are detected. If the visitor is a bird, Vizy identifies the species and uploads an image. If the animal is not a bird (for example, a squirrel) then Vizy can detect that as well and, using the I/O header, could briefly turn on a sprinkler to repel the hungry party-crasher. A sample Birdfeeder photo stream is here on Google Photos.

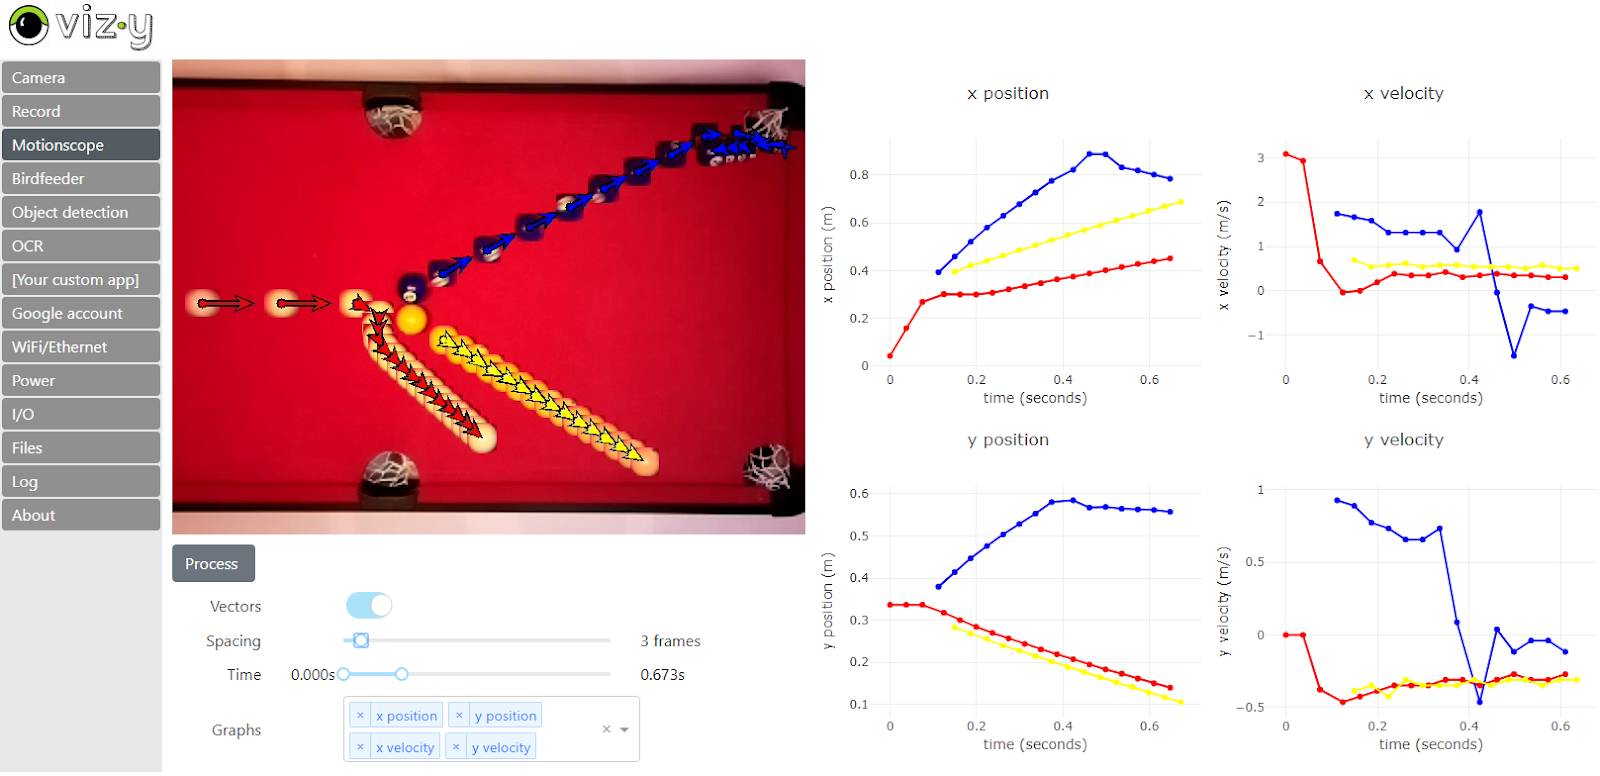
Motionscope is a more unusual but very interesting-looking application, and its purpose is to capture moving objects and measure the position, velocity, and acceleration of each. A picture does a far better job of explaining what Motionscope does, so here is a screenshot of the results of watching some billiard balls and showing what it can do.

Xbox Controller Gets Snap On Joystick From Clever 3D-Printed Design

Ball and socket linkages make for smooth operation.

People making DIY controls to enhance flight simulators is a vibrant niche of engineering and hackery, and it sure looks like Microsoft Flight Simulator is doing its part to keep the scene lively. [Akaki Kuumeri]’s latest project turns an Xbox One gamepad into a throttle-and-stick combo that consists entirely of 3D printed parts that snap together without a screw in sight. Bummed out by sold-out joysticks, or just curious? The slick-looking HOTAS (hands on throttle and stick) assembly is only a 3D printer and an afternoon away. There’s even a provision to add elastic to increase spring tension if desired.

The design looks great, and the linkages in particular look very well thought-out. Ball and socket joints smoothly transfer motion from one joystick to the other, and [Akaki] says the linkages accurately transmit motion with very little slop.

There is a video to go with the design (YouTube link, embedded below) and it may seem like it’s wrapping up near the 9 minute mark, but do not stop watching because that’s when [Akaki] begins to go into hacker-salient details about of how he designed the device and what kinds of issues he ran into while doing so. For example, he says Fusion 360 doesn’t simulate ball and socket joints well, so he had to resort to printing a bunch of prototypes to iterate until he found the right ones. Also, the cradle that holds the Xbox controller was far more difficult to design than expected, because while Valve might provide accurate CAD models of their controllers, there was no such resource for the Xbox ones. You can watch the whole video, embedded below.

Continue reading “Xbox Controller Gets Snap On Joystick From Clever 3D-Printed Design”

Watch A Fast Sand Plotter Plow Patterns At Speed

[Mark]’s sand table wisely has a glass top.
Most of us have probably seen a video of a sand drawing table at work, in which a steel ball — magnetically-coupled to a gantry under a layer of sand — lazily draws geometric patterns with utter precision and zen-like calmness. That’s all well and good, but [Mark Rehorst] thinks it can also be interesting to crank up the speed and watch the ball plow through sand just as physics intended. There’s a deeper reason [Mark] is working at this, however. Faster drawing leads to less crisp results, but by how much, exactly? To answer this, [Mark] simply ran his table (which is named The Spice Must Flow) at both fast and slow speeds and documented the results.

These two images show the difference between running the table at 100 mm/s versus 500 mm/s. The slower speed is noticeably crisper, but on the other hand the faster speed completed the pattern in about a fifth of the time. [Mark] says that as the ball aggressively accelerates to reach target speeds, more sand is thrown around over existing lines, which leads to a loss of detail.

Crisper detail, or a faster draw? Which is “better” depends on many things, but it’s pretty clear that [Mark]’s cat finds the fast version more exciting. You can see [Mark]’s table at high speed and the cat’s reaction in the video, embedded below.

Continue reading “Watch A Fast Sand Plotter Plow Patterns At Speed”

Custom Keyboard Goes Split, Gets Thin, Acquires Stained Wood

The hardware and software required to make DIY keyboards happen has gotten more and more accessible, and that means it’s easier than ever to make one’s ideal input device a reality from the ground up. For [Cameron Sun], his Ellipsis Split mechanical keyboard buildlog details his second effort, refining his original design from lessons learned the first time around. The new keyboard is slim, split into two, and has integrated wrist supports made from stained wood. The painting and wood treatment took a lot of work and patience, but it certainly paid off because the result looks amazing!

Small integrated OLED screen shows the current mode.

When we saw [Cameron]’s first custom keyboard, we admired the unique aluminum case and some nice touches like the physical toggle switches. Those tactile switches allow changing the keyboard to different modes, while also serving as a visual indicator. [Cameron] liked those switches too, but alas they just didn’t fit into the slim new design. However, he’s very happy with swapping modes in software and using a small OLED display as an indicator. What kind of different modes does his keyboard have? There’s Windows mode and Mac mode (which changes some hotkeys) as well as modes that change which keys in the thumb clusters do what (moving the space key to the left for easier gaming, for example.) After all, it’s not just the physical layout that can be customized with a DIY keyboard.

Interested in making your own custom keyboard? Be sure to look into this breakaway keyboard PCB concept before you start, because it just might make your custom build a lot easier.

Whimsical Solder Stand Moonlights As Toy 3D Printer

A few Lego pieces provide key functionality, like an articulated dispenser head.

Most of us have bent a length of solder into a more convenient shape and angle when soldering, and just sort of pushed the soldering iron and work piece into the hanging solder instead of breaking out a third hand. Well, [yukseltemiz] seems to have decided that a solder dispenser and a miniature 3D printer model can have a lot in common, and created a 1/5 scale Ender 3 printer model that acts as a solder stand and dispenser. The solder spool hangs where the filament roll would go, and the solder itself is dispensed through the “print head”.

It’s cute, and we do like the way that [yukseltemiz] incorporated a few Lego pieces into the build. A swivel and eyelet guides the solder off the roll and a small Lego ball and socket gives the dispenser its articulation, an important feature for bending solder to a more convenient angle for working. It makes us think that using Lego pieces right alongside more traditional hardware like M3 nuts and bolts might be an under-explored technique. You can see the unit in action in the brief assembly video, embedded below.

Continue reading “Whimsical Solder Stand Moonlights As Toy 3D Printer”

A Bit Of DIY Helps Cut Straight And Happy Threads

A cheap and effective ratcheting tap.

Need to cut threads into a hole? A tool called a tap is what you need, and a hand-operated one like the one shown here to the side is both economical and effective. A tap’s cutting bit works by going into a pre-drilled hole, and it’s important to keep the tool straight as it does so. It’s one thing to tap a few holes with steady hands and a finely calibrated eyeball, but when a large number of holes need to be tapped it can be worth getting a little help.

The usual tool to help keep a tap straight and pressed gently downwards is called a tap follower, but [Tony] had a lot of M4 holes to tap and no time to order one and wait for it to arrive. Instead, he converted a cheap tap into a tool that could be held in the chuck of his mill, with the freedom to slide up and down as needed. The result? A tap that’s hand-operated but certain to be orthogonal to the work piece, making the job of cutting a lot of threads much more pleasant.

Tapping isn’t just for metal, either. Cutting threads into wood is also done, and be sure to check out this simple method for making your own surprisingly effective wood taps in the shop with a threaded rod, or a lag screw. Of course, the need to tap a hole can be sidestepped by using threaded inserts in the right material, instead.

Cell Phone Signal Booster Gets Teardown And Demo

Ever wonder what was inside a cell phone booster, or what it is like to set up or use one? If so, [Kerry Wong]’s got you covered with his teardown of a Cel-Fi Go X Cell Signal Booster by Nextivity. [Kerry] isn’t just ripping apart a cheap unit for laughs; his house has very poor reception and this unit was a carefully-researched, genuine investment in better 4G connectivity.

The whole setup consists of three different pieces: the amplifier unit pictured above, and two antennas. One is an omnidirectional dome antenna for indoors, and the other is a directional log-periodic dipole array (LPDA) antenna for outdoors. Mobile phones connect to the indoor antenna, and the outdoor antenna connects to the distant cell tower. The amplifier unit uses a Bluetooth connection and an app on the mobile phone to manage settings and actively monitor the device, which works well but bizarrely doesn’t seem to employ any kind of password protection or access control whatsoever.

Overall [Kerry] is happy, and reports that his mobile phone enjoys a solid connection throughout his house, something that was simply not possible before. Watch a hands-on of the teardown along with a short demonstration in the video embedded below.

Continue reading “Cell Phone Signal Booster Gets Teardown And Demo”