The Postmortem Password Problem

Death and passwords: two things we just can’t avoid. With so much of our lives tied up in cloud services nowadays, there’s good reason to worry about what happens to these accounts if we drop dead tomorrow. For many of us, important documents, photos, financial information and other data will be locked behind a login prompt. Your payment methods will also expire shortly after you have, which could lead to data loss if not handled promptly. The most obvious way to address this is to give a trusted party access in case of emergency.

A Bad Solution

Let’s start with the simplest solution: using the same password everywhere.  Great, all you need to do is put this on a Post-it note, stuff it in an envelope, and let someone know where to find it. Unfortunately, using a single password for many services is a terrible idea. Password breaches happen, and if you’re using a single password across the internet, they can be disastrous.

Password breaches are usually the result of an attacker finding a vulnerability that allows reading password data from an application’s database. Odds are high that your information has been leaked in one of these breaches. You can check if your email is on a list of known breaches with Have I Been Pwned. Don’t feel bad if you’ve been pwned, my email shows up on six different breaches, and this service only indexes publicly known breaches!

Depending on the competency of the company that was breached, your password may have been stolen in a few different formats. In the worst case, the passwords were stored as-is (i.e., cleartext), and the breach contains your actual password. Nowadays, storing passwords in cleartext is never considered acceptable. A hash of the password is stored instead. Attackers need to use a tool like hashcat to try to recover the passwords via brute force hash cracking. This is slow for complex passwords, but is always getting faster as GPUs improve.

So we really need to use different passwords everywhere, or our Tumblr account from 2013 could give access to our bank account. Given the large number of services we use and our inability to remember passwords, we’re going to need to use a password manager. Continue reading “The Postmortem Password Problem”

Inside The Secret World Of Crimping

At some point in your electrical pursuits, you’ll need to make a connector. Maybe you’re designing something that will connect to another device, or maybe the spaghetti mess of wires coming out of your Raspberry Pi has become a pain to deal with. Whatever the reason, a proper connector can solve a lot of headaches in electronics projects.

Your first thought might be to run to your favorite component distributor and order the connectors, terminals, and crimping tool. Unfortunately, those tools can cost thousands of dollars. Maybe you’ll just solder the connectors instead? Don’t! It makes for easily damaged connections.

Fortunately, [Matt Millman] has a great guide on wire-to-board connectors. This guide will explain why you should never solder crimp terminals and then get into working with some of the most common wire-to-board connector families.

For example, the Mini-PV series (which often get called “Dupont”) are one of the most ubiquitous connectors in hobbyist electronics. They’re the connector on those rainbow colored jumper wire sets, and connect perfectly to 0.1″ pin headers. The connectors and terminals are cheap, but the official HT-0095 crimp tool costs over $1500. Most crimp tools make a mess of these terminals since they require a cylindrical jaw to crimp correctly. By using a combination of two unofficial tools, you can crimp these connectors properly for under $60.

If you want to learn more about the art of wiring, the NASA Workmanship Standards are an interesting read.

[Thanks to MarkMLl for the tip!]

Inefficient NeoPixel Control Solved With Hardware Hackery

Everyone loves NeoPixels. Individually addressable RGB LEDs at a low price. Just attach an Arduino, load the demo code, and enjoy your blinking lights.

But it turns out that demo code isn’t very efficient. [Ben Heck] practically did a spit take when he discovered that the ESP32 sample code for NeoPixels used a uint32 to store each bit of data. This meant 96 bytes of RAM were required for each LED. With 4k of RAM, you can control 42 LEDs. That’s the same amount of RAM that the Apollo Guidance Computer needed to get to the moon!

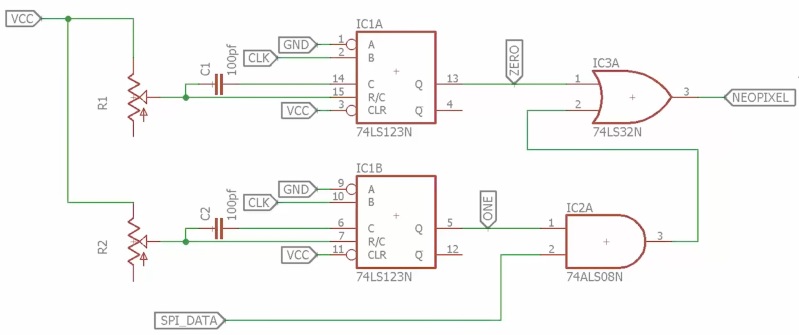
His adventure is based on the thought that you should be able to generate these signals with hardware SPI. First, he takes a look at Adafruit’s DMA-Driven NeoPixel example. While this is far more efficient than the ESP32 demo code, it still requires 3 SPI bits per bit of NeoPixel data. [Ben] eventually provides us with an efficient solution for SPI contro using a couple of 7400 series chips:

Schematic of SPI to NeoPixel circuit using 74HC123

[Ben]’s solution uses some external hardware to reduce software requirements. The 74HC123 dual multi-vibrator is used to generate the two pulse lengths needed for the NeoPixels. The timing for each multi-vibrator is set by an external resistor and capacitor, which are chosen to meet the NeoPixel timing specifications.

The 74HC123s are clocked by the SPI clock signal, and the SPI data is fed into an AND gate with the long pulse. (In NeoPixel terms, a long pulse is a logical 1.) When the SPI data is 1, the long pulse is passed through to the NeoPixels. Otherwise, only the short pulse is passed through.

This solution only requires a 74HC123, an AND gate, and an OR gate. The total cost is well under a dollar. Anyone looking to drive NeoPixels with a resource-constrained microcontroller might want to give this design a try. It also serves as a reminder that some problems are better solved in hardware instead of software.

Continue reading “Inefficient NeoPixel Control Solved With Hardware Hackery”

WiFi Controlled Finger

WiFi Controlled Finger Dims Lights Over UDP

While WiFi controlled lights are readily available, replacing your lighting fixtures or switches isn’t always an option. [Thomas] ran into this issue with his office lights. For the developers in the office, these lights always seemed to run a little too bright. The solution? A 3D printed, WiFi controlled finger to poke the dimmer switch.

This little hack consists of a servo, a 3D printed arm and finger assembly, and a Wemos D1 Mini development board. The Wemos is a low cost, Arduino compatible development board based on the ESP8266. We’ve seen it used for a wide variety of hacks here on Hackaday.

For this device, the Wemos is used to listen for UDP packets on the company’s WiFi network. When it receives a packet, it tells the servo to push the dimming button for a specified amount of time. [Thomas] wrote a Slack bot to automatically send these packets. Now, when the lights are too bright, a simple message to the bot allows anyone to dim the lights without ever leaving the comfort of their desk. Sure, it’s not the most secure or reliable method of controlling lights, but if something goes wrong, the user can always get up and flip the switch the old fashioned way.

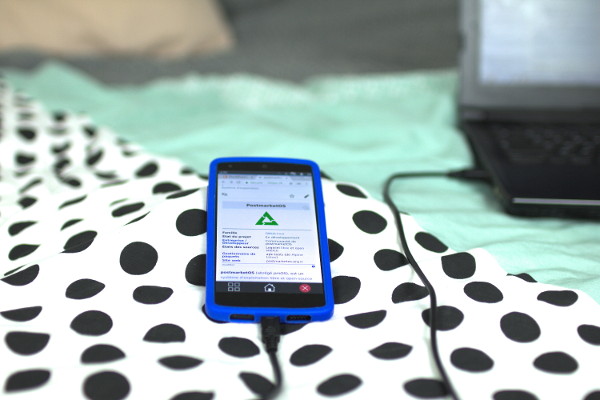
A Nexus 5 Smartphone Running PostmarketOS

PostmarketOS Turns 600 Days Old

PostmarketOS began work on a real Linux distribution for Android phones just over 600 days ago. They recently blogged about the state of the project and ensured us that the project is definitely not dead.

PostmarketOS’ overarching goal remains a 10 year life-cycle for smartphones. We previously covered the project on Hackaday to give an introduction. Today, we’ll concern ourselves with the progress the PostmarketOS team has made.

The team admits that they’re stuck in the proof-of-concept phase, and need to break out of it. This has required foundational changes to the operating system to enable development across a wide variety of devices and processor architectures. There’s now a binary package repository powered by builds.sr.ht which will allow users to install packages for their specific device.

Other updates include fixing support for the Nexus 5 and Raspberry Pi Zero, creating support for open source hardware devices including the Pine A64-LTS and Purism Librem 5. PostmarketOS now boots on a total of 112 different devices.

We’re excited to see the PostmarketOS project making progress. With the widespread move to mobile devices, users lose control over their computing devices. PostmarketOS gives us the ability to run code that we can read and modify on these devices. It’s no small feat though. Supporting the wide variety of custom hardware in mobile devices requires a lot of effort.

While it may be a while before PostmarketOS is your daily driver, the project is well suited to building task-specific devices that require connectivity, a touch screen, and a battery. We bet a lot of Hackaday readers have a junk drawer phone that could become a project with the help of PostmarketOS.

The Clementine Spacecraft

Preventing Embedded Fails With Watchdogs

Watchdog timers are an often overlooked feature of microcontrollers. They function as failsafes to reset the device in case of a software failure. If your code somehow ends up in an infinite loop, the watchdog will trigger. This is a necessity for safety critical devices. If the firmware in a pacemaker or a aircraft’s avionics system gets stuck, it isn’t going to end well.

In this oldie-but-goodie, [Jack Ganssle] provides us with a great write up on watchdog timers. This tells the story of a failed Clementine spacecraft mission that could have been saved by a watchdog, and elaborates on the design and implementation of watchdog techniques.

If you’re designing a device that needs to be able to handle unexpected failures, this article is definitely worth a read. [Jack] explains a lot of traps of using these devices, including why internal watchdogs can’t always be trusted and what features make for a great watchdog.

Thanks to [Jan] for the tip!

Build A Home Automation Hub For $20

With so many WiFi home automation devices on the market, you might want to take advantage of these low cost products without having to send your data to third-party servers. This can be accomplished by running your own home automation hub on your home network.

If you don’t want to use a full computer for this purpose, [Albert] has you covered. He recently wrote a guide on running Domoticz on the $20 GL-MT300Nv2 pocket router.

The setup is rather simple: just perform a firmware update on your router using the provided image and a full home automation stack is installed. Domoticz provides a web interface for configuring your devices, setting up rules, and viewing sensor data.

The pocket router is also supported by OpenWrt and provides a USB host port, making it a low-cost option for any WiFi hack you might have in mind. We’ve seen quite a few OpenWrt based hacks over the years.