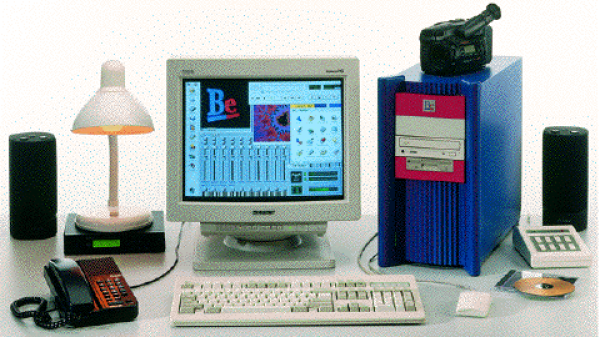
BeOS: The Alternate Universe’s Mac OS X

You’re likely familiar with the old tale about how Steve Jobs was ousted from Apple and started his own company, NeXT. Apple then bought NeXT and their technologies and brought Jobs back as CEO once again. However, Jobs’ path wasn’t unique, and the history of computing since then could’ve gone a whole lot different.

In 1990, Jean-Louis Gassée, who replaced Jobs in Apple as the head of Macintosh development, was also fired from the company. He then also formed his own computer company with the help of another ex-Apple employee, Steve Sakoman. They called it Be Inc, and their goal was to create a more modern operating system from scratch based on the object-oriented design of C++, using proprietary hardware that could allow for greater media capabilities unseen in personal computers at the time.

Continue reading “BeOS: The Alternate Universe’s Mac OS X”

Learn Arduino In Time And In Tune For Christmas

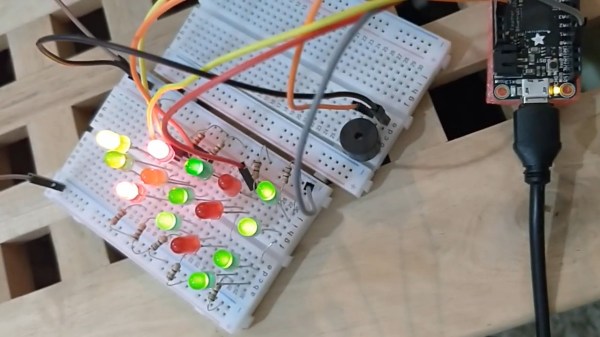
If you’re one of the lucky ten thousand today who still haven’t tried programming electronics with the Arduino platform, this detailed guide by [Dafna Mordechai] should hopefully give you enough incentive to pick it up now and make a simple bit of Christmas-themed decoration with it.

The guide isn’t exactly aimed at complete ground-up beginners but it does give some pointers on where to look up whatever information you don’t have in order to follow along. Other than that, it’s very simple and has well-detailed steps, showing you how to turn a breadboard into a simple animated arrangement of LEDs in the shape of a Christmas tree, along with a piezo buzzer playing “Jingle Bells”. If you’ve never done this sort of stuff before, [Dafna] explains in pretty good detail which part of the code does what, making it pretty simple if you want to play around with it and customize it to your taste.

Once you’ve gotten the hang of the basics of Arduino, why not try a project that’s a little more elaborate? Without having to stray too far from your comfort zone, you can easily build a kid’s toy full of switches and lights or even a very extra clock that has no shortage of lights and dials.

3D Printed Goggles Let R.O.B. See Into The Bluetooth World

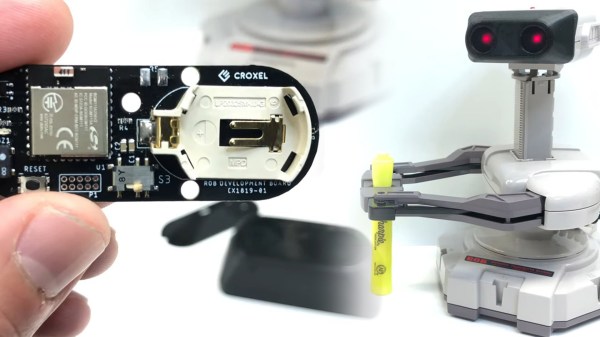
We admit that a hack enabling a 34-year-old video game peripheral to be controlled by a mobile app wasn’t something we were expecting to see today, but if controlling something with something else isn’t the definition of a classic hack, we don’t know what is. The folks at [Croxel Inc.] worked out a way to control R.O.B. using a phone app to demo out their expertise in building hardware and software prototypes, a service they offer at their website.

R.O.B. was a little robot with movable clamp arms bundled with the 1985 release of the NES, an effort by Nintendo of America to drive sales of the console after the gaming crash of 1983 by making it look less like a video game and more like a toy. The robot receives inputs from light sensors in its head, which would be pointed towards the TV playing one of the only two games released with support for it. [Croxel] used this to their advantage, and in order to control the robot without needing a whole NES, they fabricated a board using a BGM111 Bluetooth Low-Energy module which can receive outside inputs and translate them to the light commands the robot recognizes.

To avoid having to modify the rare toy itself and having to filter out any external light, the hack consists of a 3D printed “goggles” enclosure that fits over R.O.B.’s eyes, covering them entirely. The board is fitted inside it to shine the control light into its eyes, while also flashing “eye” indicators on the outside to give it an additional charming 80s look. The inputs, which are promptly obeyed, are then given by a phone paired to the module using a custom app skinned to look like a classic NES controller.

We’ve seen more intrusive hacks to this little robot here on Hackaday, such as this one which replaces the old sluggish motors entirely with modern servos and even plans to reconstruct it from scratch given the scarcity of the originals. It’s interesting to see the ways in which people are still hacking hardware from 35 years ago, and we’re excited to see what they’ll come up with around the 40 or 50 year marks!

[via Gizmodo, thanks Itay for the tip!]

What Does An Electronics Tinkerer’s Workbench Need?

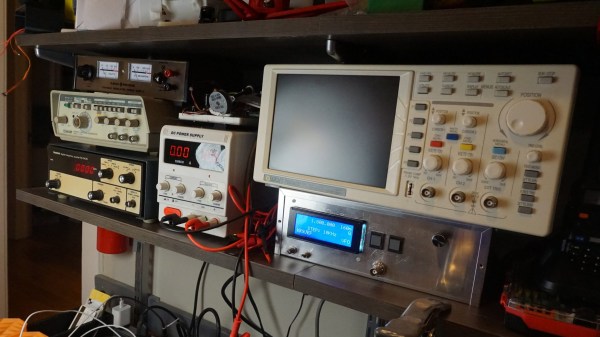
Ever been in a situation where you’re not sure where to begin building your own electronics workbench or improve your existing one? [Jeff Glass] writes in with a blog post as detailed as it is beautifully long, chronicling each and every part of his own home lab in order to give us some ideas on how to get one started.

Despite [Jeff] using his own workbench tools accrued over 10 years of working in the field as prime example, his guide takes into account that you don’t need the latest and most expensive in order to get working. Affordable examples of the tools presented are suggested, along with plenty of links to follow and what to look for in each one of them. He even goes on and aside to note the lack of affordable versions of bench-top multimeters, seeing how the portable counterparts are so cheap and plentiful in contrast.

However, contrary to [Jeff]’s claims, we would argue that there are things you could do without, such as the oscilloscope. And you could use a regular soldering iron instead of a soldering station if you are in a pinch. It just depends on the type of work you’re looking to do, and simpler tools can work just fine, that’s what they’re there for after all. That’s not to say his advice is all bad though, just that every job has different requirements, and he notes just that in the final notes as something to keep in mind when building your own lab.

Lastly, we appreciate having a section dedicated to shop safety and the inclusion of soldering fume extractors in the recommendations. We’ve talked about the importance of fire safety when working with these tools at home before, and how soldering is not the only thing that can produce toxic fumes in your shop. With no shortage of great tips on how to build your own fume extractors, we hope everybody’s out there hacking safely.

Turntable Spins Color And Sound Together

If you can’t grow your own synesthesia, buying electronics to do it for you is fine. Such is the case with the CHROMATIC by [Xavier Gazon], an artist who turns all kinds of electronics into circuit-bent musical art pieces. His project turns an old Philips Music 5120 turntable into a colorful MIDI sequencer, inspired by older 20th century instruments such as the Optophonic Piano and the Luminaphone.

The CHROMATIC uses colored pucks placed on a converted turntable to perform a looping sequence of chords in a given musical scale, generating MIDI data as output. Where its inspirations used primitive optics as their medium, this project employs a Teensy microcontroller and two modern optical sensors to do the work. One of these is a simple infrared sensor which tracks a white spot on the edge of the turntable, generating a MIDI clock signal to keep everything quantized and in sync. The other is a color sensor mounted on the tone arm, which can tell what color it sees and the height of the arm from the turntable.

While the instrument is still in beta testing phase details on how notes are generated aren’t yet given, though the general idea is that they are dictated by the color the tone arm sees and its position above the platter. Moving the tone arm changes which pucks it tracks, and the speed of the turntable can also be adjusted, changing how the melody sounds.​

The CHROMATIC is a very interesting project, but it’s not the first optical-based turntable hack we’ve seen here. We’ve also seen a much weirder use for a color sensor, too. Check out the video of this one in action after the break.

Continue reading “Turntable Spins Color And Sound Together”

Building IoT Devices The Easy Way

Do you have a Raspberry Pi? What is it being used for right now? If you’re like the majority of people who replied to [Michael Hall’s] poll on Twitter, it’s likely yours is sitting on a shelf doing nothing too. So why not just turn it into an IoT device for your home?

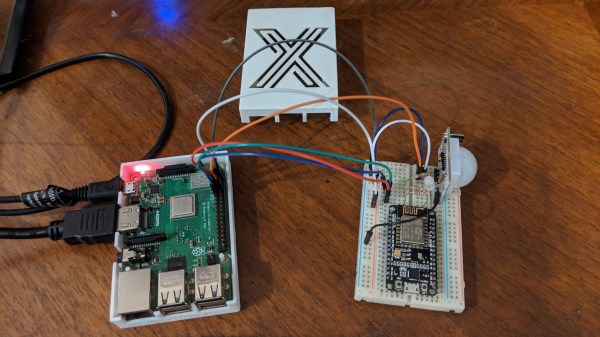
[Michael] wrote an easy-to-follow guide focusing on getting the EdgeX Foundry IoT platform running on the Raspberry Pi. It is designed to be a unified multi-platform base for IoT devices hosted by the Linux Foundation, making it easy to control and integrate them into other systems. The framework for this consists of two parts, a Device Service running on your Pi, and the rest of the services running on a desktop or laptop where you’ll be monitoring it.

His guide goes into detail on how to get both parts working on your computer and your Pi using Docker for ease of installation. As for the IoT device, he uses the built-in PIR sensor example to show how to configure it without having to write any programming. You can then monitor the device’s sensors, which you can just connect straight to the Pi’s GPIO pins, from your desktop. Since the EdgeX software is designed to run on any flavor of Linux, this should make it easy to repurpose any forgotten single-board computer into the beginnings of a home automation system.

However, if you are confident in your programming skills, you’re probably looking for something slimmer such as the ESP8266 family of microcontrollers to do your bidding. Why not try an energy monitor or a smoke detector project with them?

A Cyberdeck Built With Ergonomics In Mind

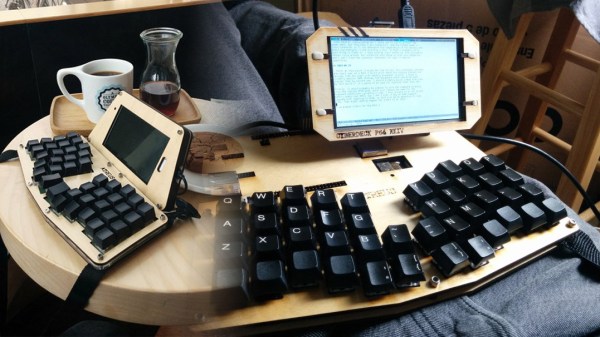
With a new decade looming over us, the hot new thing for hackers and makers everywhere is to build cyberdecks to go with the flashy black-and-neon clothing that the sci-fi films of old predicted we’d all be wearing come next year. [Phil Hagelberg] has been designing one based on his own ergonomic keyboard, prioritizing not only form but also function.

The Atreus mechanical keyboard has a split layout that foregoes the traditional typewriter-inherited staggered arrangement in favor of one that better fits the user’s hands. The reduced number of keys limits hand movement for a more comfortable writing experience, however if you use function keys often, the trade-off is that you’ll need to use an auxiliary key to access them.

The deck [Phil] documents for us here is built from the ground up around that same design and aims to be small enough for travel, yet pleasant enough for serious use. It’s gone through four revisions so far, including an interesting one where the keyboard is laid out on the sides for using while standing up. As for the brains of the machine, the past revisions have used different flavors of Raspberry Pi and even a Samsung Galaxy S4 phone, though the latest model has a Pine64 running the show. How much has changed between each finished prototype really goes to show that you don’t have to get it right the first time, and it’s always good to experiment with a new idea to see what works.

[Phil] is now moving onto a fifth prototype, and hopes to eventually sell kits for building the whole cyberdeck along with the kits already available for the standalone keyboard. We’ve been struck by the creativity shown in these cyberdeck builds, which range from reusing retro computer shells to completely printing out a whole new one for a unique look. We can’t say for sure if this custom form-factor will eventually surpass mass-produced laptops, but it sure would be hella cool if it did.