Engineer’s Primer On DIY Christmas Light Shows

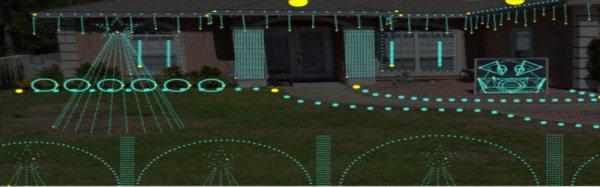
Each year brings new Christmas light shows, with synchronised music and wild blinking decorations to light your eyeballs ablaze. Now, many of us have dabbled in the dark arts of blinken, tinkering with LEDs or flashing a neon bulb or two. There’s plenty of tutorials on how to control all manner of lights, but they’re often written for novices. Learning the basics of electronics for the nth time when you just need to know the specifics of a protocol or what IC you need can be a total drag. That’s why [Bill Porter] has written the Engineer’s Guide to DIY Computer Controlled Holiday Lights.

[Bill] covers the topic from start to finish – not just the technical side of things, but practical considerations about where to source components, and timescales for keeping your project on track. It’s no coincidence this is coming out in January – if you want to get something big up and running for Christmas, it’s time to start now! The guide gives links to forum communities that put in large group orders for parts early, and ship them slow to save money.

Other areas covered include software for creating advanced sequences for your lighting setup, which allow you to map animations over your entire layout. There’s also tips on which controller hardware to use for incandescent lights and the now-ubiquitous WS2811 strings. Even better, [Bill] shares specific tips on how to avoid common problems like voltage drop over long pixel runs and communication issues.

It’s a testament to [Bill] and his experience – the guide is an excellent way to get right up to speed with the state of the art in DIY Christmas light shows, and will save you from all manner of pitfalls. If you need to build something big this year and don’t want to reinvent the wheel, this is for you.

It’s not the first time we’ve heard from [Bill] either – check out his stunning wedding invitations or his repair of a science museum exhibit.

MIDI DAC For Vintage Synth Hacks

A lot of classic synthesizers rely on analog control voltages to vary parameters; this is a problem for the modern musician who may want to integrate such hardware with a MIDI setup. For just this problem, [little-scale] has built a MIDI-controllable DAC for generating control voltages.

It’s a simple enough build – a Teensy 2 is used to speak USB MIDI to a laptop. This allows the DAC to be used with just about any modern MIDI capable software. The Teensy then controls a Microchip MCP4922 over SPI to generate the requisite control voltages. [little-scale]’s video covers the basic assembly of the hardware on a breadboard, and goes on to demonstrate its use with a performance using the MIDI DAC to control a Moog Mother 32 synth. [little-scale] has also made the code available, making it easy to spin up your own.

We can see this project being indispensable to electronic musicians working with banks of modular synths, making it much easier to tie them in with automation in their DAW of choice. This isn’t the first MIDI interfacing hack we’ve seen either – check out this setup to interface an iPad to guitar pedals.

Continue reading “MIDI DAC For Vintage Synth Hacks”

Appliance Monitor Is Kinda Shaky

Lots of people set out to build appliance monitors, whether it be for the fridge, the garage door, or the washing machine. Often, it’s nicer not to cut into an appliance to make direct electrical connections, especially when mains power or water is involved. But how else can we know what the appliance is doing?

[Drew Dormann] wanted to smarten up his old washing machine, so designed a system that uses a vibration sensor to monitor appliances. It’s a simple build, pairing the 801s vibration sensor with a Raspberry Pi Zero. Naturally, adapter boards are readily available to make hooking things up easy. Then it’s just a matter of tying it all together with a simple Python script which sends notifications using Twitter & PushBullet.

It’s important to note that this approach isn’t just limited to washing machines – there’s a whole laundry list of home appliances that vibrate enough to be monitored in this way! It’s likely you could even spy on a communal microwave in this way, though you might struggle with WiFi dropouts due to interference. Build it and let us know.

[Drew]’s build is a great example of what you can put together in a few hours with parts off the shelf. For those that consider the Pi Zero overkill for this application, consider this vibration-based laundry monitor based on the ESP8266. Think you can do better? Show us what you’ve got on Hackaday.io!

Air Conditioner Speaks Serial, Just Like Everything Else

Like so many other home appliances, it’s likely that even your air conditioner has a serial interface buried inside it. If you’re wondering why, it’s because virtually every microcontroller on the planet has a UART built in, and it’s highly useful for debugging during the development process, so it makes sense to use it. Thus, it was only a matter of time before we saw a hacked airconditioner controlled by a Raspberry Pi.

[Hadley] was growing frustrated with the IR remote for his Mitsubishi air conditioner; it can issue commands, but it’s a one way interface – there’s no feedback on current status or whether commands are received, other then the occasional beep or two. Deciding there had to be a better way, [Hadley] grabbed a Saleae Logic Analyser and started probing around, determining that the unit spoke 5 V TTL at 2400 bps with even parity. The next step was to start talking back.

Continue reading “Air Conditioner Speaks Serial, Just Like Everything Else”

Where There’s Smoke, There’s A Knockoff 3D Printer

These days, it’s possible to buy clones of popular 3D printers from China for satisfyingly low prices. As always, you get what you pay for, and while usable, often they require some modification to reach their full potential. [g3ggo] recently laid down €270 for a clone of the Prusa i3 by Geeetech, knowing it would require some modifications for safety and performance.

First on the bill was a wobbly Z-axis, which was dealt with by printing some new parts designed to fix this issue which have already been developed by the community. Forums are your friend here – often an enterprising user will have already developed fixes for the most common issues, and if they haven’t, you can always step up to be the hero yourself. There was a darker problem lurking inside, though.

[g3ggo] began to wonder why the MOSFETs for the hot end were running so hot. It turned out to be an issue of gate drive – the FETs were only being driven with 5V, which for the given part, wasn’t enough to reach its lowest R_DS(on) and thus was causing the overheating issue. It gets worse, though – the heatsinks on the MOSFETs were bolted on directly without insulation, and sitting fractions of a millimeter above traces on the PCB. Unfortunately, with a small scratch to the soldermask, this caused a short circuit, destroying the hot end and MOSFETs and narrowly avoiding a fire. This is why you never leave 3D printers unattended.

The fix? Replacing the MOSFETs with a part that could deal with a 5V gate drive was the first step, followed by using insulating pads & glue to stop the heatsinks contacting the PCB. Now with the cooler running MOSFETs, there’s less chance of fire, and the mainboard’s cooling fan isn’t even required anymore. Overall, for a small investment in time and parts, [g3ggo] now has a useful 3D printer and learned something along the way. Solid effort!

Atari Now Runs Java, Thankfully Doesn’t Require Constant Updates

Java Grinder is a tool that compiles Java programs to run on platforms like microcontrollers and consoles, by outputting native assembly code and using APIs to work with custom hardware like bespoke graphics and sound chips. Amongst other hardware, Java Grinder supports the Commodore 64, which uses a variant of the 6502 CPU. [Michael Kohn] realized the Atari 2600 shares this processor, and figured he’d get started on making Java Grinder work with the Atari by expanding on the C64 work done by [Joe Davisson]. Together, they brought Java to the Atari 2600 and made a game along the way.

According to [Michael], parts of the project were easy, as some Java routines compile down into as little as 1 or 2 instructions on the 6502. Other parts were harder, like dealing with the graphics subsystem, and modifying Java Grinder to output 8-bit bytecode to fit into the Atari’s tiny 4K ROM limit. Even with this tweak, they still couldn’t fit in a game and title screen. In the end they relied on bank switching to get the job done. [Joe]’s game is pretty solid fare for the Atari 2600 — blocky graphics and bleepy sounds — and they’ve uploaded it to the page so you can try it yourself in an emulator.

At the end of the day, porting Java code to a system with 128 bytes of RAM probably isn’t going to be particularly useful. However, as a coding exercise and learning experience, there’s a lot of value here in terms of building your skills as a coder. Other such experiments have shown us Java running on other unexpected devices, like the Sega Genesis or the MSP430. Video after the break.

Continue reading “Atari Now Runs Java, Thankfully Doesn’t Require Constant Updates”

Gravity Simulations With An FPGA

Gravity can be a difficult thing to simulate effectively on a traditional CPU. The amount of calculation required increases exponentially with the number of particles in the simulation. This is an application perfect for parallel processing.

For their final project in ECE5760 at Cornell, [Mark Eiding] and [Brian Curless] decided to use an FPGA to rapidly process gravitational calculations. This allows them to simulate a thousand particles at up to 10 frames per second. With every particle having an attraction to every other, this works out to an astonishing 1 million inverse-square calculations per frame!

The team used an Altera DE2-115 development board to build the project. General operation is run by a Nios II processor, which handles the VGA display, loads initial conditions and controls memory. The FPGA is used as an accelerator for the gravity calculations, and lends the additional benefit of requiring less memory access operations as it runs all operations in parallel.

This project is a great example of how FPGAs can be used to create serious processing muscle for massively parallel tasks. Check out this great article on sorting with FPGAs that delves deeper into the subject. Video after the break.

Continue reading “Gravity Simulations With An FPGA”