3D Printed ESP8266 TV Is A Blast From The Past

We’ve often said that one of the best applications for desktop 3D printing is the production of custom enclosures, but you certainly aren’t limited to an extruded version of the classic Radio Shack project box. As [Marcello Milone] shows with this very clever retro TV enclosure for the Wemos D1 Mini, 3D printing means your imagination is the only limit when it comes to how you want to package up your latest creation.

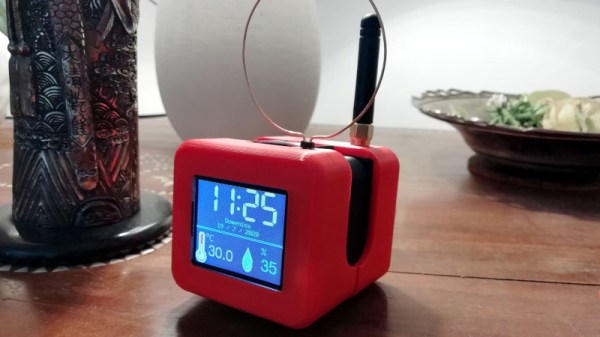
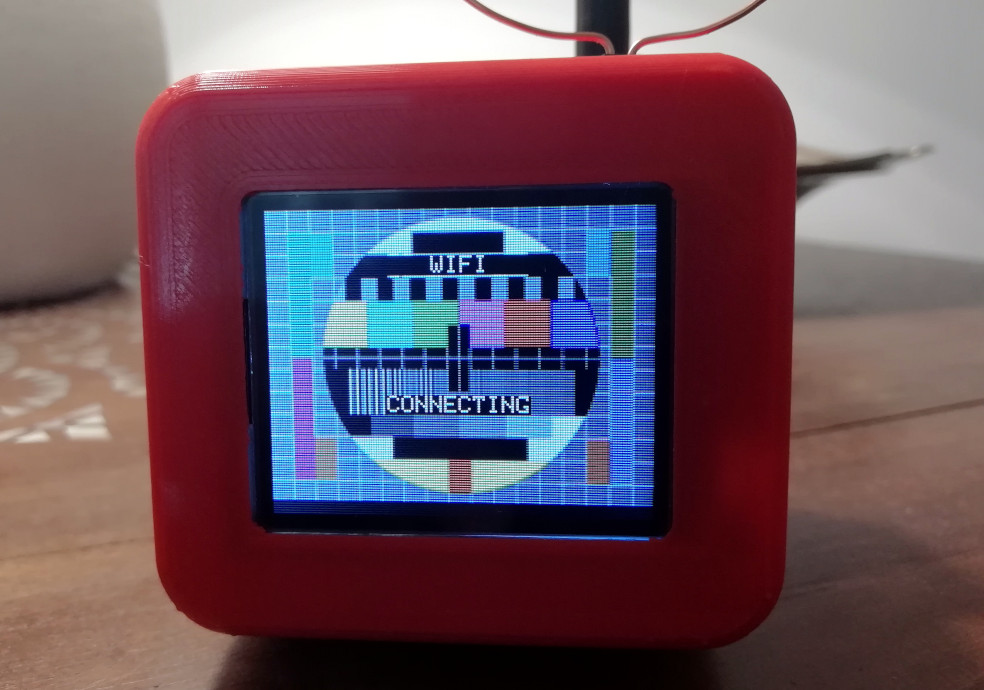
As nice as the printed parts are, it’s the little details that really sell the look. [Marcello] has bent a piece of copper wire into a circle to make a faux antenna with vintage flair, and while the ESP is connecting to the WiFi network, it even shows an old school TV test pattern on its 1.8″ TFT display.

In the video after the break you can see the device go through its startup routine, and while displaying the Hackaday Wrencher at boot might not be strictly on theme…we’ll allow it.

While you could certainly use this little enclosure for whatever ESP project you had in mind, [Marcello] says he’s building a distributed environmental monitoring network using HTU21D temperature and humidity sensors. It sounds like he’s still working on the software side of things though, so hopefully he posts an update when the functionality is fully realized.

Continue reading “3D Printed ESP8266 TV Is A Blast From The Past”

Custom Weather Camera Feed With Software Tricks

With a gorgeous view of the Italian seaside, we’re not surprised [Danilo Larizza] had a couple IP cameras set up to pull in real-time views. But using a Raspberry Pi, an environmental sensor, and some software trickery to overlay the current (and naturally, perfect) weather conditions over the images? Now he’s just teasing us.

Whatever his motives are, we have to admit that the end result is very nice. Especially when you find out that there’s no complex hardware or software at work here. An original Raspberry Pi is doing all the heavy lifting by pulling a frame from the external IP camera using ffmpeg, polling the I2C-connected BME280 temperature and humidity sensor with a Python script, and then producing a final snapshot with the environmental data laid over top using ImageMagick.

[Danilo] gives the exact commands he’s using for each step of the process, making it easy to follow along and see how everything comes together in the end. That also makes it much easier to adapt for your own purposes should you feel so inclined. Once you see how all the pieces fit together, where the data and images come from is up to you.

We’ve previously shown how some simple Python code can be used to turn your raw data into attractive images, and combining that with real-world photographs is an excellent way of turning a text file full of values into a display worth showing off.

Tiny Ethernet Switch Gets Even Smaller

As a project gets more complicated, some kind of internal communication network is often used to that all of the various modules and sensors can talk with each other. For hardware hackers like us, that usually means SPI, I2C, or maybe even good old fashioned UART. But if you’re pushing a lot of data around, like live video feeds from multiple cameras, you’ll need something a bit faster than that.

Which is why [Josh Elijah] has created the SwitchBlox Nano, a three port 10/100 Ethernet switch that fits on a one inch square PCB. All you need to do is provide it with power, with a generous input range of 5 to 50 volts, connect your devices to the Molex Picoblade connectors on the board, and away you go. There’s even a 5 V 1 A regulated output you can use to run your downstream devices.

If you’ve got a feeling that you’ve seen something very similar on these pages earlier in the year, you’re not imagining things. Back in April we covered the original five port SwitchBlox in a post that garnered quite a bit of attention. In fact, [Josh] tells us that the design of this new switch was driven largely by the feedback he got from Hackaday readers. The Nano is not only smaller and cheaper than the original, but now maintains full electrical isolation between each port.

The average Hackaday reader is as knowledgeable as they are opinionated, and we’re glad [Josh] was able to put the feedback he received to practical use. We’re proud that our community has had a hand in refining successful commercial products like the Arduboy handheld game system and the Mooltipass hardware password keeper. Now it looks like we can add a tiny Ethernet switch to the list of gadgets we’ve helped push up the hill. Maybe we should get a stamp or something…

CBS Announces Functional Tricorder Replica For 2021

It’s taken 54 years, but soon, you’ll finally be able to buy a fully-functional version of the tricorder from Star Trek. Announced on the official website for the legendary sci-fi franchise, the replica will be built by The Wand Company, who’ve previously produced a number of high-quality official Star Trek props as well as replicas for Doctor Who and the Fallout game series.

Admittedly, we’re not sure what a “fully-functional tricorder” actually is, mainly because the various on-screen functions of the device were largely driven by whatever bind Kirk and Spock managed to find themselves in that week. But the announcement mentions the ability to scan radio frequencies, pull in dynamic data from environmental sensors, and record audio. The teaser video after the break doesn’t give us any more concrete information than the announcement, but it does seem to confirm that we’ll be viewing said data on the device’s iconic flip-up display.

Now as the regular Hackaday reader knows, fans have been building extremely impressive “functional” tricorders for some time now. Unlike the sleek 24th century versions seen in Star Trek: The Next Generation, the original tricorder prop was rather clunky and offers plenty of internal volume for modern goodies. Cramming a Raspberry Pi, LCD, and a bunch of sensors into an inert replica is a relatively approachable project. So it will be interesting to see how the official version stacks up to what’s already been done by intrepid hackers and makers.

The official tricorder won’t be available until summer of 2021, but you can sign up to be notified when it’s your turn to beam one up. While the $250 USD sticker price might keep the more casual Trekkers at bay, it’s actually a bit cheaper than we would have assumed given the amount of time and money we’ve seen fans put into their own builds.

Continue reading “CBS Announces Functional Tricorder Replica For 2021”

The WISE In NEOWISE: How A Hibernating Satellite Awoke To Discover The Comet

Over the last few weeks the media has been full of talk about NEOWISE, one of the brightest and most spectacular comets to ever pass through our solar system that you can still see if you hurry. While the excitement over this interstellar traveler is more than justified, it’s also an excellent opportunity to celebrate the Wide-field Infrared Survey Explorer (WISE) space telescope it was named after. The discovery of this particular comet is just the latest triumph in the orbiting observatory’s incredible mission of discovery that’s spanned over a decade, with no signs of slowing down anytime soon.

In fact, WISE has been operational for so long now that its mission has evolved beyond its original scope. When it was launched in December 2009 from California’s Vandenberg Air Force Base, its primary mission was scheduled to be completed in less than a year. But like many NASA spacecraft that came before it, WISE achieved its original design goals and found itself ready for a new challenge. Though not before it spent almost three years in hibernation mode as the agency decided what to do with it.

Continue reading “The WISE In NEOWISE: How A Hibernating Satellite Awoke To Discover The Comet”

Hand Depanelizer Gets Pneumatic Upgrade

In high volume production, smaller PCBs are often “panelized” so that multiple copies can be shuffled through assembly as a single piece. Each board is attached to the panel with a few strategically placed tabs, not unlike the sprues in a plastic model kit. If you only have to separate a few boards you can simply cut them with a hand nipper, but when you’re doing hundreds or thousands of boards, it quickly becomes impractical.

Which is where [Clough42] found himself recently. Looking to improve the situation without breaking the bank, he decided to automate his trusty hand-held depanelizer tool. The basic idea was to build an actuator that could stand in for his own hand when operating the tool. He already had a pneumatic cylinder that he could power the device with, he just needed to design it.

In the video below, he walks the viewer though his CAD design process for this project. His first step, which is one that’s often overlooked by new players, is creating digital representations of the hardware he’s using. This allows him to quickly design 3D printed parts that have the proper dimensions and clearances to interface with his real-world components. Remember: it’s a lot easier to adapt your 3D model to the components on hand than the other way around.

With the appropriate valves, hoses, and a foot pedal attached to the pneumatic cylinder, he’s able to operate the cutter completely hands-free. He still has to manually move the panel around, but at least it saves him from the repetitive squeezing motion.

With a tool like this and a custom testing jig, you’ll be producing PCBs like the pros in no time.

Continue reading “Hand Depanelizer Gets Pneumatic Upgrade”

A Simple Soft Power Switch Using Common Modules

If you want to easily control the power in a circuit, you’ll probably reach for the classic toggle switch. While there’s certainly nothing wrong with that, physical toggles are a bit dated at this point. A soft power switch that turns your gadget on and off at the tap of a finger is far more 21st century. You might think this kind of modern trickery is too difficult to implement on a DIY project, but as [Sasa Karanovic] shows, it’s actually a lot easier than you might think.

Now to be fair, that wasn’t actually his goal. All [Sasa] was trying to do was come up with a slick way to control the LED lighting in his 3D printer enclosure. Which, as you can see in the video below, he accomplished. But the hacked together circuit he used to do it could easily be adapted for other electronic projects. If you’re using a LM2596 DC-DC converter module to power your gadget, you can add a touch sensitive soft switch for literally pennies.

The trick is utilizing the enable pin on the LM2596. The common buck converter modules tie this pin to ground so the regulator is always enabled, but if you lift the pin off the PCB and connect it to the output of a TTP223 capacitive touch sensor, you can simply tap the pad to control the regulator. Power for the touch sensor itself is pulled from the input side of the regulator, so even when the power is cut off downstream, the sensor is still awake and can kick the chip back into gear when you need it.

If you’re not interested in touch control, you could try connecting the enable pin on the regulator to an ESP8266 and making a cheap Internet-controlled DC power supply. Continue reading “A Simple Soft Power Switch Using Common Modules”