Syringes Put The Squeeze On This Mini Drill Press

If you’re making your own PCBs for through-hole projects at home, getting the board etched is only half the battle; you’ve still got to drill all those little holes. It’s a tedious process, and if you’ve got a lot of them, doing them freehand with a drill just isn’t going to cut it. Which is why [Ruchir Chauhan] built this tiny 3D printed drill press.

This design is actually interesting for a number of reasons. The fact that it’s primarily 3D printed is a big one, though of course it’s not the first time we’ve seen that. We also like the minimal part count and low-cost, which is sure to appeal to those looking to produce PCBs on a budget. But the most impressive feature has to the hydraulic system [Ruchir] has come up with to actually do the drilling.

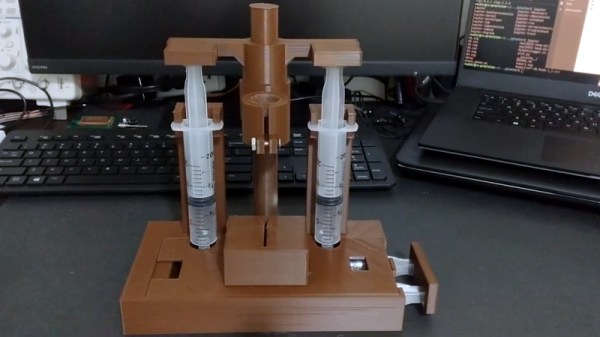
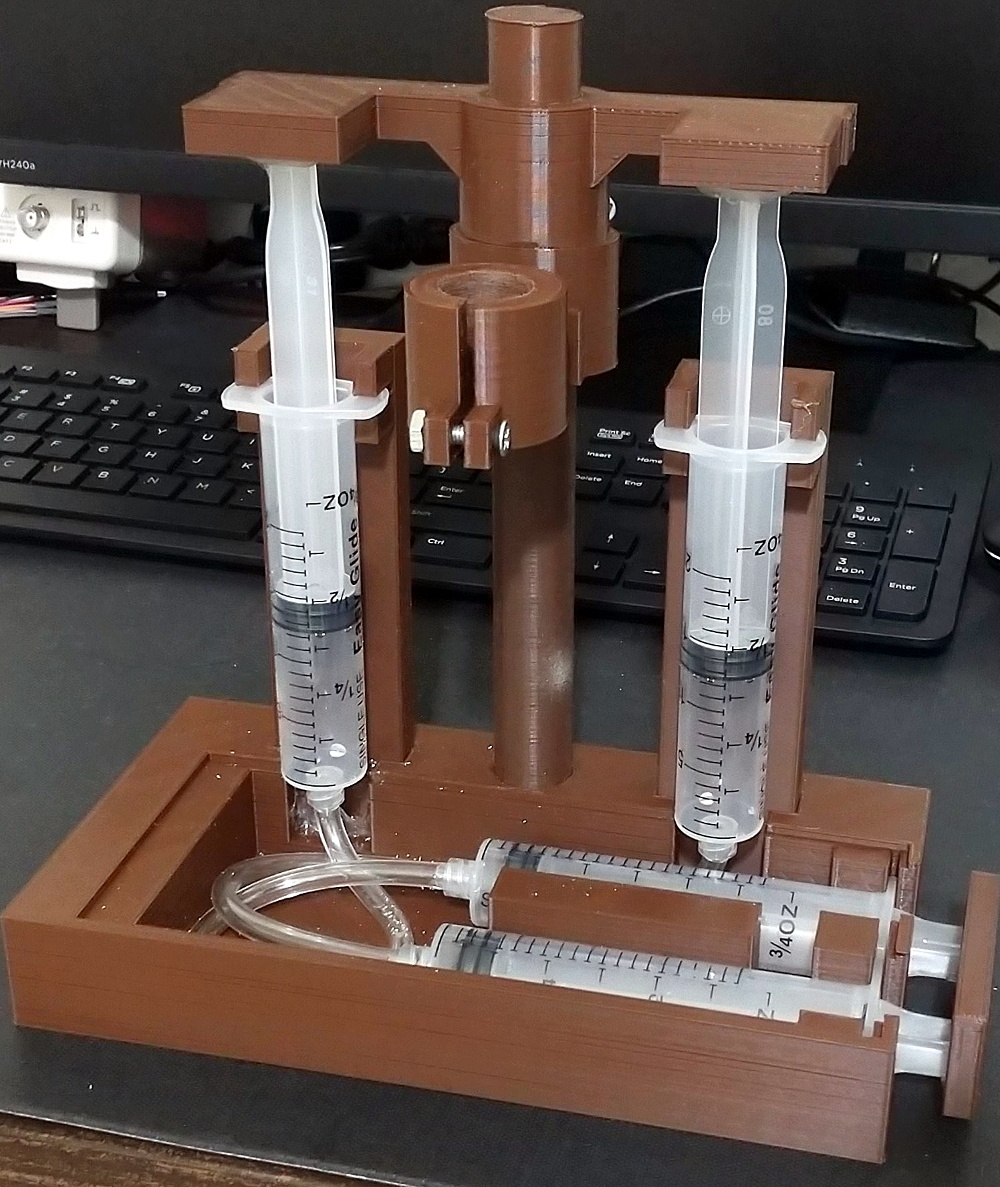
Rather than pulling an arm to lower the bit towards the work piece, a system utilizing four syringes, some water, and a bit of tubing is used to pull the tool down. This might seem extravagant, but if you’ve got a lot of holes to drill, this design is really going to save your arms. This method should also give you more consistent and accurate results, as you won’t be putting any torque on the structure as you would with a manually operated press.

[Ruchir] doesn’t offer much in the way of instructions on the project’s Hackaday.io page, but once you print out all of the provided STLs and get your syringes ready to go, the rest should be fairly self explanatory. Personally we might have added a smooth steel rod in there to make sure the movement is nice and straight, but we can see the appeal of doing it with a printed part to keep things cheap.

Looking for more ideas? If you’re after something a bit larger we might suggest this one made from PVC pipes, and this 3D printed desktop press would look good on anyone’s bench. Just don’t blame us if your arms get tired.

Continue reading “Syringes Put The Squeeze On This Mini Drill Press”

Reviving A DOA Smart Bulb With Custom Firmware For Its ESP8266

There are some incredibly cheap WiFi smart bulbs on the market these days, but as is often the case, you tend to get what you pay for. When [Viktor] took delivery of his latest bargain basement bulb, the thing didn’t even work. So much for Quality Assurance. On the plus side, it was a great excuse to pop it open and replace the firmware.

For anyone wondering, [Viktor] never actually figured out why the bulb didn’t work. Its ESP8266-based control board was getting power, and data was getting spit out of the serial port when he connected it to the computer (although he never got the communications settings right to actually see what it was saying). But he also didn’t care much; once he confirmed that the hardware was good, he just uploaded the custom firmware he’d previously developed for another ESP8266 bulb.

Of course, it wasn’t quite that easy. The chances that both bulbs would have used the same GPIO pins to control the red, green, blue, and white LEDs were pretty slim. But after some testing and modifications to the code, he was able to fire them up. The other issue was a bit trickier, as it turned out the bulb’s flash chip was too small to hold his firmware’s web configuration pages. So he had to break out the hot air gun and replace the SPI flash chip with something a bit roomier. We suppose he could have just made smaller web pages… but where’s the fun in that?

Even with the chip swap, this looks a lot easier than building your own smart bulbs from scratch. With so many cheap ESP8266 bulbs on the market, it seems there’s never been a better time to code your own home lighting solution.

Finding A Secret Message From A Gaming Legend

Satoru Iwata is perhaps best remembered for leading Nintendo through the development of the DS and Wii, two wildly successful systems which undeniably helped bring gaming to a wider and more mainstream audience. But decades before becoming the company’s President in 2002, he got his start in the industry as a developer working on many early console and computer games. [Robin Harbron] recently decided to dig into one of the Iwata’s earliest projects, Star Battle for the VIC-20.

Finding the message was easy, if you knew were to look.

It’s been known for some time that Iwata, then just 22 years old, had hidden his name and a message in the game’s source code. But [Robin] wondered if there was more to the story. Looking at the text in memory, he noticed the lines were actually null-terminated. Realizing the message was likely intended to get printed on the screen at one point during the game’s development, he started hunting for a way to trigger the nearly 40 year old Easter Egg.

As it turns out, it’s hidden behind a single flag in the code. Just change it from 0 to 1, and the game will display Iwata’s long-hidden credit screen. That proved the message was originally intended to be visible to players, but it still didn’t explain how they were supposed to trigger it during normal game play.

That’s where things really get interesting. As [Robin] gives us a guided tour through Star Battle’s inner workings, he explains that Iwata originally intended the player to hit a special combination of keys to tick over the Easter Egg’s enable flag. All of the code is still there in the commercial release of the game, but it’s been disabled. As Iwata’s life was tragically cut short in 2015 due to complications from cancer, we’ll perhaps never know the reason he commented out the code in question before the game was released. But at least we can now finally see this hidden message from one of gaming’s true luminaries.

Last time we heard from [Robin], he’d uncovered a secret C64 program hidden on a vinyl record. With his track record so far, we can’t wait to see what he digs into next. Continue reading “Finding A Secret Message From A Gaming Legend”

An RGB Backlight For The Nokia 5110 LCD

Hardware hackers love the Nokia 5110 LCD. Or at least, they love the clones of it. You can pick up one of these panels for a couple bucks wherever electronic bits and bobs are sold, and integrating it into your project is a snap thanks to all the code and documentation floating around out there. But while it might be cheap and reliable, it’s not a terribly exciting component.

Which is perhaps why [Miguel Reis] thought he’d spruce it up a bit with an RGB backlight. While we’ll admit that this hack is mostly about looking cool, it’s not entirely without practical application. If your gadget experiences some kind of fault, having it flash the LCD bright red is sure to get somebody’s attention from across the room.

The board itself is very straightforward, with four MHPA1010RGBDT RGB LEDs and a couple of passives to keep them happy. The Nokia 5110 LCD module just pops right on, and beyond the extra pins added for the three LED colors, gets wired up the same as before. The backlight LEDs just need a few spare GPIO pins on your microcontroller to drive them, and away you go.

[Miguel] is currently selling his RGB version of this iconic LCD on Tindie for only a couple dollars more than the standard version, so it looks like a pretty cheap way to add a little bling to your next project. (Tindie is owned by Supplyframe, which also owns Hackaday. But they didn’t put us up to adding this link.)

The Open Source Mars Rover, One Year Later

As the name implies, here at Hackaday we strive to bring you interesting projects every single day. But that doesn’t necessarily mean a project only gets one day to grace these storied pages. Quite the opposite, in fact. We’re always happy to revisit a project and find out how far it’s evolved since we last crossed paths with it, especially when the creators themselves reach out to give us an update.

Which is exactly what happened when [Jakob Krantz] recently wrote in to get us up to speed on this incredible open source rover project. We first saw this 3D printed Curiosity inspired robot a little less than a year ago, and at that point it was essentially just a big box with the distinctive NASA rocker-bogie suspension bolted on. Now it not only looks a lot closer to the Martian rovers that inspired it, but it’s also learned a number of new tricks that really take this project to the next level.

The articulated head and grabber arm don’t just help sell the Curiosity look, they’re actually functional. [Jakob] notes that he doesn’t have kinematics integrated yet, so moving the arm around is more for show than practical application, but in the future it should be able to reach out and grab objects. With the new cameras in the head, he’ll even be able to get a first person view of what he’s picking up.

Last year [Jakob] was using a standard RC transmitter to drive the rover around, but he’s since put together a custom controller that’s truly a thing of beauty. It uses an ESP32 and LoRa module to communicate with matching hardware inside the rover, as well as a smartphone clipped onto the top that’s displaying telemetry and video over WiFi. The controller is actually its own separate project, so even if you aren’t in the market for a scaled down Mars rover, its controller could come in handy for your next robotics project.

Presumably the multi-mission radioisotope thermoelectric generator (MMRTG) on the back of the rover is just pretend….but with this guy, we’re not so sure. Give him another year, and who knows.

Review: Calculator Kit Is Just A Few Hacks From Greatness

While most people are satisfied with a calculator application on their smartphone these days, there’s still something to be said for the old fashioned desk calculator. Maybe it’s the fact the batteries last long enough that you can’t remember the last time you changed them, or the feel of physical buttons under your fingers. It could even be the fact that it keeps your expensive smartphone from needing to sit out on the workbench. Whatever the reason, it’s not uncommon to see a real-life calculator (or two) wherever solder smoke tends to congregate.

Which is precisely the idea behind this DIY calculator kit. Available from the usual overseas retailers for about $15 USD, it has some hobbyist-oriented features such as the ability to decode resistor color bands, convert hexadecimal numbers, and calculate resistor values for driving LEDs. If you’re going to keep a knock-around calculator on your bench, why not build the thing yourself?

Given the dual nature of this product, a DIY electronics kit and a functional desk calculator for electronic hobbyists, it seems only appropriate to review both aspects of it individually. Which is good, since there may be more to this product than just the sum of its parts.

Continue reading “Review: Calculator Kit Is Just A Few Hacks From Greatness”

AVR Multi-Tool Learns The Latest Tricks

Like many of us who fiddle with microcontrollers, [Mike] and [Brian] often found themselves using an ISP programmer and a USB-to-serial adapter. But when they started working on the latest generation of ATtiny chips, they found themselves in need of a Unified Program, and Debug Interface (UPDI) programmer as well. So they decided to wrap all three functions into one handy open hardware gadget.

They call their creation the AVR General Purpose Programmer, or AVRgpp for short. It runs on an ATmega328P with a Pro Mini bootloader, which means that the programmer itself is fully compatible with the Arduino IDE. USB-to-serial capability is provided by a CH330N, and a MC14053 digital switch IC is used to select between talking to the AVRgpp’s onboard MCU or the target device.

A 128 x 32 I2C OLED and two push buttons are used to select the device’s current mode, and there’s a physical switch to select between 5 V or 3.3 V power for the target. There’s also a ST662 12 V regulator, as UPDI targets occasionally need a high voltage pulse to switch into programming mode. Everything is packaged up in a pocket-sized laser cut enclosure that you can easily toss in your bag.

[Mike] and [Brian] say they are considering putting the AVRgpp into small scale production if there’s enough interest, so let them know if you’d like to get one without having to build it yourself.