ESP8266 And Sensors Make For A Brainy NERF Ball

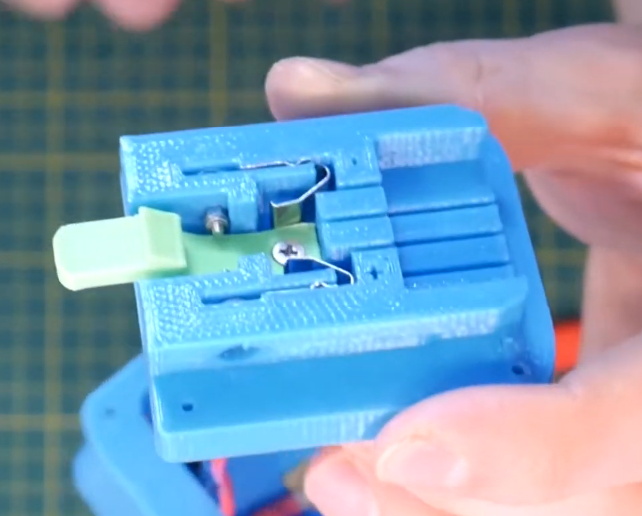
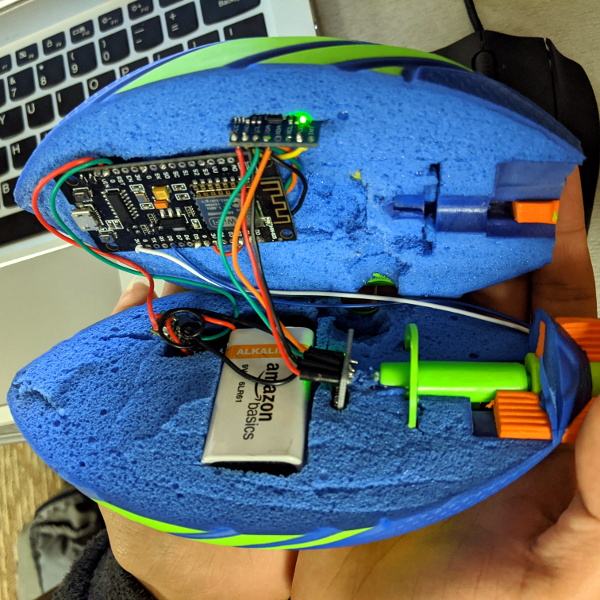
For his final project in UCLA’s Physics 4AL program, [Timothy Kanarsky] used a NodeMCU to smarten up a carefully dissected NERF football. With the addition to dual MPU6050 digital accelerometers and some math, the ball can calculate things like the distance traveled and angular velocity. With a 9 V alkaline battery and a voltage regulator board along for the ride it seems like a lot of weight to toss around; but of course nobody on the Hackaday payroll has thrown a ball in quite some time, so we’re probably not the best judge of such things.

Even if you’re not particularly interested in refining your throw, there’s a lot of fascinating science going on in this project; complete with fancy-looking equations to make you remember just how poorly you did back in math class.

As [Timothy] explains in the write-up, the math used to find velocity and distance traveled with just two accelerometers is not unlike the sort of dead-reckoning used in intercontinental ballistic missiles (ICBMs). Since we’ve already seen model rockets with their own silos, seems all the pieces are falling into place.

The NodeMCU polls the accelerometers every 5 milliseconds, and displays the data on web page complete with scrolling graphs of acceleration and angular velocity. When the button on the rear of the ball is pressed, the data is instead saved to basic Comma Separated Values (CSV) file that’s served up to clients with a minimal FTP server. We might not know much about sportsball, but we definitely like the idea of a file server we can throw at people.

Interestingly, this isn’t the first time we’ve seen an instrumented football. Back in 2011 it took some pretty elaborate hardware to pull this sort of thing off, and it’s fascinating to see how far the state-of-the-art has progressed.

Teaching Science With An Empty Soda Bottle

Creating the next generation of scientists and engineers starts by getting kids interested in STEM at an early age, but that’s not always so easy to do. There’s no shortage of games and movies out there to entertain today’s youth, and just throwing a text book at them simply isn’t going to cut it anymore. Modern education needs to be engrossing and hands-on if it’s going to make an impact.

Which is exactly what the Institute of Science and Technology Austria hopes to accomplish with the popSCOPE program. Co-founded by [Dr. Florian Pauler] and [Dr. Robert Beattie], the project uses off-the-shelf hardware, 3D printed parts, and open source software to create an engaging scientific instrument that students can build and use themselves. The idea is to make the experience more personal for the students so they’re not just idle participants sitting in a classroom.

The hardware in use here is quite simple, essentially just a Raspberry Pi Zero W, a camera module, a Pimoroni Blinkt LED module, and a few jumper wires. It all gets bolted to a 3D printed frame, which features a female threaded opening that accepts a standard plastic soda (or pop, depending on your corner of the globe) bottle. You just cut a big opening in the side of the bottle, screw it in, and you’ve saved yourself a whole lot of time by not printing an enclosure.

So what does the gadget do? That obviously comes down to the software it’s running, but out of the box it’s able to do time-lapse photography which can be interesting for biological experiments such as watching seeds sprout. There’s also a set of 3D printable “slides” featuring QR codes, which the popSCOPE software can read to show images and video of real microscope slides. This might seem like cheating, but for younger players it’s a safe and easy way to get them involved.

For older students, or anyone interested in homebrew scientific equipment, the Poseidon project offers a considerably more capable (and complex) digital microscope made with 3D printed parts and the Raspberry Pi.

DIY ESP32 Alarm System Leverages 433 MHz Sensors

There’s a huge market for 433 MHz alarm system hardware out there, from PIR motion detectors to door and window sensors. If you want to put them to work, all you need is a receiver, a network-enabled microcontroller, and some code. In his latest video, [Aaron Christophel] shows how easy it can be.

In essence, you connect a common 433 MHz receiver module to an ESP32 or ESP8266 microcontroller, and have it wait until a specific device squawks out. From there, the code on the ESP can fire off using whatever API works for your purposes. In this case [Aaron] is using the Telegram API to send out messages that will pop up with a notification on his phone when a door or window is opened. But you could just as easily use something like MQTT, or if you want to go old-school, have it toggle a relay hooked up to a loud siren.

Even if you aren’t looking to make your own makeshift alarm system, the code and video after the break are a great example to follow if you want to get started with 433 MHz hardware. Specifically, [Aaron] walks the viewer through the process of scanning for new 433 MHz devices and adding their unique IDs to the list the code will listen out for. If you ever wondered how quickly you could get up and running with this stuff, now you’ve got your answer.

In the past we’ve seen the Raspberry Pi fill in as an RF to WiFi gateway for these type of sensors, as well as projects that pulled them all together into a complete home automation system on the cheap.

Continue reading “DIY ESP32 Alarm System Leverages 433 MHz Sensors”

Using The Steam Controller With LEGO Motors

While Valve’s Steam Controller was ultimately a commercial failure, there’s no denying it’s an interesting piece of hardware. With dual trackpads, a wealth of buttons, and Bluetooth capability, it could be the ideal way to control your next build. Thanks to a recent project by [geggo], now you’ve even got an example you can follow.

A custom PCB holding an ESP32 and DRV8833 dual H-bridge motor controller is used to interface with standard LEGO motors using their stock block-like connectors. That means the board is a drop-in upgrade for whatever motorized creation you’ve already built.

Since the ESP32 obviously has WiFi in addition to Bluetooth, that also means this little board could be used to control LEGO projects over the local network or even Internet with some changes to the firmware.

Interestingly, while Valve officially enabled Bluetooth on the Steam Controller back in 2018, it sounds like some undocumented poking and reverse engineering was necessary to get it working here. That’s great for those of us who like a good hack, but if you’re more interested in just getting things working, [geggo] has been good enough to release the source code to get you started.

If you’re not interested in Bluetooth but want to get your creation up and moving, we’ve recently covered how one hacker used the ESP8266 to bring his LEGO train to life by integrating it into his smart home.

Continue reading “Using The Steam Controller With LEGO Motors”

Using A Vending Machine Bill Acceptor With Arduino

We’ve all seen, and occasionally wrestled with, bill acceptors like the one [Another Maker] recently liberated from an arcade machine. But have you ever had one apart to see how it works? If not, the video after the break is an interesting peak into how this ubiquitous piece of hardware tells the difference between a real bill and a piece of paper.

But [Another Maker] goes a bit farther than just showing the internals of the device. He also went through the trouble of figuring out how to talk to it with an Arduino, which makes all sorts of money-grabbing projects possible. Even if collecting paper money isn’t your kind of thing, it’s still interesting to see how this gadget works on a hardware and software level.

As explained in the video, a set of belts are used to pull the bill past an array of IR LEDs. The hardware uses these to scan the bill and perform some dark magic to determine if it’s a genuine piece of currency. [Another Maker] notes that these readers actually need to receive occasional firmware updates to take into account new bill designs. In fact, the particular unit he has is so out of date that it won’t accept modern $5 bills; which may explain how he got it for free in the first place.

Years ago we saw one of these bill acceptors used to make a DIY Bitcoin ATM. Of course back then, a few bucks would get you a semi-reasonable amount of BTC. These days you would skip the paper currency and do it all digitally.

Continue reading “Using A Vending Machine Bill Acceptor With Arduino”

Printed Door Handle Turns Key With A Servo

[Madalin Valceleanu] had a somewhat unique problem. He wanted to make his front door a bit “smarter”, but none of the IoT door locks he found were compatible with the style of reinforced door he had. So he set out to design and 3D print his own Internet-controlled door handle.

Now we say handle and not lock because the internal mechanisms haven’t actually been replaced. Those aren’t exactly the kind of parts that lend themselves to being recreated in PLA, after all. The printed components simply replace the original plate and handle on the interior of the door.

In that case, you might be wondering what the point of all this was. If he’s still using the same internal mechanism, how does a new handle help? On his new handle, [Madalin] has integrated a servo that’s capable of turning the original key in the door. With the servo wired up to a Raspberry Pi, this allows him to lock and unlock the door through his home automation system.

[Madalin] has made the STLs for his printed handles available on Thingiverse, but like most of these “bolt on” style door modifications, we imagine the design is bespoke enough that it won’t be much practical use to anyone else. Still, it’s an excellent example of solving a real-world problem with some outside of the box thinking. Continue reading “Printed Door Handle Turns Key With A Servo”

Designing Printed Adapters For Power Tool Batteries

Unless you’re particularly fond of having multiple types of batteries and chargers, you’d do well to make sure all your portable power tools are made by the same company. But what do you do if there’s a tool you really need, but your brand of choice doesn’t offer their own version of it? Rather than having to buy into a whole new tool ecosystem, you might be able to design your own battery adapter.

Note the locking tab that’s been printed separately.

As [Chris Chimienti] explains in the video after the break, the first thing you’ve got to do (beyond making sure the voltages match) is take some careful measurements of the connectors on your batteries and tools. His goal was to adapt a Milwaukee M12 battery to Makita CXT tool, so if you happen to have that same combination of hardware you can just use his STLs. Otherwise, you’ll be spending some quality time with a pair of calipers and a notepad.

Once the interfaces have been designed and printed, they are wired together and mounted to opposite ends of the center support column. In theory you’d be done at this point, but as [Chris] points out, there’s a bit more to it than just wiring up the positive and negative terminals. Many tools use thermistors in the batteries for thermal protection purposes, and when the tool doesn’t get a reading from the sensor, it will likely refuse to work.

His solution to the problem is to “hotwire” the thermistor lead on the battery connector with a standard resistor of the appropriate value. This will get the tool spinning, but obviously there’s no more thermal protection. For most homeowner DIY projects this probably won’t cause a problem, but if you’re a pro who’s really pushing their tools to the limit, this project might not be for you.

Of course, this isn’t the first time we’ve seen somebody adapt batteries from different brands to work on their tools. It’s a common enough problem once you start building up a workshop, although you could always avoid it by building all your own tools.

Continue reading “Designing Printed Adapters For Power Tool Batteries”