Jazzberry Bakes The Pi Into A Mechanical Keyboard

If you hang around Hackaday long enough, pretty soon you’ll start to see some patterns emerging. As the nexus of all things awesome in the hacking world, our front page offers a unique vantage point by which you can see what’s getting folks excited this particular month, year, or decade. Right now we can tell you hackers love the Raspberry Pi, 3D printing, and perhaps above all, they can’t get enough mechanical keyboards.

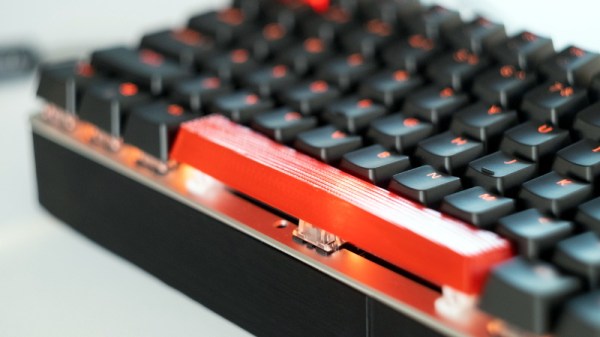
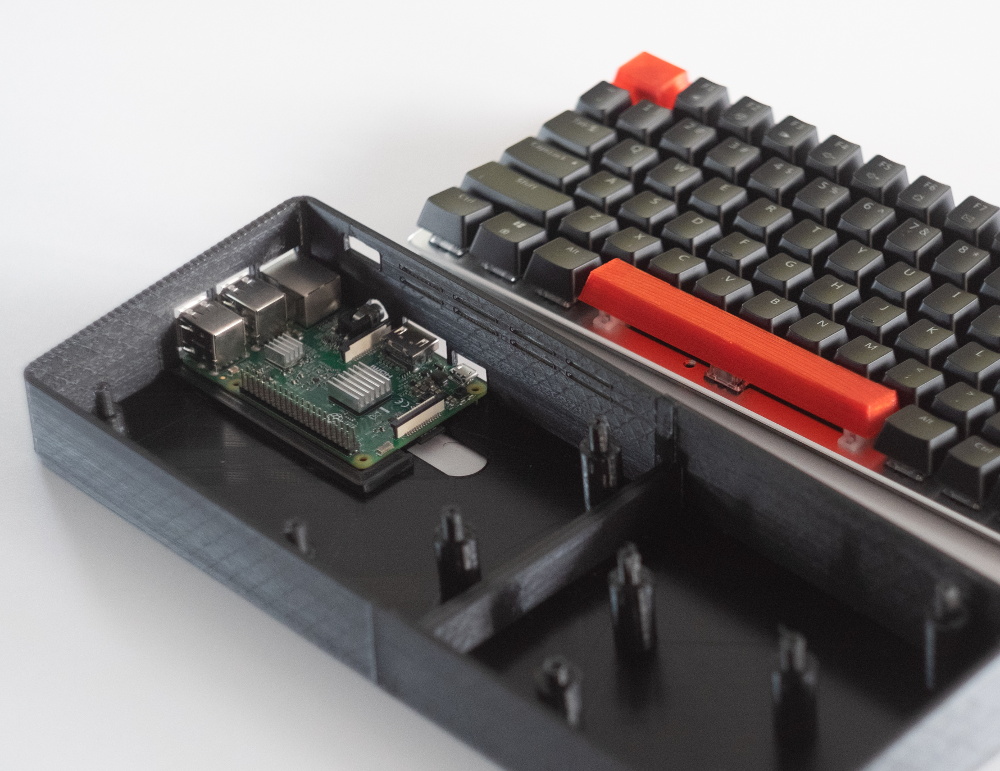
So that makes the Jazzberry by [Mattis Folkestad] something of a perfect storm in the hacker world. The project uses a 3D printed enclosure to combine a Raspberry Pi 3B+ and an Ajazz AK33 mechanical keyboard into a single unit like the home computers of old. Honestly, we’re just glad he didn’t sneak an ESP8266 in there; as the resulting combination might have been enough to crash the site.

That being said, we can’t help but notice there’s a lot of open space inside the 3D printed enclosure. Right now there’s nothing inside but the Raspberry Pi, which only takes up a fraction of the internal volume. Adding a battery and hard drive would be the logical next steps, but it could also be outfitted with a suite of radios and various other hacking and security research accoutrements. We’ve seen an influx of such builds over the last few months, and the Jazzberry seems like it could make a very slick entry into this burgeoning category of mobile pentesting devices.

The STL files are designed specifically for the combination of hardware that [Mattis] used, but it shouldn’t be too difficult to modify them for your own purposes. Even if you stick with the same AK33 keyboard, an upgrade to the impressively powerful Raspberry Pi 4 would be more than worth the time fiddling with the STLs in your CAD tool of choice. If you really want to go all in, add a display and you’re well on the way to that cyberdeck you’ve always wanted.

Building A Smarter Smoke Alarm With The ESP8266

The modern hacker wields a number of tools that operate on the principle of heating things up to extremely high temperatures, so a smoke alarm is really a must-have piece of equipment. But in an era where it seems everything is getting smarter, some might wonder if even our safety gear could benefit from joining the Internet of Things. Interested in taking a crack at improving the classic smoke alarm, [Vivek Gupta] grabbed a NodeMCU and started writing some code.

Now before you jump down to the comments and start smashing that keyboard, let’s make our position on this abundantly clear. Do not try to build your own smoke alarm. Seriously. It takes a special kind of fool to trust their home and potentially their life to a $5 development board and some Arduino source code they copied and pasted from the Internet. That said, as a purely academic exercise it’s certainly worth examining how modern Internet-enabled microcontrollers can be used to add useful features to even the most mundane of household devices.

In this case, [Vivek] is experimenting with the idea of a smoke alarm that can be silenced through your home automation system in the event of a false alarm. He’s using Google Assistant and IFTTT, but the code could be adapted to whatever method you’re using internally to get all your gadgets on the same virtual page. On the hardware side of things, the test system is simply a NodeMCU connected to a buzzer and a MQ2 gas sensor.

So how does it work? If the detector goes off while [Vivek] is cooking, he can tell Google Assistant that he’s cooking and it’s a false alarm. That silences the buzzer, but not before the system responds with a message questioning his skills in the kitchen. It’s a simple quality of life improvement and it’s certainly not hard to imagine how the idea could be expanded upon to notify you of a possible situation even when you’re out of the home.

We’ve seen how a series of small problems can cascade into a life-threatening situation. If you’re going to perform similar experiments, make sure you’ve got a “dumb” smoke alarm as a backup.

Continue reading “Building A Smarter Smoke Alarm With The ESP8266”

Tiny Game System Is An Experiment In Minimalism

Many people assumed the smartphone revolution would kill the dedicated handheld game system, and really, it’s not hard to see why. What’s the point of buying the latest Nintendo or Sony handheld when the phone you’re already carrying around with you is capable of high-definition 3D graphics and online connectivity? Software developers got the hint quickly, and as predicted, mobile gaming has absolutely exploded over the last few years.

But at the same time, we’ve noticed something of a return to the simplistic handheld systems of yore. Perhaps it’s little more than nostalgia, but small bare-bones systems like the one [Mislav Breka] has entered into the 2019 Hackaday Prize show that not everyone is satisfied with the direction modern gaming has gone in. His system is specifically designed as an experiment to build the most minimal gaming system possible.

In terms of the overall design, this ATMega328 powered system is similar to a scaled-down Arduboy. But while the visual similarities are obvious, the BOM that [Mislav] has provided seems to indicate a considerably more spartan device. Currently there doesn’t seem to be any provision for audio, nor is there a battery and the associated circuitry to charge it. As promised, there’s little here other than the bare essentials.

Unfortunately, the project is off to something of a rocky start. As [Mislav] explains in his writeup on Hackaday.io, there’s a mistake somewhere in either the board design or the component selection that’s keeping the device from accepting a firmware. He won’t have the equipment to debug the device until he returns to school, and is actively looking for volunteers who might be interested in helping him get the kinks worked out on the design.

An Open Hardware Rubber Ducky

No it’s not an open source version of Bert’s favorite bathtime toy (though seriously, let us know if you see one), the PocketAdmin by [Radik Bechmetov] is intended to be an alternative to the well-known “USB Rubber Ducky” penetration testing tool from Hak5. It might look like a standard USB flash drive, but underneath that black plastic enclosure is a whole lot of digital mischief waiting to spill out.

The general idea is that the PocketAdmin appears to the host computer as either a USB Human Interface Device (keyboard, mouse, etc) or a USB Mass Storage Device. In either event, the user has the ability to craft custom payloads which can exploit the operating system’s inherent trust in locally connected devices. The most common example is mimicking a USB keyboard that starts “typing” once connected to the computer.

You can even configure what vendor and product IDs the PocketAdmin advertises, allowing you to more accurately spoof various devices. [Radik] has included some other interesting features, such as the ability to launch different payloads depending on the detected operating system. That way it won’t waste time trying to bang out Windows commands when it’s connected to a Linux box.

The hardware is designed to be as easy and cheap to replicate as possible. The heavy lifting is done by a STM32F072C8T6 microcontroller, coupled with a W25Q256FVFG 32MiB flash chip to store the payloads. Beyond that, the BOM consists mainly of passives and a few obvious bits like the male USB connector. [Radik] has even provided a link to where you can buy the convincing looking USB “flash drive” enclosure.

We’ve seen low-cost DIY versions of the USB Rubber Ducky in the past, but PocketAdmin is interesting in that it seems like [Radik] is looking to break new ground with this project rather than just copy what’s already been done. This will definitely be one to watch as the 2019 Hackaday Prize heats up.

Printed It: Hand Cranked Photography Turntable

Even a relatively low-end desktop 3D printer will have no problems running off custom enclosures or parts for your latest project, and for many, that’s more than worth the cost of admission. But if you’re willing to put in the time and effort to become proficient with necessary CAD tools, even a basic 3D printer is capable of producing complex gadgets and mechanisms which would be extremely time consuming or difficult to produce with traditional manufacturing techniques.

Printable bearing cross-section

Once you find yourself at this stage of your 3D printing career, there’s something of a fork in the road. The most common path is to design parts which are printed and then assembled with glue or standard fasteners. This is certainly the easiest way forward, and lets you use printed parts in a way that’s very familiar. It can also be advantageous if you’re looking to meld your own printed parts with existing hardware.

The other option is to fully embrace the unique capabilities of 3D printing. Forget about nuts and bolts, and instead design assemblies which snap-fit together. Start using more organic shapes and curves. Understand that objects are no longer limited to simple solids, and can have their own complex internal geometries. Does a hinge really need to be two separate pieces linked with a pin, or could you achieve the desired action by capturing one printed part inside of another?

If you’re willing to take this path less traveled, you may one day find yourself creating designs such as this fully 3D printed turntable by Brian Brocken. Intended for photographing or 3D scanning small objects without breaking the bank, the design doesn’t use ball bearings, screws, or even glue. Every single component is printed and fits together with either friction or integrated locking features. This is a functional device that can be printed and put to use anywhere, at any time. You could print one of these on the International Space Station and not have to wait on an order from McMaster-Carr to finish it.

With such a clever design, I couldn’t help but take a closer look at how it works, how it prints, and perhaps even some ways it could be adapted or refined going forward.

Continue reading “Printed It: Hand Cranked Photography Turntable”

Developing An Automatic Tool For CAN Bus Hacking

In the old days, a physical button or switch on the dashboard of your car would have been wired to whatever device it was controlling. There was potentially a relay in the mix, but still, it wasn’t too hard to follow wires through the harness and figure out where they were going. But today, that concept is increasingly becoming a quaint memory.

Assuming your modern car even has physical buttons, pushing one of them likely sends a message over the CAN bus that the recipient device will (hopefully) respond to. Knowing how intimidating this can be to work with, [TJ Bruno] has been working on some software that promises to make working with CAN bus user interfaces faster and easier. Ultimately, he hopes that his tool will allow users to rapidly integrate custom hardware into their vehicle without having to drill a hole in the dashboard for a physical control.

But if you’re the kind of person who doesn’t like to have things done for them (a safe bet, since you’re reading Hackaday), don’t worry. [TJ] starts off his write-up with an overview of how you can read and parse CAN messages on the Arduino with the MCP2515 chip. He breaks his sample Sketch down line by line explaining how it all works so that even if you’ve never touched an Arduino before, you should be able to get the gist of what’s going on.

As it turns out, reading messages on the CAN bus and acting on them is fairly straightforward. The tricky part is figuring out what you’re looking for. That’s where the code [TJ] is working on comes in. Rather than having to manually examine all the messages passing through the network and trying to ascertain what they correspond to, his program listens while the user repeatedly presses the button they want to identify. With enough samples, the code can home in on the proper CAN ID automatically.

The upside to all this is that you can activate aftermarket functions or hardware with your vehicle’s existing controls. Need an example? Check out the forward-looking camera that [TJ] added to his his 2017 Chevy Cruze using the same techniques.

Continue reading “Developing An Automatic Tool For CAN Bus Hacking”

A Drop-In Upgrade Module For Cheap Rotary Tools

We’ve all seen them, the rotary tools that look almost, but not quite exactly, like a Dremel. They cost just a fraction of the real thing, and even use the same bits as the official Bosch-owned version. At first glance, they might seem like a perfect solution for the hacker who’s trying to kit out their workshop on a tight budget. There’s only one problem: the similarities between the two are only skin deep.

Recovering components from the original controller

As [Vitaly Puzrin] explains, one of the big problems with these clones are the simplistic electronics which have a tendency to stall out the motor at low RPM. So he’s developed a drop-in replacement speed controller for his particular Dremel clone that solves this problem. While the module design probably won’t work on every clone out there in its current form, he feels confident that with help from the community it could be adapted to other models.

Of course, the first step to replacing the speed controller in your not-a-Dremel is removing the crusty old one. But before you chuck it, you’ll need to recover a few key components. Specifically the potentiometer, filter capacitor, and the motor terminals. You could possibly source the latter components from the parts bin, but the potentiometer is likely going to be designed to match the tool so you’ll want that at least.

The microprocessor controlled upgrade board uses back EMF to detect the motor’s current speed without the need for any additional sensors; important for a retrofit module like this. [Vitaly] says that conceptually this should work on any AC brushed motor, and the source code for the firmware is open if you need to make any tweaks. But hacker beware, the current version of the PCB doesn’t have any AC isolation; you’ll need to take special care if you want to hook it up to your computer’s USB port.

On the other hand, if you’re willing to buy a cheap rotary tool just to crack it open and replace the electronics, you might as well just build your own. If you’re feeling particularly adventurous, you can always abandon the electric motor and spin it up with a tiny turbine. Continue reading “A Drop-In Upgrade Module For Cheap Rotary Tools”