Printed It: Parametric Hex Key Holder

Desktop 3D printing is an incredible technology to be sure, but it’s not a cure-all. If you’re interested in making something in large numbers, or if production speed is a concern, 3D printing probably isn’t what you’re looking for. But on the flip side, if you want to make a few highly specialized or customized objects, desktop 3D printing represents an absolute revolution in capability for the individual hacker and maker.

In our ongoing mission to prove that desktop 3D printing isn’t just a novelty, we keep a close eye out for printable objects which play to the strengths of the technology. You won’t find any benchmarks or dust collectors here; everything featured in Printed It is a bona fide practical object. An ideal entry into this series is something that you wouldn’t need to print more than a few times, isn’t easily sourced or made via traditional means, and if possible, offers some form of customization which makes it more suitable to the individual’s needs than what’s commercially available.

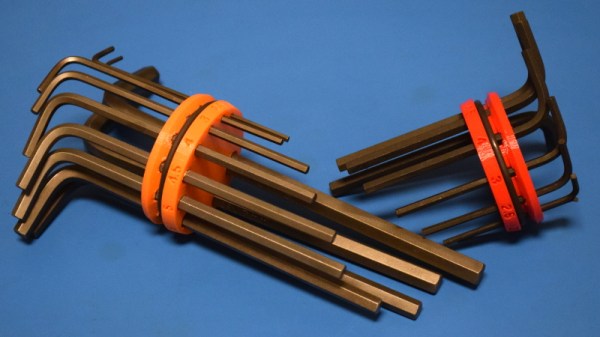
Not every object we feature hits all of these marks, but this parametric hex key holder designed by [Daniel Leitner] absolutely does. This object was created to address a problem that we imagine most Hackaday readers share: taming an ever-growing collection of hex keys. What’s more, this design is something of an open source success story. It’s an idea that passed through the hands of multiple community members, becoming more refined and functional as it went. Even if you don’t personally need to wrangle some unruly hex keys, this object is a fascinating look at how 3D printing and the community that has sprouted up around it is truly evolving the process of going from concept to execution.

Continue reading “Printed It: Parametric Hex Key Holder”

Doomba Transports Your Living Room To Hell

Despite being over 25 years old, the original DOOM is still a favorite among gamers and hackers alike. For years now, running the 1993 demonic shooter has been a critical milestone when hacking or reverse engineering a piece of gear, and at this point we’ve seen it run on everything from voting machines to cameras.

But this time around, DOOM isn’t actually running on the device being hacked. Instead, the Roomba 980 that [Rich Whitehouse] has doing his bidding is being used to generate new DOOM levels based on the maps it makes of rooms while going about its business. To be fair they’re pretty simplistic maps, and most of us don’t live in a home quite palatial enough to even fill out shareware trial of id Software’s classic, but it’s still a neat trick.

For those who might not be up to date with the latest and greatest in the world of robotic helpers, newer model Roomba vacuums are equipped with a camera and the ability to generate 3D maps of its environment using a technique called Vision Simultaneous Localization and Mapping (VSLAM). Ostensibly this capability is used to create accurate maps of hazards in the cleaning area, but of course it did set off some privacy alarm bells when introduced due to the possibility that scans of users homes could end up being used for nefarious purposes. Roomba manufacturer iRobot swears they aren’t doing anything suspect with the data their robots collect while traveling through the user’s home, but that hasn’t stopped [Rich] from using the technology as a portal to Hell.

Using “DOOMBA”, the user is able to download the mapping data off of their Roomba 980 (it might work on other models, but hasn’t been tested yet) over the local network and import it into Noesis, a 3D model viewing program developed by [Rich]. The imported map is essentially just a 2D diagram of the home’s floor plan, which on its own wouldn’t make for a terribly interesting DOOM level, so the software will take the liberty of seeding it with weapons, baddies, and all the other varied delights of the netherworld. The user can fiddle around with these settings to try and fine-tune their homespun hellscape, or just let “DOOMBA” randomize it all so they can get on with the ripping and tearing.

If you’ve got Roomba in hand but aren’t a DOOM fan, have no fear. We’ve seen plenty of hacks and mods for everyone’s favorite house-cleaning hockey puck which happen to be of the non-demonic variety. If you just can’t get enough DOOM, stick around for tomorrow’s 25th anniversary celebration article. You will want to copy the banner art and use it as your new desktop background.

Skeletal Robot Skips The Chassis

With the high availability of low-cost modular electronic components, building your own little robot buddy is easier and more affordable than ever. But while the electronics might be dirt cheap thanks to the economies of scale, modular robot chassis can be surprisingly expensive. If you’ve got a 3D printer you can always make a chassis that way, but what if you’re looking for something a bit more artisanal?

For his entry into the Circuit Sculpture Contest, [Robson Couto] has built a simple robot which dumps the traditional chassis for a frame made out of bent and soldered copper wire. Not only does this happen to look really cool in a Steampunk kind of way, it’s also a very cheap way of knocking together a basic bot with just the parts you have on hand. Not exactly a heavy-duty chassis, to be sure, but certainly robust enough to rove around your workbench.

The dual servos constrained within the wire frame have been modified for continuous rotation, which combined with the narrow track should make for a fairly maneuverable little bot. [Robson] equipped his servos with copper wheels built in the same style of the frame, which likely isn’t great for traction but really does help sell the overall look. If you aren’t planning on entering your creation into a contest that focuses on unique construction, we’d suggest some more traditional wheels for best results.

The brains of this bot are provided by an ATmega8 with external 16MHz crystal tacked onto the pins. There’s also a ultrasonic sensor board mounted to the servos which eventually will give this little fellow the ability to avoid obstacles. Of course, it doesn’t take a robotics expert to realize there’s currently no onboard power supply in the design. We’d love to say that he’s planning on using the copper loops of the frame to power the thing via induction, but we imagine [Robson] is still fiddling around with the best way to get juice into his wireframe creation before the Contest deadline.

Speaking of which, there’s still plenty of time to get your own Circuit Sculpture creation submitted. If it’s a functional device that isn’t scared to show off the goods, we’re interested in seeing it. Just document the project on Hackaday.io and submit it to the contest before the January 8th, 2019 deadline.

A Daring Search For Answers In Soyuz Mystery

If you happened to tune into NASA TV on December 11th, you’d have been treated to a sight perhaps best described as “unprecedented”: Russian cosmonauts roughly cutting away the thermal insulation of a docked Soyuz spacecraft with a knife and makeshift pair of shears. Working in a cloud of material ripped loose during the highly unusual procedure, cosmonauts Oleg Kononenko and Sergey Prokopyev were effectively carving out their own unique place in space history. Their mission was to investigate the external side of the suspicious hole in the Soyuz MS-09 capsule which caused a loss of air pressure on the International Space Station earlier in the year.

That astronauts don’t generally climb out the hatch and use a knife to hack away at the outside of their spacecraft probably goes without saying. Such an event has never happened before, and while nobody can predict the future, odds are it’s not something we’re likely to see again. Keep in mind that this wasn’t some test capsule or a derelict, but a vehicle slated to return three human occupants to Earth in a matter of days. Cutting open a spacecraft in which human lives will shortly be entrusted is not a risk taken likely, and shows how truly desperate the Russian space agency Roscosmos is to find out just who or what put a hole in the side of one of their spacecraft.

Close inspection from the inside of the spacecraft confirmed the hole wasn’t made by an impact with a micrometeorite or tiny piece of space junk as was originally assumed. It appears to have been made with a drill, which really only allows for two possible scenarios: intentional sabotage or a mistake and subsequent cover-up. In either event, a truly heinous crime has been committed and those responsible must be found. As luck would have it the slow leak of air pressure was detected early and the hole was patched before any damage was done, but what if it hadn’t?

Continue reading “A Daring Search For Answers In Soyuz Mystery”

Automatic Soap Dispenser Hides Arduino Board

If you’ve been hanging out here at Hackaday for awhile, you’ve certainly seen projects that were based around the concept of putting a miniature computer inside the carcass of some other piece of electronics. In fact at this point it’s something of a running joke, certainly we must have seen an Arduino or Raspberry Pi shoehorned into every type of consumer gadget ever built by this point. But if you thought this would be another example of that common trope by the headline, you might be in for something of a surprise.

[zapta] didn’t put an Arduino inside this GOJO LTX-7 soap dispenser, it was already in there to begin with. That’s right, apparently we’ve hit the point that even cheap soap dispensers are now running on programmable microcontrollers. While we can’t blame those of you who are no doubt groaning and/or rolling their eyes thanks to this particular case of computational gluttony, it does mean we’re able to report with a straight face something which frankly would have passed as an April Fool’s joke in previous years: the development of an open source soap dispensing firmware.

So how does one upload a new Arduino sketch to their GOJO soap dispenser? It’s not like the thing has a USB port on the side for convenient hacking. As explained by [zapta], it involves stripping the dispenser all the way down until the electronics board is free, and then adding in a programming header to make subsequent firmware fiddling a bit easier. Writing a new firmware to the ATTiny48 powered board will require an external ISP (the Atmel AVRISP MKII was used for this hack, though any should work), but it’s otherwise pretty painless.

[zapta] has done an excellent job documenting the different components on the board, and reverse engineered enough of the critical aspects (such as the motor controller and proximity sensor) to write a new open source firmware which can be flashed to the GOJO LTX-7. Beyond allowing you to “Open Source All the Things”, using this new firmware does have some practical advantage in that you can configure how much soap is dispensed per activation. Going further, we’d be exceptionally interested in hearing about anyone who manages to come up with a firmware that enables some hitherto impossible soap dispensing trickery.

We’ve seen hacks involving dispensers of all types, from Halloween games that spit out candy to gadgets which let dogs get their own treats, but a soap dispenser hack is something truly new for us. More proof that there’s still plenty of hardware out there just waiting to be hacked!

Vintage Toys Live On Through 3D Printing

We all have fond memories of a toy from our younger days. Most of which are still easy enough to get your hands on thanks to eBay or modern reproductions, but what if your childhood fancies weren’t quite as mainstream? What if some of your fondest memories involved playing with 1960’s educational games which are now so rare that they command hundreds of dollars on the second-hand market?

Inside the Think-a-Dot replica

That’s the situation [Mike Gardi] found himself in recently. Seeing that the educational games which helped put him on a long and rewarding career in software development are now nearly unobtainable, he decided to try his hand at recreating them on his 3D printer. With his keen eye for detail and personal love of these incredible toys, he’s preserved them in digital form for future generations to enjoy.

His replica of The Amazing Dr. Nim” needed to get scaled-down a bit in order to fit on your average desktop 3D printer bed, but otherwise is a faithful reproduction of the original injection molded plastic computer. The biggest difference is that his smaller version uses 10 mm (3/8 inch) steel ball bearings instead of marbles to actuate the three flip-flops and play the ancient game of Nim.

[Mike] has also created a replica of “Think-a-Dot”, another game which makes use of mechanical flip-flops to change the color of eight dots on the front panel. By dropping marbles in the three holes along the top of the game, the player is able to change the color of the dots to create various patterns. The aim of the game is to find the fewest number of marbles required to recreate specific patterns as detailed in the manual.

Speaking of which, [Mike] has included scans of the manuals for both games, and says he personally took them to a local shop to have them professionally printed and bound as they would have been when the games were originally sold. As such, the experience of owning one of these classic “computer” games has now been fully digitized and is ready to be called into corporeal form on demand.

This is really a fascinating way of preserving physical objects, and we’re interested to see if it catches on with other toys and games which otherwise might be lost to time. As storage capacities get higher and our ability to digitize the world around us improve, we suspect more and more of our physical world will get “backed up” onto the Internet.

Lighting Up A Very Wiry Candle

Entries into the Circuit Sculpture Contest tend to be pretty minimalist by nature, and this LED candle by [Amal Mathew] is a perfect example. The idea here was to recreate the slim and uncomplicated nature of a real candle but with a digital twist, and we think he’s pulled it off nicely with a bare minimum part count and exaggerated wire length that gives it the look of a thin pillar candle.

To give the LED a fading effect, [Amal] uses a ATtiny85 programmed with the Arduino IDE. His code uses the analogWrite() in a loop to gradually increase and then decrease the PWM frequency. With the LED connected directly to one of the pins on the ATtiny85, the simple program achieves the fading effect without needing any additional components.

On the opposite side of the candle, connected by long copper wires, is the single CR2032 which provides power for the circuit. In a nice touch, [Amal] has turned the battery 90 degrees relative to the rest of the circuit, so it can serve as a weighted base. We imagine getting it to stand up might be a little fiddly from the looks of it, but once it’s up and merrily fading in and out, it really helps sell the candle idea.

The finished product might look fairly straight-forward, but in his write-up on Hackaday.io, [Amal] gives detailed instructions on how to build your own version if you’re not a bare microcontroller wizard. This includes direction on how to program the ATtiny85 using an Arduino Uno; a neat trick to know even if you aren’t planning on making any candles in the near future. The next logical step is making it so you can “blow out” the LED, which should only take the addition of a resistor and some updated code.

There’s still plenty of time to enter your own functional piece of art in the Circuit Sculpture Contest. Just write it up on Hackaday.io and submit it before the January 8th, 2019 deadline.

Continue reading “Lighting Up A Very Wiry Candle”