Incredible 3D Printed Overwatch Airsoft Pistol

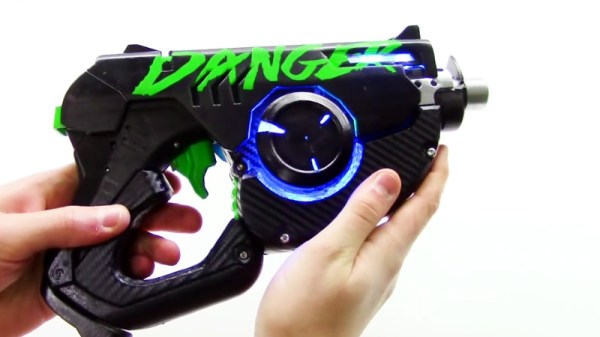
If you ever needed evidence that gamers are some of the most dedicated individuals in all of fandom, then look no further than this fantastic 3D printed recreation of the “Pulse Pistol” as featured in the immensely popular “Overwatch”. Built by the guys at [Danger Doc], this replica doesn’t just look the part, it’s also a fully functional Airsoft gun. In the detailed build video after the break, the year-long design and construction of the gun is broken down for your viewing pleasure.

Because the end goal was to make something that looked as though it came from the game itself, a lot of time was put into making sure that the externals were faithful to the digital version while still able to contain all the hardware they needed to cram in there. This is a fully auto gun, so it needed a battery and motors, as well as a way to feed the firing mechanism Airsoft BBs that didn’t require an anachronistic magazine sticking out.

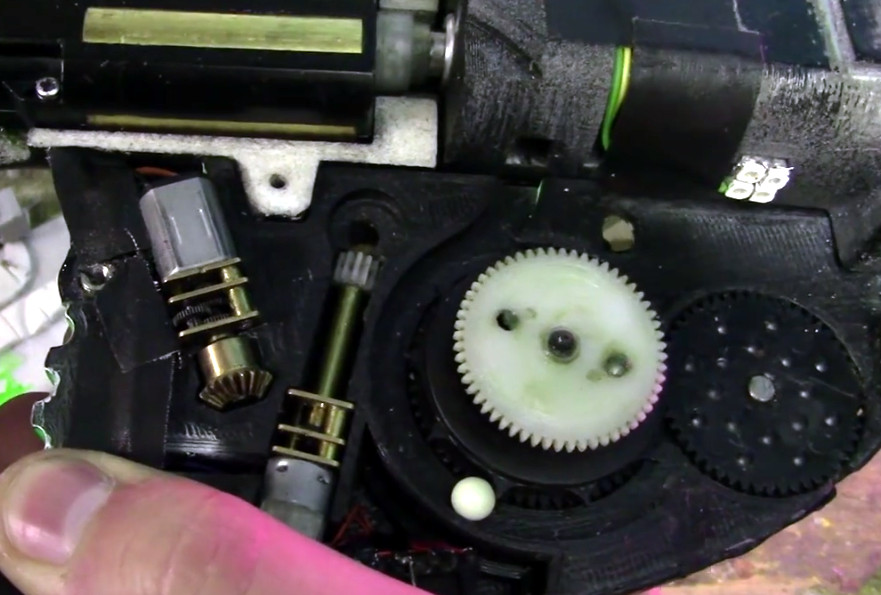
They combined a off-the-shelf firing mechanism and high-capacity magazine but it took plenty of custom designed parts to get everything mated up. The magazine has a clockwork mechanism to advance the BBs which required the user to manually crank up, but this was replaced with an electric motor to make things a little more futuristic. In addition to all the LEDs on the body of the gun, there’s also an internal array of ultraviolet SMD LEDs to charge the glow-in-the-dark “tracer” BBs as they move through the magazine. In low light, this gives the shots from the gun something of a laser effect.

We’ve seen 3D printed guns from games before, but rarely with this attention to detail and engineering. Honestly, this even gives some real 3D printed guns a run for their money.

Continue reading “Incredible 3D Printed Overwatch Airsoft Pistol”

A Mobile Computer To Make William Gibson Jealous

The personal computers in science fiction books, movies, and games are way cooler than the dinky pieces of hardware we’re stuck with in the real world. Granted the modern laptop has a bit more style than the beige boxes of yesteryear, but they still aren’t half as l33t as the custom PowerBooks in Hackers. Luckily for those who dream of jacking into the Matrix, the average hacker now has access to the technology required to make a custom computer to whatever fanciful specifications they wish.

A perfect example is this “cyberdeck” created by [Tinfoil_Haberdashery]. Inspired by William Gibson’s Neuromancer, this wild-looking machine is more than just a cosplay prop or conversation piece. It packs in enough power to be a daily-driver computer, as well as some special features which make it well suited for field work.

The body of the cyberdeck is 3D printed, but as [Tinfoil_Haberdashery] doesn’t have a 3D printer big enough to do the whole thing in one piece he had to break it up into subsections. He added a dovetail pattern to the edges of each piece, which makes for much stronger joint than simply gluing it together. A worthwhile tip if you ever find yourself in need of printing something really big.

Raspberry Pi aficionados might be disappointed to see the Intel NUC motherboard inside; which features a 3.4 Ghz dual-core CPU, 8 GB of RAM, and a roomy 500 GB SSD in an incredibly small package. To keep everything running the machine can take up to twelve 18650 cells, giving it a maximum run-time of sixteen hours or so. There’s even a 12 V power jack so he can power a soldering iron and other low voltage gadgets off of the deck’s batteries in a pinch. The integrated charger can take anywhere from 6 to 30 V, which gives [Tinfoil_Haberdashery] the ability to charge up from a wide array of sources.

But perhaps the best feature of the cyberdeck is the display. It uses a Fat Shark Transformer, a five inch 720p display designed for FPV drone use, which can not only fold flat against the deck for storage, but can be removed and slipped into a pair of goggles. This gives the cyberdeck a head mounted display that looks like something straight out of the movies. It even supports 3D, if you’re willing to cut the resolution in half.

Things have come a long way in the world of DIY head mounted computer displays. Really makes you wonder what the dedicated hacker is going to be able to pull off in another 10 years or so.

[via /r/cyberpunk]

Building An SDR Lab With Wheels

With the incredibly low cost of software defined radio (SDR) hardware, and the often zero cost of related software, there’s never been a better time to get into the world of radio. If you’ve got $30 burning a hole in your pocket, you’re good to go. But as with any engrossing hobby that’s cheap to get into, you run the risk of going overboard eventually.

For example, if the radio gear inside your car approaches parity with the Kelly Blue Book value of said vehicle, you may have been bitten by the radio bug. In the video after the break, [Corrosive] gives us a tour of his antenna festooned Hyundai Accent, that features everything he needs to receive and analyze a multitude of analog and digital radio signals on the go.

He starts with the roof of the car, which is home to five whip antennas (not counting the one from the factory installed AM/FM radio) and two GPS receivers. The ones on the rear of the car feed down into the trunk, where a bank of Nooelec NESDR RTL-SDR receivers will live in a USB hub. He’s only got one installed for test purposes, but he’ll need more for everything he’s got planned. Also riding in the back is a BCD780XLT scanner, which he got cheap on eBay thanks to the fact it had a dead display.

Luckily, where [Corrosive] is going, he won’t need displays. The SDR receivers and the scanner are all controlled from the driver’s seat by way of a Windows 10 tablet. This runs the ProScan software that provides a virtual interface to the BCD780XLT, as well as various SDR interfaces. He’s also got Gpredict for tracking satellites and ADS-B programs like Virtual Radar.

The car’s head unit has been replaced by a rooted Android entertainment system which supports USB host mode. [Corrosive] says it isn’t hooked up yet, but in the future the head unit is going to get its own SDR receiver so he can run programs like RF Analyzer right in the dashboard. We’re willing to bet that this will be the only car in the world that has both a waterfall display and the “Check Engine” light on at the same time.

Even if you aren’t ready to install it in your car, you might like to read up on using multiple SDR receivers for trunked radio or setting up your own ADS-B receiver to get a better idea of what [Corrosive] has in mind once everything is up and running.

Continue reading “Building An SDR Lab With Wheels”

Custom ATTiny85 Board Powers Kids’ Light Show

We’ve often said that kids with hackers and makers for parents must be some of the luckiest kids in the world. While all the other children have to settle for some mass produced drivel from Toys“R”Us Amazon, they’ve got some of the most thoughtfully engineered and built toys and gadgets on the planet. After all, there’s no way any hacker worth their salt is going to give anything less than 110% for their own child.

A case in point is this RGB star nightlight that [Unexpected Maker] built for his children. The star itself is simple enough, just a basic shape printed in transparent PLA on his Prusa i3. The impressive part is how he lights it up. Rather than stick an Arduino or ESP8266 in there as we have seen plenty of times before, he’s put together his own custom ATTiny85 board specifically for controlling the RGB LED strips.

The board, which he calls TinyDev, is designed to be the same thickness as NeoPixel style LED strips so it can fit inside tight spaces. He solders it onto the tail end of his LED strip, adds a photoresistor so the star can tell when it’s time to light up, and then snakes the whole arrangement through a channel printed in the star itself. There’s a battery pack in the middle, but that’s about it. It really does allow for a remarkably clean LED strip implementation, and the mind can’t help but start thinking of interesting possibilities when you can tuck the controller into the same space as the lights themselves.

[Unexpected Maker] has made the TinyDev completely open source for anyone who wants to build their own, but it’s also available on Tindie if you want to get one to play with quickly. If you’re looking to light up the little one’s room with somewhat more mainstream methods, we’ve got that covered too.

Continue reading “Custom ATTiny85 Board Powers Kids’ Light Show”

ESP8266 Internet Controlled LED Dimmer

There’s no shortage of debate about the “Internet of Things”, largely centered on security and questions about how much anyone really needs to be able to turn on their porch light from the other side of the planet. But while many of us are still wrestling with the realistic application of IoT gadgets, there’s undoubtedly those among us who have found ways to put this technology to work for them.

One such IoT devotee is [Sasa Karanovic], who writes in to tell us about his very impressive custom IoT LED dimmer based on the ESP8266. Rather than rely on a commercial lighting controller, he’s designed his own hardware and software to meet his specific needs. With the LED strips now controllable by any device on his network, he’s started working on Python scripts which can detect what he’s doing on his computer and react accordingly. For example, if he’s watching a movie the lights will automatically dim, and come back up when he’s done.

[Sasa] has provided all the files necessary to follow in his footsteps, from the Gerber files for his PCB to the Arduino code he’s running on the ESP. The source code is especially worth checking out, as he’s worked in a lot of niceties that we don’t always see with DIY projects. From making sure the ESP8266 gets a resolvable DNS hostname on the network to using websockets which update all connected clients with status info in real-time, he’s really put a lot of work into making the experience as complete as possible.

He’s explains in his blog post what needs to be edited to put this code to work in your own environment, and there’s even some descriptive comments in the code and a helpful debug mode so you can see how everything works. It’s always a good idea to consider that somebody else down the road might be using your code; taking a few minutes to make things clear can save them hours of stumbling around in the dark.

If you need more inspiration for your ESP8266 lighting project, check out this ambient lighting controller for a kid’s room, or this professional under-cabinet lighting controller.

An MRI-Safe 3D Printed Pneumatic Stepper Motor

You will no doubt have seen those videos where MRI machines suck up all sorts of metallic objects with hilariously disastrous results. The magnetic field in one of these machines can easily pull in metal objects from across the room, exerting a force of several hundred pounds on any ferrous object unlucky enough to wander too close. As you can probably imagine, designing mechanical devices that can operate in such an intense magnetic field is exceptionally difficult.

But this fully 3D printed pneumatic stepper motor designed by [Foad Sojoodi Farimani] might one day change that. The PneuAct, which he presented at the recent International Conference on Robotics and Automation (ICRA) in Brisbane, Australia, manages to run at up to 850 RPM with full position control using bursts of air rather than electronic pulses. Made entirely of plastic and without any electronic components, the PneuAct can not only operate in intense magnetic fields but also areas with flammable gases where sparks could potentially cause an explosion.

We often say that a design is “fully” 3D printable, even though it might require screws or other bits of hardware. But in the case of the PneuAct, it’s truly all printed. It has to be, or else the whole thing would be ripped apart when it got to close to the MRI machine. Each and every piece of the motor is printed in ABS, and can be used without any additional machining or cleanup. No lubrication is required, and [Foad] mentions that the whole thing is so cheap that it can be disposable. Which is a huge advantage in medical environments where contamination could be a concern.

Design-wise the PneuAct is essentially an expanded version of the 3D printed air motors we’ve seen previously, but it would be fair to say that none has ever been studied so closely before.

Continue reading “An MRI-Safe 3D Printed Pneumatic Stepper Motor”

Grbl Ported To The ESP32

If you’re building a CNC or laser, there’s an excellent chance you’ll be using Grbl to get moving. It’s also a pretty safe bet you’d end up running it on some variation of the Arduino sitting in a motor controller breakout board. It’s cheap, easy to setup and use, and effectively the “industry” standard for DIY machines so there’s no shortage of information out there. What’s not to love?

Well, quite a few things in fact. As [bdring] explains, Grbl pushes the capability of the Arduino to the very limit; making it something of a dead-end for future development. Plus the Arduino needs to be plugged into the host computer via USB to function, a rather quaint idea to many in 2018. These were just some of the reasons he decided to port Grbl to the ESP32 board.

Price wise the Arduino and ESP32 are around the same, but the ESP does have the advantage of being much more powerful than the 8-bit Italian Stallion. Its got way more flash and RAM as well, and perhaps most importantly, includes Wi-Fi and Bluetooth out of the box. It still needs to be plugged into a board to hold the motor drivers like the Arduino, but beyond that [bdring] opines the ESP32 is about as close to the perfect Grbl platform as you can get.

[bdring] reports that porting the code over to the ESP32 wasn’t terrible, but it wasn’t exactly a walk in the park either. The bulk of the code went by without too much trouble, but when it came to the parts that needed precise timing things got tricky. The ESP32 makes use of a Real Time Operating System (RTOS) that’s not too happy about giving up control of the hardware. Turning off the RTOS was an option, but that would nuke Bluetooth and Wi-Fi so obviously not an ideal solution. Eventually he figured out how to get interrupts more or less playing nicely with the RTOS, but mentions there’s still some more work to be done before he’s ready to release the firmware to the public.

If you’ve been browsing Hackaday for a while you may remember [bdring]. He’s got a real knack for making things move, and has created a number of fantastic little CNC machines recently which have definitely caught our eye.

[Thanks to Jon and Craig for the tip.]

Continue reading “Grbl Ported To The ESP32”