Home Decorating With Tiny Arcade Cabinets

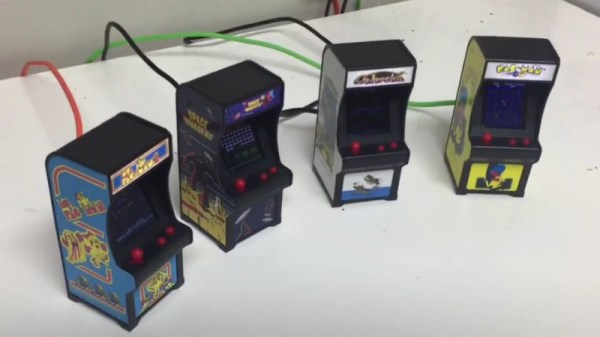
Thanks to the general miniaturization of electronics, the wide availability of cheap color LCD screens, and the fact that licensing decades old arcade games is something of a free-for-all, we can now purchase miniature clones of classic arcade cabinets for about $20 USD. In theory you could play these things, but given they’re less than 4 inches in height they end up being more of a desk novelty than anything. Especially since it seems like most of the effort went into making the cabinet itself; a classic example of “form over function”.

Unfortunately, if you want to buy these little arcade cabinets to use as decoration for your office or game room, they aren’t particularly well suited to the task. The “demo” mode where the game plays itself doesn’t last for very long, and even if it did, the game would chew through batteries at an alarming rate. [Travis] decided to tackle both issues head on by powering his Tiny Arcades over USB and locking them into demo mode.

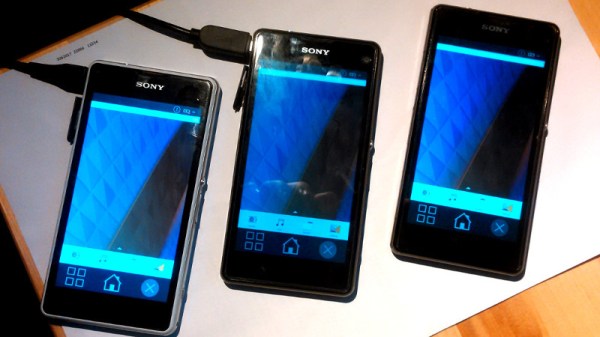
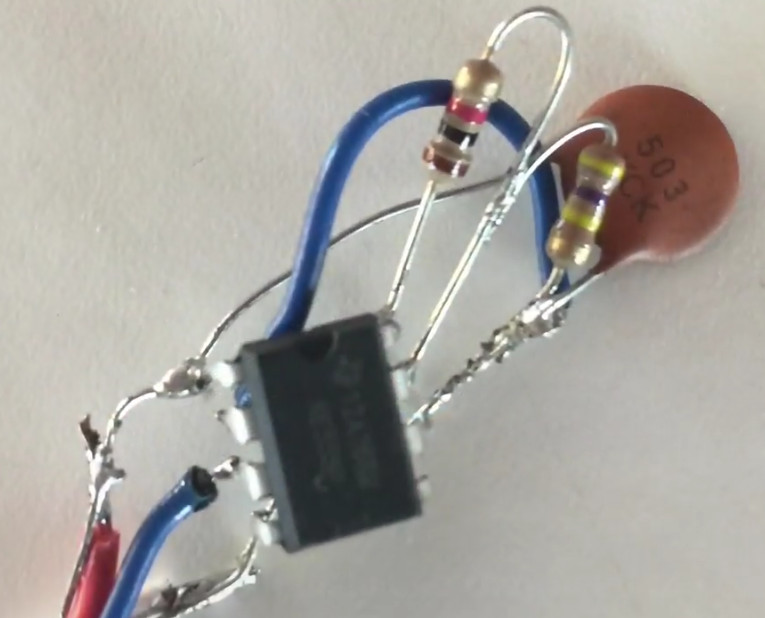
The stock power for the Tiny Arcade comes from three AAA batteries, or 4.5 V. This made it easy enough to run over  5 V USB, and a four port USB charger is used to provide power to multiple machines at once. Forcing the game to stay in demo mode wasn’t much harder: a 555 timer was used to “push” the demo button with a frequency of every 10 seconds or so to keep the game up and running. A simple timer circuit was put together in the classic “dead bug” style, and sealed up with liquid rubber so it would play nice with the insides of the Tiny Arcade.

Since his little machines wouldn’t need their stock power switches anymore, [Travis] rewired the speaker lead through it. So now the machine stays on and in demo mode as long as it’s plugged into USB power, and you can flip the switch on the back to turn off the sounds. Perfect for sitting up on a shelf or the corner of your desk.

Usability issues not withstanding, there’s a pretty big (no pun intended) following for micro sized arcade cabinets. We’ve seen projects ranging from modding a Game Boy Advance to even tinier scratch builds.

Continue reading “Home Decorating With Tiny Arcade Cabinets”

Printed PC Speakers Are Way Cooler Than Yours

On the off chance you’re reading these words on an actual desktop computer (rather than a phone, tablet, smart mirror, game console…), stop and look at the speakers you have on either side of your monitor. Are you back now? OK, now look at the PC speakers and amplifier [Kris Slyka] recently built and realize you’ve been bested. Don’t feel bad, she’s got us beat as well.

The speaker and amplifier enclosures were painstakingly printed and assembled over the course of three months, and each piece was designed to be small enough to fit onto the roughly 4 in x 4 in bed of her PrintrBot Play. While limited print volume made the design considerably trickier, it did force [Kris] to adopt a modular design approach with arguably made assembly (and potential future repairs or improvements) easier.

The amplifier is made up of rectangular “cells” which are connected to each other via 3 mm threaded rods. For now the amplifier only has 4 cells, but this could easily be expanded in the future without having to design and print a whole new case. Internally the amplifier is using two TDA8932 digital amplifier modules, and some VU meters scored off of eBay.

Each speaker enclosure is made up of 10 individual printed parts that are then glued and screwed together to make the final shape, which [Kris] mentions was inspired by an audio installation at the Los Angeles County Museum of Art. They house 4″ Visaton FR 10 HM drivers, and are stuffed with insulation.

It’s a bit difficult to nail down the style that [Kris] has gone for here. You see the chunky controls and analog VU meters and want to call it retro, but it’s also a brass cog and sprocket away from being Steampunk. On the other hand, the shape of the speakers combined with the bamboo-filled PLA used to print them almost gives it an organic look: as if there’s a tree somewhere that grows these things. That’s actually a kind of terrifying thought, but you get the idea.

If your computer speakers were assembled by mere mortals, never fear. We’ve covered a number of interesting hacks and mods for more run-of-the-mill desktop audio setups which should hold you over until it’s time to harvest the speaker trees.

[via /r/3Dprinting]

Color Changing Clock Gets A Pi Zero Heart

Hackaday reader [Don] dropped by the tip line recently to let us know about the latest version of his color-changing LCD clock project. This is his second version of the hardware which makes some pretty big improvements over the original, including moving from the Pi B to the Pi Zero and an internal simplification of the wiring. He mentions the next revision of the project will focus on Google Home integration, which should be interesting to see.

As a father of two pre-school age children, he was looking for a way to help his kids understand the concept of time and scheduled activities. Colors and shapes come fairly easy to children of this age, but time and how it relates to the day is a bit more difficult for them especially as their comprehension of numbers is still developing. [Don] reasoned that even if they couldn’t read the numbers on the clock yet, if he had the display change colors to indicate different periods of the day (sleep, play, cleanup, etc), it would not only keep them on schedule, but reinforce the meaning of the numbers on the screen.

ShiftBrite installed in the projector.

The project was made infinitely easier by a lucky find at a local retailer. For $10 he got a kid-friendly looking clock that utilized a simple projector to backlight the LCD display. This meant [Don] would just need to swap out the stock lighting module for a controllable RGB LED, and the hardware modifications would essentially be complete.

Even the Pi Zero fits perfectly inside the case of the clock, the only modification necessary was cutting a little hole in the back for the Pi’s micro USB port. His earlier version used an external Pi B connected to the clock via CAT5, so getting it all integrated into the one device is a huge improvement, especially when little kids are involved. Moving the Pi and its 5 V pins into the clock itself also allowed [Don] to drop the voltage regulator required previously.

With the basic hardware for a color changing LCD clock together, the rest of the project was just a matter of software. After some research, [Don] came across RPi-ShiftBrite by [Hive13] and made his own fork which added some features necessary for his project, namely the ability to quickly set the ShiftBrite to a specific color on the command line. To schedule the color changes, he used the very slick minicron: a web-based tool to create and monitor Linux cron jobs.

The Pi itself does not actually interface with the clock, and with no onboard RTC it’s necessary to keep it updated with NTP or else the times will become desynchronized. It can be necessary to sync the Pi’s clock to the Internet as often as every hour to make sure the colors shift at the appropriate times. The addition of a RTC module like the DS1307 could alleviate this issue and might be something to consider for a future revision.

All told, a fantastic project and something we’ll be sure to keep our eyes on as it progresses. We’ve seen our share of unique Raspberry Pi powered clocks, and even a few color changing ones, but this approach is easily the most straight-forward we’ve seen.

Continue reading “Color Changing Clock Gets A Pi Zero Heart”

Star Chart Watch Is A Romantic Tragedy

It’s becoming abundantly clear that [Colin Merkel] doesn’t know the definition of “good enough”. Not only has he recently completed his third (and most impressive) wristwatch build, but he also managed to put together one of the most ridiculously romantic gifts ever conceived. While some of us are giving our significant others a gift card to Starbucks, he made his girlfriend a watch with a chart on the face representing the position of the stars at the time and place of their first meeting.

As per his usual style, the documentation on this build is phenomenal. If paging through his gallery of build images doesn’t make you want to get a lathe and start learning metal working, nothing will. A chunk of stainless steel rod miraculously becomes a gorgeous wrist watch over the course of a few dozen images, perfectly encapsulating that old adage of “making it look easy”.

All you have to do is turn this into that. Easy.

Certainly the highlight of this build is the star chart on the face. To make it, he used PyEphem to plot the position of the brightest stars that were visible at the time and place of their first meeting. He then wrote a script to take those stars and convert their positions to G-Code the CNC could use to drill holes in the appropriate locations. The depth of the hole even corresponds to the magnitude (brightness) of each star, giving the chart a subtle 3D effect.

Unfortunately, [Colin] made a couple of mistakes during this build, to the point that he’s not exactly sure how to proceed. He mentions he might even be forced to start over from scratch. It’s hard to imagine how something that looks this good could ever end up being a failure, but the world of watch making is unkind.

To start with, he used 304 stainless instead of 303. This made machining the case much more difficult, and from his very first cut he realized it was going to be a problem. While it was an annoyance he mentions a couple times during the build log, he was at least was able to work through it.

The real problem came at the end, when he put the watch together. He originally made his designs assuming a front glass which was 0.5 mm thick, but in actuality used a piece that is 0.8 mm thick. This slight difference is just enough to cause the seconds hand to rub up on the glass, putting drag on the movement. The end result is that the battery dies extremely quickly, effectively rendering the watch useless.

We can’t imagine the heartbreak [Colin] felt when he realized what happened; we felt bad just reading about it. But given his track record, we have no doubt he’ll get the issue sorted out. It would be a shame to start over completely, but there’s some consolation in knowing it’s part of the learning process: you don’t become a master of your craft without making a couple mistakes along the way.

The predecessor to this watch was covered here at Hackaday last year, and made quite an impression. It’s interesting to see the improvements made between the two, and we’re certainly excited to see his next build.

You Got A 3D Printer, Now What?

Given the incredibly low prices on some of the models currently on the market, it’s more than likely a number of Hackaday readers have come out of the holiday season with a shiny new desktop 3D printer. It’s even possible some of you have already made the realization that 3D printing is a bit harder than you imagined. Sure the newer generation of 3D printers make it easier than ever, but it’s still not the same “click and forget” experience of printing on paper, for instance.

In light of this, I thought it might be nice to start off the new year with some advice for those who’ve suddenly found themselves lost in a forest of PLA. Some of this information may seem obvious to those of us who’ve spent years huddled over a print bed, but as with many technical pursuits, we tend to take for granted the knowledge gained from experience. For my own part, the challenges I faced years ago with my first wooden 3D printer were wholly different than what I imagined. I assumed that the real challenge would be getting the machine assembled and running, but the time it took to build the machine was nothing in comparison to the hours and hours of trial and error it took before I gained the confidence to really utilize the technology.

Of course, everyone’s experience is bound to be different, and we’d love to hear about yours in the comments. Grand successes, crushing defeats, and everything in between. It’s all part of the learning process, and all valuable information for those who are just starting out.

Continue reading “You Got A 3D Printer, Now What?”

PostMarketOS Saves Old Smartphones

Modern smartphones, even the budget models, are extremely impressive pieces of technology. Powerful ARM processors, plenty of RAM, and an incredible number of sensors and radios are packed into a device that in some cases are literally given away for free when you sign up for a service plan. Unfortunately manufacturers are not obligated to keep up with software updates, and while the hardware may be willing to keep on fighting, the user is often pushed to upgrade due to perennially outdated software. Even if you aren’t the kind of person to be put off by using a phone that doesn’t have the latest and greatest OS, the lack of software security updates pose a clear threat in a world where mobile devices are increasingly targeted by attackers.

But what if the operating system on your phone worked more like the on one your computer? That’s the dream of postmarketOS, a Linux distribution created by [Oliver Smith] that is designed to be installed on outdated (mostly Android) smartphones and tablets. He’s recently made a comprehensive blog post about the state of the project a little over 6 months since it started, and we have to say things are looking very impressive so far.

One of the key goals of postmarketOS is to avoid the fragmented nature of previous attempts at replacing Android with a community-developed operated system. By avoiding binary blobs and focusing on getting the mainline Linux kernel running on as much as the hardware as possible, there’s no need to make different forks and releases for each supported device. By unifying the OS as much as far as it can be, an upstream update can be pushed to all devices running postmarketOS regardless of their make and model, just like with traditional Linux distributions.

The blog post shows two things very clearly: that the community is extremely excited and dedicated to the prospect of running what is essentially desktop Linux on old smartphones and tablets, and that postmarketOS still has a long way to go. In these early days, many devices aren’t what could be considered “daily drivers” by most standards. In fact, the blog post mentions that they’ve decided to abandon the term “supported” when talking about devices, and make no claims beyond the fact that they will boot.

Still, incredible progress is being made on everything from mainline kernel development to getting standard Linux desktops such as Gnome, MATE and XFCE4 running. Work has also been done on the backend process of compiling and packaging up components of the operating system itself, promising to speed up development times even for those who don’t have a beefy machine they can dedicate to compiling. The blog post ends with a helpful list of things the reader can do to help support postmarketOS, ranging from making your own t-shirts to porting to new hardware.

At Hackaday we’ve seen our fair share of hackers and makers re-purposing old smartphones and tablets, keeping them out of the landfills they would almost certainly end up in otherwise. A project that aims to make it even easier to hack these cheap and incredibly useful devices is music to our ears.

PCB Production On The Sienci Mill One

A complete start to finish electronics prototyping workshop is nirvana for many of us: being able to go from design on the computer to real hardware without having to get up from your rolling chair. The falling prices of 3D printers have helped make at least part of this a reality: $200 USD is enough to get you a printer that can churn out decent looking enclosures. But there’s more to producing your own hardware than creating slick looking project boxes; at some point you’ll need to put some electronics in there.

For [Chuck Hellebuyck] at least, the last piece of the puzzle has just fallen into place. He’s recently put up a YouTube video describing how he converted his $399 Sienci Mill One into a capable PCB mill. With a 3D printer and this new PCB mill, he’s happy to say he can now go from concept to production all on the same workbench.

The Sienci Mill One is a solid enough mill in its own right but did need some modification to attain the accuracy necessary for cutting at a depth of only .9 mm. First, a block of wood was cut to the same size as the original plastic bed of the Sienci, and then the mill itself was used to drill holes through the wood block and plastic bed. The wood was attached to the bed using a nut and bolt in each corner, being sure to torque it down enough that the head of the bolt is pulled down flush with the surface of the wood.

Pulling the head of the bolts flush wasn’t just to keep the surface free of any snags, [Chuck] uses them in conjunction with a probe in the mill’s chuck as a simple way of adjusting the Z height. With a continuity meter attached between the two, he could lower the probe down until they were touching just enough to make a circuit.

Click through the break for the rest of the story!

Continue reading “PCB Production On The Sienci Mill One”