Imaging The Neighborhood With Solar Panels

Like many people who have a solar power setup at home, [Jeroen Boeye] was curious to see just how much energy his panels were putting out. But unlike most people, it just so happens that he’s a data scientist with a deep passion for programming and a flair for visualizations. In his latest blog post, [Jeroen] details how his efforts to explain some anomalous data ended with the discovery that his solar array was effectively acting as an extremely low-resolution camera.

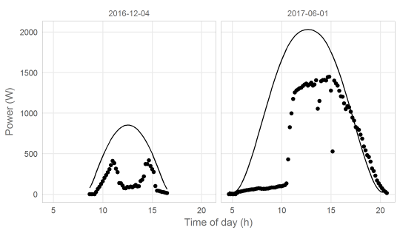
It all started when he noticed that in some months, the energy produced by his panels was not following the expected curve. Generally speaking, the energy output of stationary solar panels should follow a clear bell curve: increasing output until the sun is in the ideal position, and then decreasing output as the sun moves away. Naturally cloud cover can impact this, but cloud cover should come and go, not show up repeatedly in the data.

Expected versus actual power output.

[Jeroen] eventually came to realize that the dips in power generation were due to two large trees in his yard. This gave him the idea of seeing if he could turn his solar panels into a rudimentary camera. In theory, if he compared the actual versus expected output of his panels at any given time, the results could be used as “pixels” in an image.

He started by creating a model of the ideal energy output of his panels throughout the year, taking into account not only obvious variables such as the changing elevation of the sun, but also energy losses through atmospheric dispersion. This model was then compared with the actual power output of his solar panels, and periods of low efficiency were plotted as darker dots to represent an obstruction. Finally, the plotted data was placed over a panoramic image taken from the perspective of the solar panels. Sure enough, the periods of low panel efficiency lined up with the trees and buildings that are in view of the panels.

We’ve seen plenty of solar hacks, but this one has to be something of a first. Usually people are more worried about maximizing efficiency or tracking the sun with them.

Two Factor Authentication With The ESP8266

Google Authenticator is a particularly popular smartphone application that can be used as a token for many two factor authentication (2FA) systems by generating a time-based one time password (referred to as TOTP). With Google Authenticator, the combination of your user name and password along with the single-use code generated by the application allows you to securely authenticate yourself in a way that would be difficult for an attacker to replicate.

That sounds great, but what if you don’t have a smartphone? That’s the situation that [Lady Ada] recently found herself in, and rather than going the easy route and buying a hardware 2FA token that’s compatible with Google Authenticator, she decided to build one herself based on the ESP8266. With the hardware and source documented on her site, the makings of an open source Google Authenticator hardware token are available for anyone who’s interested.

Generated codes can also be viewed via serial.

For the hardware, all you need is the ESP8266 and a display. Naturally [Lady Ada] uses her own particular spin on both devices which you can purchase if you want to create an identical device, but the concept will work the same on the generic hardware you’ve probably already got in the parts bin. Software wise, the code is written in CircuitPython, a derivative of MicroPython, which aims to make microcontroller development easier. If you haven’t tried MicroPython before, grab an ESP and give this a roll.

Conceptually, TOTP is relatively simple. You just need to know what time it is, and run an SHA1 hash. The time part is simple enough, as the ESP8266 can connect to the network and get the current time from NTP. The calculation of the TOTP is handled by the Python code once you’ve provided it with the “secret” pulled from the Google Authenticator application. It’s worth noting here that this means your 2FA secrets will be held in clear-text on the ESP8266’s flash, so try not to use this to secure any nuclear launch systems or anything, OK? Then again, if you ever lose it the beauty of 2-factor is you can invalidate the secret and generate a new one.

We’ve covered the ins and outs of 2FA applications before here at Hackaday if you’d like to know more about the concept, in addition to previous efforts to develop a hardware token for Google Authenticator.

Upgrading A 3D Printer With OctoPrint

If you’ve been hanging around 3D printing communities, or reading the various 3D printing posts that have popped up here on Hackaday, you’ve almost certainly heard of OctoPrint. Created and maintained by Gina Häußge, OctoPrint allows you to turn an old computer (or more commonly a small ARM board like the Raspberry Pi or BeagleBone) into a network-accessible control panel for your 3D printer. Thanks to a thriving collection of community developed plugins, it can even control other hardware such as lights, enclosure heaters, smart plugs, or anything else you can think to hook onto the GPIO pins of your chosen ARM board. The project has become so popular that the new Prusa i3 MK3 has a header on the control board specifically for connecting a Pi Zero W running OctoPrint.

Even still, I never personally “got” OctoPrint. I was happy enough with my single printer connected to my computer and controlled directly from my slicer over USB. The majority of the things I print are of my own design, so when setting up the printer it only seemed logical that I would have it connected to the machine I’d be doing my designing on. If I’m sitting at my computer, I just need to rotate my chair to the right and I’m at my printer. What do I need to control the thing over WiFi for?

But things got tricky when I wanted to set up a second printer to help with speeding up larger projects. I couldn’t control them both from the same machine, and while I could print from SD on the second printer if I really had to, the idea seemed painfully antiquated. It would be like when Scotty tried talking into the computer’s mouse in “Voyage Home”. Whether I “got it” or not, I was about to dive headfirst into the world of OctoPrint.

Continue reading “Upgrading A 3D Printer With OctoPrint”

When A Skimmer Isn’t A Skimmer

I have a confession to make: ever since the first time I read about them online, I’ve been desperate to find an ATM skimmer in the wild. It’s the same kind of morbid curiosity that keeps us from turning away from a car accident, you don’t want to be witness to anyone getting hurt, but there’s still that desire to see the potential for danger up close. While admittedly my interest is largely selfish (I already know on which shelf I would display it), there would still be tangible benefits to the community should an ATM skimmer cross my path. Obviously I would remove it from the machine and prevent others from falling prey to it, and the inevitable teardown would make interesting content for the good readers of Hackaday. It’s a win for everyone, surely fate should be on my side in this quest.

So when my fingers brushed against that unmistakable knobby feel of 3D printed plastic as I went to insert my card at a local ATM, my heart skipped a beat. After all these years, my dream had come true. Nobody should ever be so excited about potentially being a victim of fraud, but there I was, grinning like an idiot in the farmer’s market. Like any hunter I quickly snapped a picture of my quarry for posterity, and then attempted to free it from the host machine.

But things did not go as expected. I spend most of my free time writing blog posts for Hackaday, so it’s safe to say that physical strength is not an attribute I possess in great quantity, but even still it seemed odd I couldn’t get the skimmer detached. I yanked it in every direction, tried to spin it, did everything short of kicking it; but absolutely no movement. In fact, I noticed that when pulling on the skimmer the whole face plate of the ATM bulged out a bit. I realized this thing wasn’t just glued onto the machine, it must have actually been installed inside of it.

I was heartbroken to leave my prize behind, but at the very least I would be able to alert the responsible party. The contact info for the ATM’s owner was written on the machine, so I emailed them the picture as well as all the relevant information in hopes that they could come check the machine out before anyone got ripped off.

Continue reading “When A Skimmer Isn’t A Skimmer”

Custom PCB Revives A Vintage Tree Stand

After 56 years, [Jeff Cotten]’s rotating Christmas tree stand had decided enough was enough. While its sturdy cast aluminum frame was ready for another half-century of merriment, the internal mechanism that sent power up through the rotating base had failed and started tripping the circuit breaker. The problem itself seemed easy enough to fix, but the nearly 60 year old failed component was naturally unobtanium.

But with the help of his local makerspace, he was able to manufacture a replacement. It’s not exactly the same as the original part, and he may not get another 56 years out of it, but it worked for this season at least so that’s a win in our books.

The mechanism inside the stand is fairly simple: two metal “wipes” make contact with concentric circle traces on a round PCB. Unfortunately, over the years the stand warped a bit and the wipe made contact with the PCB where it wasn’t intended do. This caused an arc, destroying the PCB.

The first step in recreating the PCB was measuring the wipes and the distance between them. This allowed [Jeff] to determine how thick the traces needed to be, and how much space should be between them. He was then able to take that data and plug it into Inkscape to come up with a design for his replacement board.

To make the PCB itself, he first coated a piece of copper clad board with black spray paint. Using the laser cutter at the makerspace, he was then able to blast away the paint, leaving behind the two concentric circles. A quick dip in acid, a bit of polishing with toothpaste, and he had a replacement board that was close enough to bolt up in place of the original hardware.

If you’d like to see the kind of hacks that take place above the stand, we’ve got plenty to get you inspired before next Christmas.

34C3: Hacking The Nintendo Switch

There’s a natural order to the world of game console hacking: every time a manufacturer releases a new game console they work in security measures that prevent the end user from running anything but commercially released games, and in turn every hacker worth his or her salt tries to break through. The end goal, despite what the manufacturers may have you believe, is not to run “bootleg” games, but rather to enable what is colloquially referred to as “homebrew”. That is to say, enabling the novel concept of actually running software of your choice on the hardware you paid for.

At 34C3, noted console hackers [Plutoo], [Derrek], and [Naehrwert] have demonstrated unsigned code running on Nintendo’s latest and greatest and while they are keeping the actual exploit to themselves for now, they’ve promised that a platform for launching homebrew is coming shortly for those who are on firmware version 3.0.0. From the sound of it, after 9 months on the market, Switch owners will finally have complete access to the hardware they purchased.

The key to running the team’s own code was through a WebKit exploit that was already months old by the time the Switch was released. Loading up an arbitrary webpage was the tricky part, as the Switch generally uses its web browser for accessing official sources (like the online game store). But hidden away in the help menus of Tetris, the developers helpfully put a link to their website which the Switch will dutifully open if you select it. From there it’s just a matter of network redirection to get the Switch loading a webpage from your computer rather than the Internet.

It’s easier to ask for forgiveness than permission.

But as the more security-minded of our readers may have guessed already, that just gets you into the browser’s sandbox. The team now had to figure out a way to break out and get full control of the hardware. Through a series of clever hacks the team was able to learn more about the Switch’s internal layout and operating system, slowly working their way up the ladder.

A particularly interesting hack was used to get around a part of the Switch’s OS that is designed to check which services code is allowed to access. It turns out that if code doesn’t provide this function with its own process ID (PID), the system defaults to PID 0 because the variable is not initialized. In other words, if you don’t ask the operating system which functions you have access to, you will get access to them all. This is a classic programming mistake, and a developer at Nintendo HQ is likely getting a very stern talking to right about now.

But not everything was so easy. When trying to get access to the boot loader, the team sniffed the eMMC bus and timed the commands to determine when it was checking the encryption keys. They were then able to assemble a “glitcher” which fiddled with the CPU’s power using FPGA controlled MOFSETs during this critical time in an attempt to confuse the system.

The rabbit hole is pretty deep on this one, so we’d recommend you set aside an hour to watch the entire presentation to see the long road it took to go from a browser bug to running their first complete demo. It’s as much a testament to the skill of  [Plutoo], [Derrek], and [Naehrwert] as it is the lengths at which Nintendo went to keep people out.

We’ve seen other attempts at reverse engineering Nintendo’s hardware, but by the looks of it, the Switch has put up a much harder fight than previous console generations. Makes you wonder what tricks Nintendo will have up their sleeves for the next generation.

Continue reading “34C3: Hacking The Nintendo Switch”

Arduino Trivia Box Is A Gift Unto Itself

There’s something about impressing strangers on the Internet that brings out the best in us. Honestly, we wouldn’t be able to run this site otherwise. A perfect example of this phenomenon is the annual Reddit Secret Santa, where users are challenged to come up with thoughtful gifts for somebody they’ve never even met before.

For his entry into this yearly demonstration of creativity, [Harrison Pace] wanted to do something that showcased his improving electronic skills while also providing something entertaining to the recipient. So he came up with a box of goodies which is unlocked by the successful completion of a built-in trivia game tailored around their interests. If this is how he treats strangers, we can’t wait to see what he does for his friends.

Hardware packed into the lid so the box itself remains empty.

There’s quite a bit of hardware hidden under the hood of this bedazzled gift box. The primary functions of the box are handled by an Arduino Nano; which runs the trivia game and provides user interaction via a 16×2 LCD, three push buttons, and a buzzer. Once the trivia game is complete, a servo is used to unlock the box and allow the recipient access to the physical gifts.

But that’s not the only trick this box has hidden inside. Once the main trivia game is complete, a ESP8266 kicks into action and advertises an access point the user can connect to. This starts the second level of challenges and gifts, which includes a code breaking challenge and gifted software licenses.

The project wasn’t all smooth sailing though. [Harrison] admits that his skills are still developing, and there were a few lessons learned during this project he is unlikely to forget in the future. Some Magic Smoke managed to escape when he connected his 5V Arduino directly to the 3.3V ESP8266, but at least it was a fairly cheap mistake and he had spares on hand to get the project completed anyway.

This project is reminiscent of reverse geocache boxes which only open when moved to a certain location, but the trivia aspect makes it perfect even for those of us who don’t want to put pants on just to receive our Internet gifts.

Continue reading “Arduino Trivia Box Is A Gift Unto Itself”