Fingerling Disemboweled For Your Entertainment

Due to the graphic nature of this post, small children and the elderly may want to leave the room. One of the hottest toys this holiday season has been gutted like a fish so that we may better understand the nature of its existence. Or maybe just what kind of sensors and motors the craftsmen over at WowWee managed to cram into a “robot” with an MSRP of only $15 USD.

[Josh Levine] mercilessly tears a Fingerling Monkey limb from limb on his blog, and points out some interesting design decisions made. While some elements of the toy are rather clever, there’s a few head-scratchers to be had inside the Fingerling. It’s interesting to see the final results of a decision process that had to balance the relatively rough life such a toy will live with the ever crucial cost of production.

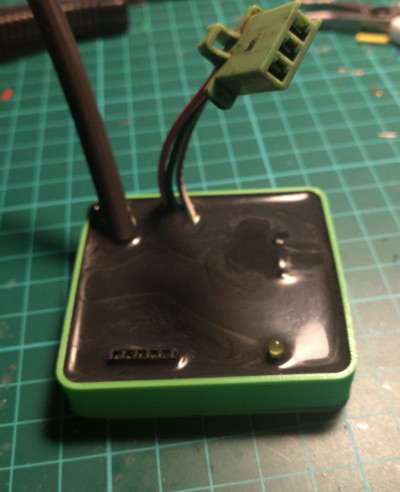
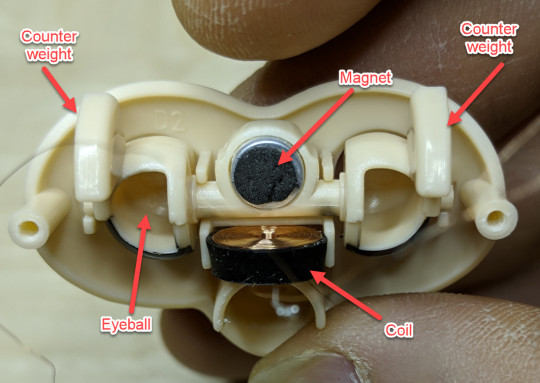
The eyelids are particularly well thought out, operated by charging a coil under a magnet which is embedded in the plastic. Opening and closing the eyelids without a separate motor or gearbox is not only easier and cheaper, but prevents the possibility of damage if a child attempts to force open the eyes or otherwise manipulate the mechanism.

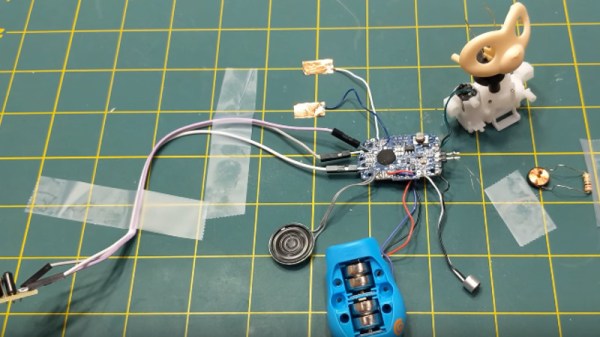
Other cost saving measures include the use of foil tape as a capacitive sensor, and simple ball-filled tilt sensors to detect orientation rather than an expensive accelerometer.

Interestingly, other parts of the toy seem overengineered in comparison. A cam and limit switch are used to detect when the Fingerling’s head has turned to its maximum angle, when it would have been cheaper and easier to simply detect motor stall current.

If you’re interested in seeing what makes popular toys tick, we’ve got a number of plaything tear downs which are sure to keep you satiated until the next big holiday toy rolls around.

Continue reading “Fingerling Disemboweled For Your Entertainment”

Coasty The Coaster Toaster

Whether or not you feel the need to laser cut custom drink coasters, you have to be impressed by the amount of thought that went into Coasty.

They say that justice is blind, and while we can’t promise you anything at your next court date, we can at least say with confidence that we’re not the kind of people who will turn down a good hack just because it’s held together with rubber bands and positive vibes. If it works it works, and it doesn’t matter what it looks like. Having said that, we’re blown away by how incredibly finished this particular project is.

Coasty, designed and built by [Bart Dring] is one of those projects that elevate a hack into something that looks like it could be a commercial product. It takes in a common pulpboard coaster and laser cuts any design you want. It’s just the right size, with just the right components because this is Coasty’s purpose. It has a slot to feed in the coaster, and uses this as one of the axes during the laser cutting process, with the laser’s left to right movement as the other. This method makes for a smaller overall footprint and means you never need to open the protective enclosure for normal operation.

One of the most striking elements of Coasty is how much of the hardware is 3D printed. If it isn’t a motor, smooth rod, or other mechanical component, it’s printed. We’re used to seeing 3D printed parts as brackets or mounts, but rarely do you see an entire chassis printed like this. Not only does it take a serious amount of forethought and design, but the print time itself can be quite prohibitive.

But by designing and printing the majority of Coasty, it really gives it a professional look that would have been harder to achieve if it was a bundle of aluminum extrusions.

The back of Coasty features an exposed PCB “motherboard” with a dizzying array of plug-in boards. Hardware like the stepper drivers, Bluetooth radio, and laser power supply are separate modules for ease of maintenance and development. There’s a few neat hardware features integrated into the motherboard as well, like the IR sensor for detecting the edge of the coaster.

The printed filter is an especially nice touch. Containing a scrap of commercially available carbon cloth intended for home air filters, Coasty is able to cut down on the smoke that is invariably produced when blasting cardboard with a 3W 450nm laser.

It turns out that custom drink coasters are serious business for some hackers out there. This isn’t the first time somebody has gone all out to make their mark while simultaneously preventing marks.

Continue reading “Coasty The Coaster Toaster”

Environmentally Aware Jewelry Gets Attention

We didn’t include a “Most Ornate” category in this year’s Coin Cell Challenge, but if we had, the environmentally reactive jewelry created by [Maxim Krentovskiy] would certainly be the one to beat. Combining traditional jewelry materials with an Arduino-compatible microcontroller, RGB LEDs, and environmental sensors; the pieces are able to glow and change color based on environmental factors. Sort of like a “mood ring” for the microcontroller generation.

[Maxim] originally looked for a turn-key solution for his reactive jewelry project, but found that everything out there wasn’t quite what he was looking for. It was all either too big or too complicated. His list of requirements was relatively short and existing MCU boards were simply designed for more than what he needed.

On his 30 x 30 mm PCB [Maxim] has included the bare essentials to get an environmentally aware wearable up and running. Alongside the ATtiny85 MCU is a handful of RGB LEDs (with expansion capability to add more), as well as analog light and temperature sensors. With data from the sensors, the ATtiny85 can come up with different colors and blink frequencies for the LEDs, ranging from a randomized light show to a useful interpretation of the local environment.

It’s not much of a stretch to imagine practical applications for this technology. Consider a bracelet that starts flashing red when the wearer’s body temperature gets too high. Making assistive technology visually appealing is always a challenge, and there’s undoubtedly a market for pieces of jewelry that can communicate a person’s physical condition even when they themselves may be unable to.

Form or function, life saving or complete novelty, there’s still time to enter your own project in the 2017 Coin Cell Challenge.

A Guidebook To The World Of Counterfeit Parts

We’ve all experienced it: that sinking feeling you get when you’ve powered up your latest circuit and nothing happens. Maybe you made a mistake in your design or you shorted something while soldering. It’s even possible that ESD damaged one of your chips. All of these issues and more are possible, maybe even inevitable, when designing your own hardware.

But what if your design is perfect and your soldering skills beyond reproach? What if your shiny new device is DOA but you’ve done everything right? A fascinating report by [Yahya Tawil] makes the case that it’s increasingly possible that you’ve run across a counterfeit component. While it’s still relatively unlikely the hobby hacker is going to get bit by the counterfeit bug, the figures and examples referenced in his report may surprise you.

One of these is an ATmega328, the other is literal garbage.

[Yahya] points to a number of government studies on the rising scourge of counterfeit components, and the numbers are rather surprising. For example, the U.S Department of Commerce conducted a study between 2005 and 2008 where over 50% of respondent manufacturers and distributors had encountered counterfeit components. Another estimate claims that up to 15% of the semiconductors purchased by the Pentagon are counterfeit, presenting a serious risk to national security.

But how exactly does one counterfeit a microcontroller or transistor? Interestingly, in the vast majority of cases, old chips are pulled from recycled circuit boards and new labels are written over the original. Sometimes the forgery is as simple as changing the date code on the component or up-rating its capability (such as labeling it military spec when it isn’t), but in some cases chips with the same package will be labeled as something else entirely. Other tricks are decidedly low-tech: the documentation for the device may list functions and capabilities which it simply does not possess, artificially raising its value.

The report is a worthwhile read, even for those of us who may not be purchasing components in the same quantities as the Pentagon. It may make you think twice before you click “Buy” on that shady site with the prices that seem to good to be true.

Counterfeit components certainly seem to be on the rise from where we’re sitting. We’ve covered a number of other studies on this increasingly common trend, as well as first hand accounts ranging from successful recoveries to frustrating failures.

LiquidWatch Is Dripping With Style

Some of the entries for the 2017 Coin Cell Challenge have already redefined what most would have considered possible just a month ago. From starting cars to welding metal, coin cells are being pushed way outside of their comfort zone with some very clever engineering. But not every entry has to drag a coin cell kicking and screaming into a task it was never intended for; some are hoping to make their mark on the Challenge with elegance rather than brute strength.

A perfect example is the LiquidWatch by [CF]. There’s no fancy high voltage circuitry here, no wireless telemetry. For this entry, a coin cell is simply doing what it’s arguably best known for: powering a wrist watch. But it’s doing it with style.

The LiquidWatch is powered by an Arduino-compatible Atmega328 and uses two concentric rings of LEDs to display the time. Minutes and seconds are represented by the outer ring of 60 LEDs, and the 36 LEDs of the inner ring show hours. The hours ring might sound counter-intuitive with 36 positions, but the idea is to think of the ring as the hour hand of an analog watch rather than a direct representation of the hour. Having 36 LEDs for the hour allows for finer graduation than simply having one LED for each hour of the day. Plus it looks cool, so there’s that.

Square and round versions of the LiquidWatch’s are in development, with some nice production images of [CF] laser cutting the square version out of some apple wood. The wooden case and leather band give the LiquidWatch a very organic vibe which contrasts nicely with the high-tech look of the exposed PCB display. Even if you are one of the legion that are no longer inclined to wear a timepiece on their wrist, you’ve got to admit this one is pretty slick.

Whether you’re looking to break new ground or simply refine a classic, there’s still plenty of time to enter your project in the 2017 Coin Cell Challenge.

A Laser Cut Arcade Cabinet For Ants

Most of us would probably like to have an arcade cabinet at home, but it’s hard to justify the space they take up. Sure it’s an awesome conversation starter when friends are over, and you might even play it regularly, but at some point you’ll look over at the corner and realize there’s probably something more practical you could be doing with that particular section of the room.

Perhaps the solution is to just make a smaller one. You could do one at half scale, or even desktop sized. But why stop there? Why not make one so small that you could put the thing in a drawer when you don’t need it? While it might be more of an academic experiment than a practical entertainment device, [RedPixel] has managed to create just such an easily concealable arcade cabinet out of a Pi Zero and laser cut wood. At only 83 mm high, this may well be the smallest functional arcade cabinet ever made (at least for now).

All of the cabinet parts were drawn in Inkscape and cut out of 3 mm plywood. The buttons and joystick are wired directly to the Pi Zero’s GPIO pins and configured with Adafruit-retrogame. The display is a SPI ILI9163, which [RedPixel] previously documented on his site.

The Pi is running the ever-popular RetroPie, which allows this tiny arcade cabinet to emulate 1000’s of console and arcade games, assuming you can deal with the controls anyway. While [RedPixel] has uploaded a video of his lilliputian cabinet running an emulator, there’s no video of him actually playing the thing. While we don’t doubt that it functions as advertised, gameplay on such a tiny array of inputs must be very difficult.

This may be the smallest functional arcade cabinet to date, but it isn’t without challengers. We’ve covered a number of very impressive builds that manage to invoke the look and feel of a hulking coin-up despite fitting neatly on your desk.

Continue reading “A Laser Cut Arcade Cabinet For Ants”

Interfacing With A Digital Speedometer

After swapping the engine out in his scooter, [James Stanley] made an unfortunate discovery. The speedometer was digitally controlled, and while the original engine had a sensor which would generate pulses for it to interpret, his new engine didn’t. Learning that the original sensor would pull the signal wire to ground each time it detected a tooth of one of the spinning gears, [James] reasoned he needed to find a way to detect the scooter’s speed and create these pulses manually.

To find the scooter’s speed, he installed a magnet on the front wheel and a hall effect sensor on the fork to detect each time it passed by. Since the wheel is of a known circumference, timing the pulses from the sensor allows calculation of the current speed. A GPS receiver could be used if you wanted fewer wires, but the hall effect sensor on the wheel is simple and reliable. With the speed of the scooter now known, he needed to turn that into a signal the speedometer understands.

Speedometer controller potted with resin.

[James] wrote a program for an ATmega that would take the input from the wheel sensor and use it to create a PWM signal. This PWM signal drives a transistor, which alternates the speedometer sensor wire between low and floating. With a bit of experimentation, he was able to come up with an algorithm which equated wheel speed to the gearbox speed the speedometer wanted with accuracy close enough for his purposes.

While the software side of this project is interesting in its own right, the hardware is an excellent case study in producing robust electronic devices suitable for use on vehicles. [James] 3D printed a shallow case for the circuit board, and potted the entire device with black polyurethane resin. He even had the forethought to make sure he had a debugging LED and programming connector before he encapsulated everything (which ended up saving the project).

While the specific scenario encountered by [James] is unlikely to befall others, his project is an excellent example of not only interfacing with exiting electronics but producing rugged and professional looking hardware without breaking the bank. Even if scooters aren’t your thing, there are lessons to be learned from this write-up.

For all you two wheeled hackers out there, we’ve covered similar projects designed for bicycles, as well as some very slick digital speedometer mods for motorcycles.