You Can Build A Giant 7-Segment Display Of Your Very Own

Sometimes you need to display a number nice and large, making it easily readable at a good distance. [Lewis] has just the thing for that: a big expandable 7-segment display.

The build is modular, allowing it to be extended from 2 to 10 digits and beyond. The digits themselves are made of 3D-printed parts assembled onto acrylic. These can then be ganged up in a wooden frame for displaying larger numbers with more digits. Individual elements are lit by addressable LEDs, and the project can be built using an Arduino Nano or an ESP8266 for control. The latter opens up possibilities for controlling the screen over WiFi, which could prove useful.

[Lewis] has built his own version for a local swim club, where it will be used as a laptimer. Other applications could be as a scoreboard in various sports, or to confuse your neighbours by displaying random numbers in your front yard.

We’ve seen a similar build from [Ivan Miranda] that served well as a workshop clock, too. Video after the break.

Continue reading “You Can Build A Giant 7-Segment Display Of Your Very Own”

The LCD being replaced in an old laptop

Hackaday Prize 2022: Repairing A Vintage Laptop With Modern Components

Laptop computers may be ubiquitous today, but there was a time when they were the exclusive preserve of rich businesspeople. Back in the early ’90s, the significant added cost of portability was something that few were willing to pay. As a result, not many laptops from those days survive; for those that do, keeping them running can be quite a challenge due to their compact construction and use of non-standard components.

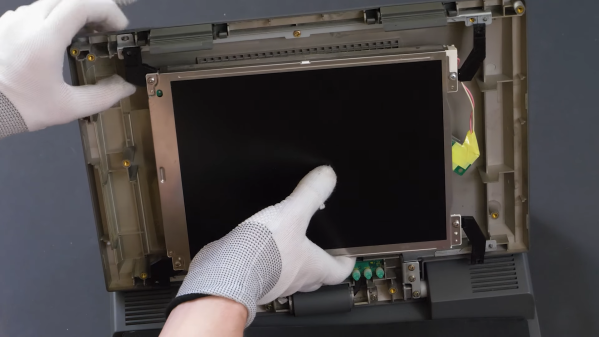
[Adalbert] ran into these problems when he got his hands on a Toshiba T3200SXC from 1991. As the first laptop ever to feature a color TFT display, it’s very much worth preserving as an historical artifact. Sadly, the original display was no longer working: it only displayed a very faint image and went completely blank soon after. Leaky capacitors then destroyed the power supply board, leaving the laptop completely dead. [Adalbert] then began to ponder his options, which ranged from trying to repair the original components to ripping everything out and turning this into a modern-computer-in-an-old-case project.

In the end he went for an option in between, which we as preservationists can only applaud: he replaced the display with a modern one of the correct size and resolution and built a new custom power supply, keeping the rest of the computer intact as far as possible. [Adalbert] describes the overall process in the video embedded below and goes into lots of detail on his hackaday.io page.

Connecting a modern LCD screen was not as difficult as it might seem: where the old display had an RGB TTL interface with three bits per color, the new one had a very similar system with six bits per color. [Adalbert] made an adapter PCB that simply connected the three bits from the laptop to the highest three bits on the screen. A set of 3D-printed brackets ensured a secure fit of the new screen in the classic case.

The internal power supply module of a laptop
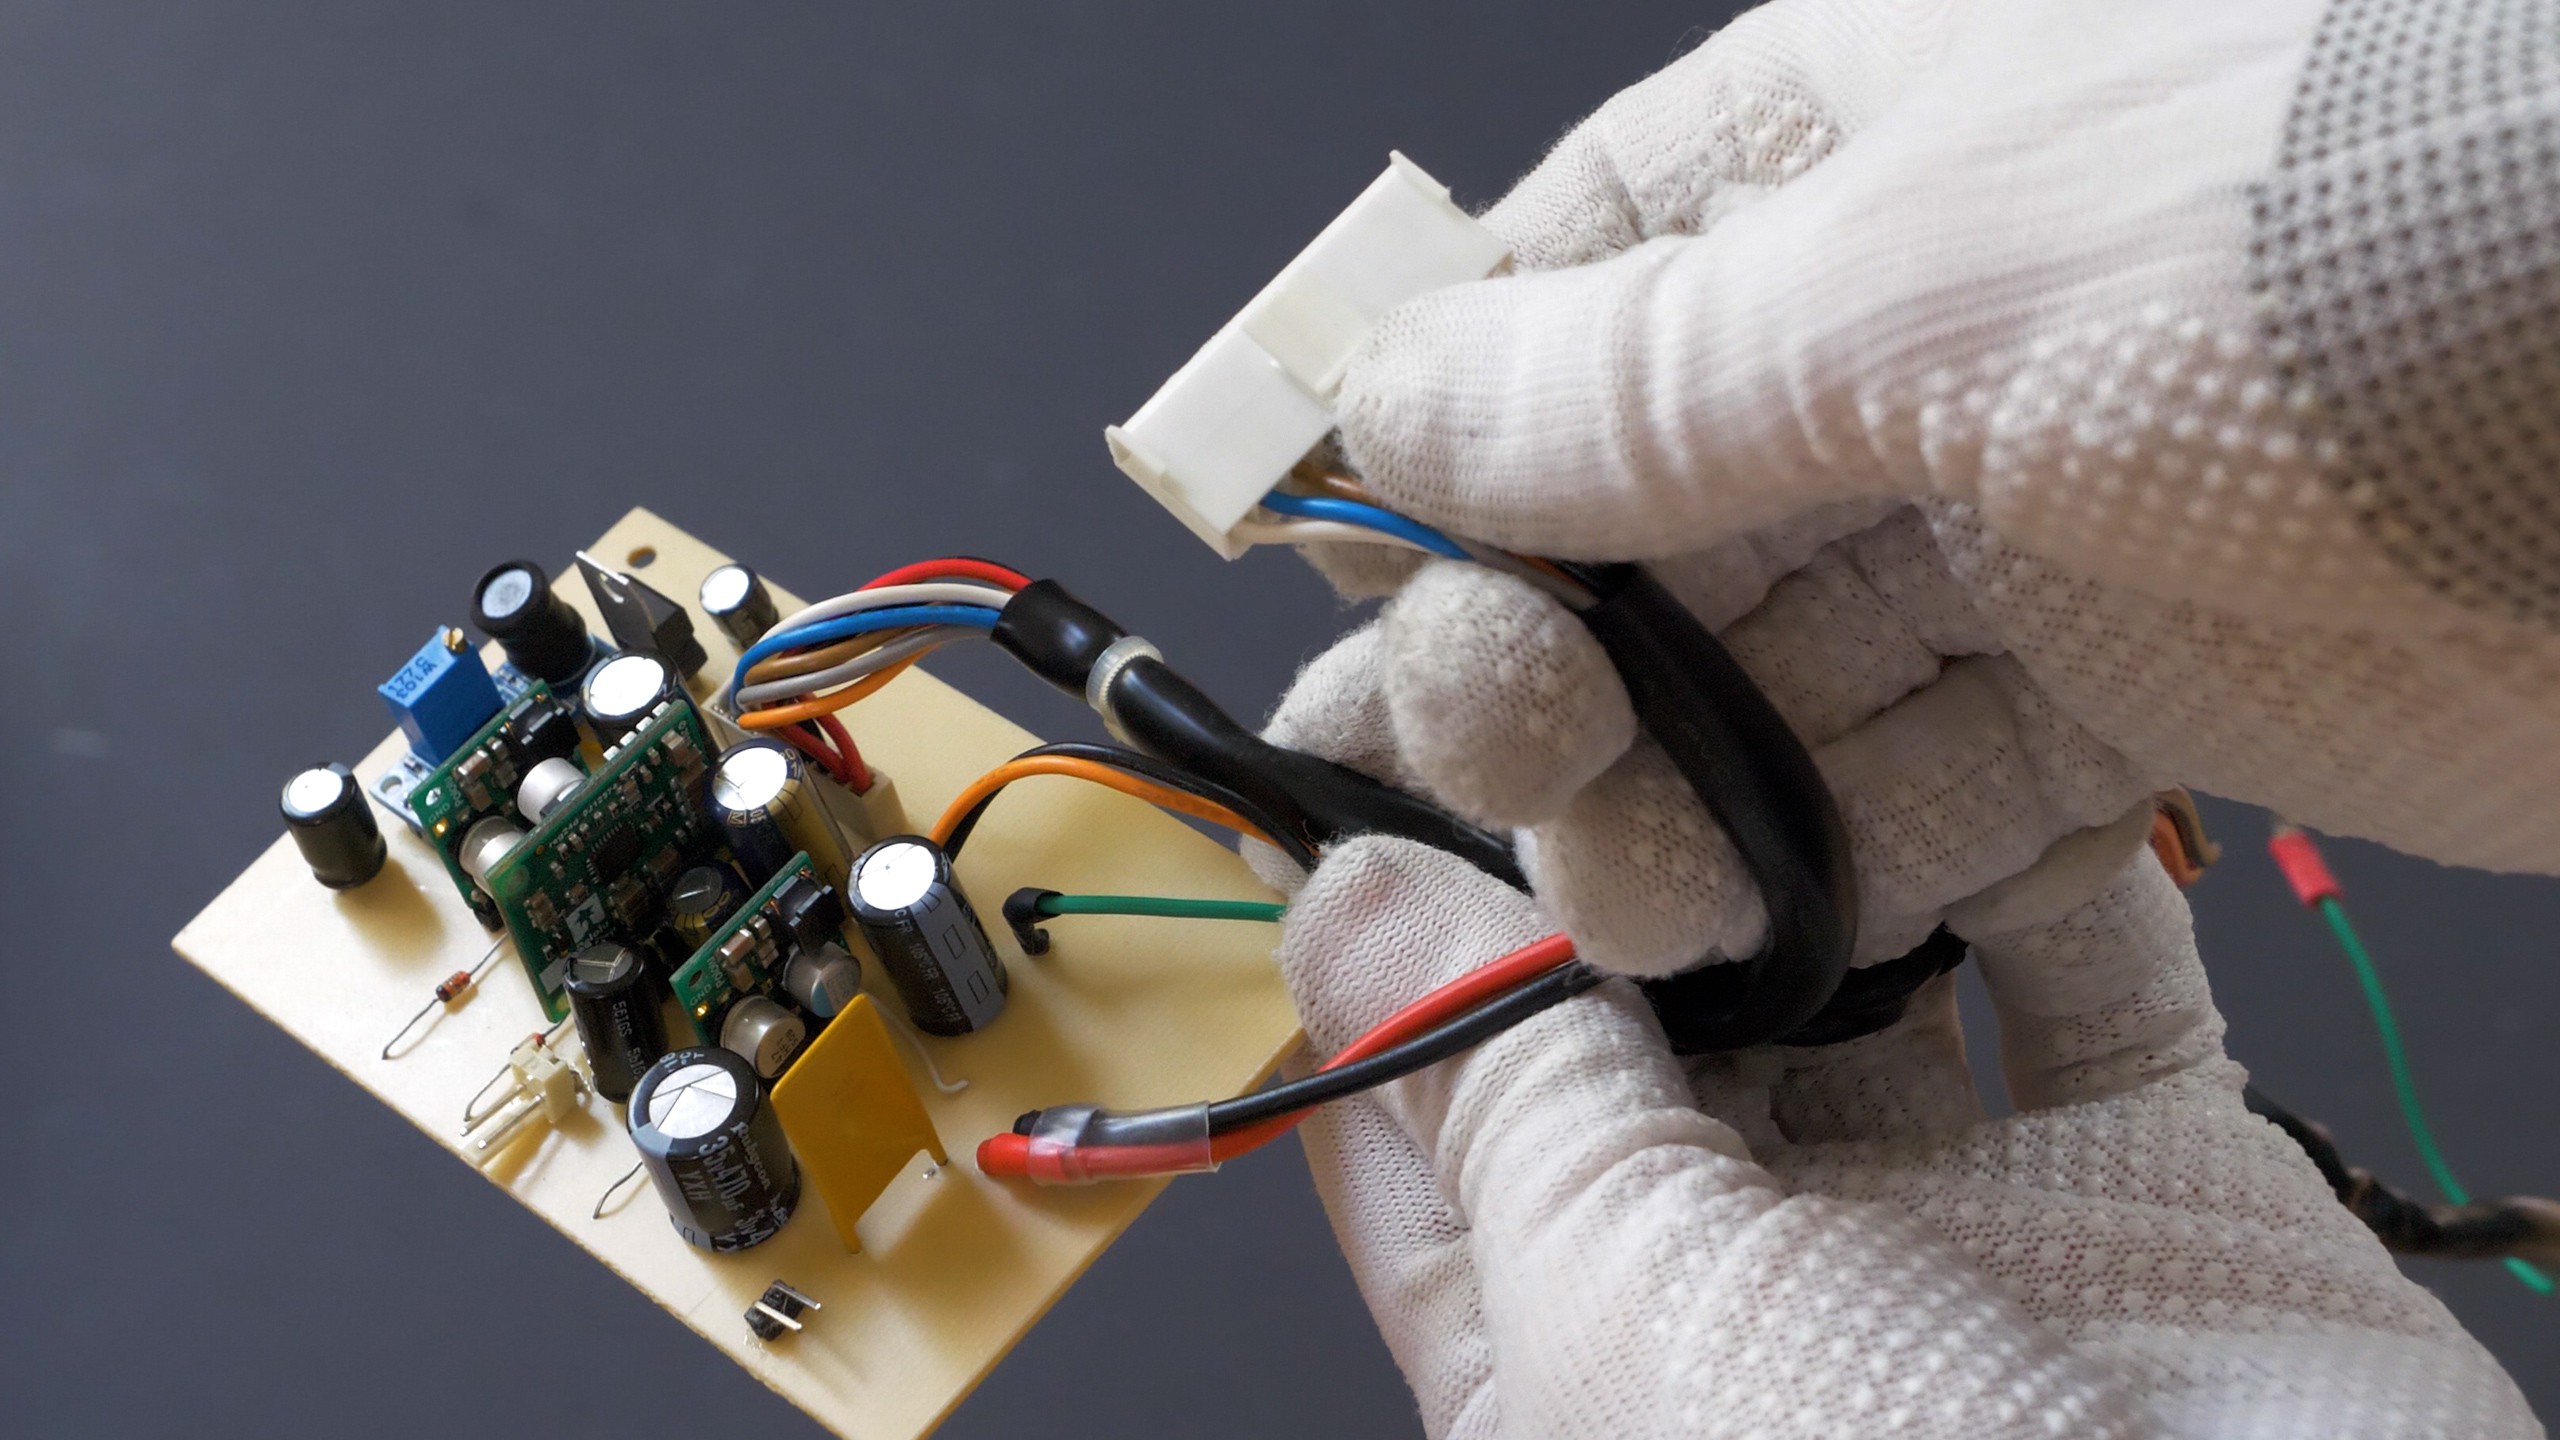
For the power supply [Adalbert] took a similar approach. He designed a PCB with several DC/DC converters that fit easily inside the computer’s case, leaving enough space to add a battery. This made the old Toshiba more portable than it ever was — believe it or not, the original T3200SXC could only be used with a mains connection.

Once the laptop was restored to working order, [Adalbert] added a few finishing touches: a sound card and speakers made it suitable as a gaming platform, and a network card gave it rudimentary online capabilities. The end result is a T3200SXC that looks and feels exactly the way it did when it was new, but with a few added features. That’s a really satisfying result: many classic laptop projects add modern computing hardware, or even completely replace the original contents. You might also want to check out [Adalbert]’s unusual 3D printer based PCB manufacturing technique that he used for the new power supply.

Continue reading “Hackaday Prize 2022: Repairing A Vintage Laptop With Modern Components”

Electrolytes, They’re What Dehydrated Hackaday Writers Crave!

The oddly prophetic 2006 comedy film Idiocracy features an isotonic drink called Brawndo, whose marketing continuously refers to its electrolytes as a miraculous property. Brawndo is revealed in the film to be useless for agricultural irrigation, but yesterday perhaps a couple of Hackaday writers could have used a bottle or two. At the MCH hacker camp, the record heat of a Dutch summer under the influence of global warming caused us to become dehydrated, and thus necessitated a trip to the first aid post for some treatment. We’d done all the right things, staying in the shade, keeping as cool as we could, eating salty foods like crisps, and drinking plenty of liquids, so what had gone wrong?

Perhaps Club-Mate Should Have An Isotonic Version

The answer will probably be obvious to trained observers, we’d become deficient in those electrolytes. Our bodily stocks of sodium and potassium salts had become exhausted by sweat and all that extra water requiring trips to the toilet, so while we weren’t dehydrated in liquid terms we had exhausted some of the essentials to our cellular function.

The symptoms would have been easy to spot given the right training, but at a hacker camp it was too easy to attribute a headache and tiredness to a late night. For me the point at which it became obvious something was significantly wrong came when my thought processes started to slow down and my movement became a lot less easy. I’m a long-distance walker and cyclist, yet here I was walking like an octogenarian. If I’d know what to spot I might also have noticed that I had stopped sweating despite the heat. I found a friend (Thanks Gasman!), and together we made our way to the first aid post. MCH2022 first aiders were very efficient, and I was given a cup of oral rehydration salts which restored me to health in a matter of minutes. Continue reading “Electrolytes, They’re What Dehydrated Hackaday Writers Crave!”

Launch And Track Your Model Rockets Via Smartphone

Building and flying model rockets is great fun. Eventually, though, the thrill of the fire and smoke subsides, and you want to know more about what it’s doing in the air. With a thirst for knowledge, [archy587] started building a project to monitor the vital stats of rockets in flight. 

The project mounts an M0 Feather microcontroller board into the rocket, along with a 900 MHz LoRa transmitter and a GPS module. This allows the rocket’s journey to be measured and logged, and is particularly useful for when a craft floats off downrange during parachute recovery. There’s also a relay module onboard, which dumps power from a dedicated separate battery into the rocket motor igniter. This allows the rocket to be fired wirelessly.

On the ground, the setup uses an ESP32 fitted with another LoRa module to receive signals from the rocket. It’s designed to hook up to an Android smartphone over its USB-C port. This allows data received from the rocket to be displayed in an Android app, including the rocket’s GPS location overlaid on Google Maps.

Being able to remotely ignite your rockets and track their progress brings some high-tech cool to the launch pad. You’ll be upgrading your rockets with micro flight controllers and vectored thrust in no time. Just be sure whatever tech you’re using is compliant with the rules for model rocketry in your local area.

Continue reading “Launch And Track Your Model Rockets Via Smartphone”

The Surprisingly Manual Process Of Building Automotive Wire Harnesses

Even from the very earliest days of the automobile age, cars and trucks have been hybrids of mechanical and electrical design. For every piston sliding up and down in a cylinder, there’s a spark plug that needs to be fired at just the right time to make the engine work, and stepping on the brake pedal had better cause the brake lights to come on at the same time hydraulic pressure pinches the wheel rotors between the brake pads.

Without electrical connections, a useful motor vehicle is a practical impossibility. Even long before electricity started becoming the fuel of choice for vehicles, the wires that connect the computers, sensors, actuators, and indicators needed to run a vehicle’s systems were getting more and more complicated by the year. After the engine and the frame, a car’s wiring and electronics are its third most expensive component, and it’s estimated that by 2030, fully half of the average vehicle’s cost will be locked in its electrical system, up from 30% in 2010.

Making sure all those signals get where they’re going, and doing so in a safe and reliable way is the job of a vehicle’s wire harnesses, the bundles of wires that seemingly occupy every possible area of a modern car. The design and manufacturing of wire harnesses is a complex process that relies on specialized software, a degree of automation, and a surprising amount of people-power.

Continue reading “The Surprisingly Manual Process Of Building Automotive Wire Harnesses”

Move Over Silicon, A New Semiconductor Is In Town

Silicon has had a long run as the king of semiconductors, and why not? It’s plentiful and works well. However, working well and working ideally are two different things. In particular, electrons flow better than holes through the material. Silicon also is a poor heat conductor as we’ve all noticed when working with high-speed or high-power electronics. Researchers at MIT, the University of Houston, and other institutions are proposing cubic boron arsenide to overcome these limitations.

According to researchers, this material is a superior semiconductor and, possibly, the best possible semiconductor. Unfortunately, the material isn’t nearly as common as silicon. Labs have created small amounts of the material and there is still a problem with fabricating uniform samples.

Early experiments show the material has very high mobility for electrons and holes along with thermal conductivity almost ten times greater than that of silicon. It also has a good bandgap, making it very attractive as a semiconductor material. In fact, only diamond and isotopically enriched cubic boron nitride have better thermal conductivity.

However, there are still unknowns about how to use the material in practical devices. Long-term stability tests are as lacking. So maybe it will wipe out silicon or maybe it won’t. Time will tell.

We are always on the lookout for the next big semiconductor material. However, we suspect this tech will be out of reach to the home semiconductor fab, at least for a little while.

Large Format 3D Printer Is A Serious Engineering Challenge

When you want to build a large format 3D printer, you can’t just scale up the design of a desktop machine. In an excellent four-part build series (videos after the break), [Dr. D-Flo] takes us through all the engineering challenges he had to contend with when building a 3D printer with a 4x4x4 ft (1.2 m cube) print volume.

For such a large print volume you won’t be printing with a 0.4 mm nozzle. The heart of the printer is a commercial Massive Dimension MDPH2 pellet extruder, capable of extruding ~1 kg of plastic per hour through 1.5 mm to 5 mm nozzles. To feed the extruder, [Dr. D-Flo] used a Venturi vacuum system to periodically suck pellets from a large hopper. The system is driven by compressed air, which can introduce moisture back into the carefully dried pellets. To reduce the humidity levels, the compressed air passes through a series of vertical aluminum tubes to allow moisture to condense and drain out the bottom.

At 8.4 kg, it needs a powerful motion platform to move it. [Dr. D-Flo] went with a stationary bed design, with the extruder pushed around by seven high torque NEMA23 motors on a large gantry built from C-beam aluminum extrusions. A machine this size needs to be very rigid with well-fitting parts, so [Dr. D-Flo] made heavy use of CNC machined aluminum parts.

To allow dynamic bed leveling, [Dr. D-Flow] made use of a Quad Gantry Leveling (GQL) scheme. This means that each of the four Z-actuators will dynamically adjust its position based on inputs from the leveling probe. The avoid stressing the corner mountings that hold the X-Y gantry to the Z carriage plates, he used radial spherical bearings at the mounting points to allow a few degrees of play.

The build plate consists of an aluminum plate bolted onto the base in 25 positions with springs for adjustability. A massive 6000 watt 220 V heating pad sticks to the bottom, while the actual printing surface is a large sheet of borosilicate glass. One major concern was the deflection of the build plate when heated to working temperature, but with all the adjustment options [Dr. D-Flo] was able to get height variation down to about 0.25 mm. This is within the acceptable range when printing with layer heights of 1 mm or more.

We’ve featured large scale 3D printers in the past, but none are quite as big the University of Maine’s building-sized 3D printer that can print a motorboat in one piece.

Continue reading “Large Format 3D Printer Is A Serious Engineering Challenge”