Gold Cables Really Do Work The Best

As a writer, I have long harboured a dream that one day an editor will buy me a top-of-the-range audio analyser, and I can set up an audio test lab and write pieces debunking the spurious claims made by audiophiles, HiFi journalists, and the high-end audio industry about the quality of their products. Does that amp really lend an incisive sibilance to the broader soundstage, and can we back that up with some measurable figures rather than purple prose?

An Audio Playground You Didn’t Know You Had

An Audio Precision APx525 audio analyser.
An Audio Precision APx525 audio analyser. Bradp723 (CC-BY-SA 3.0)

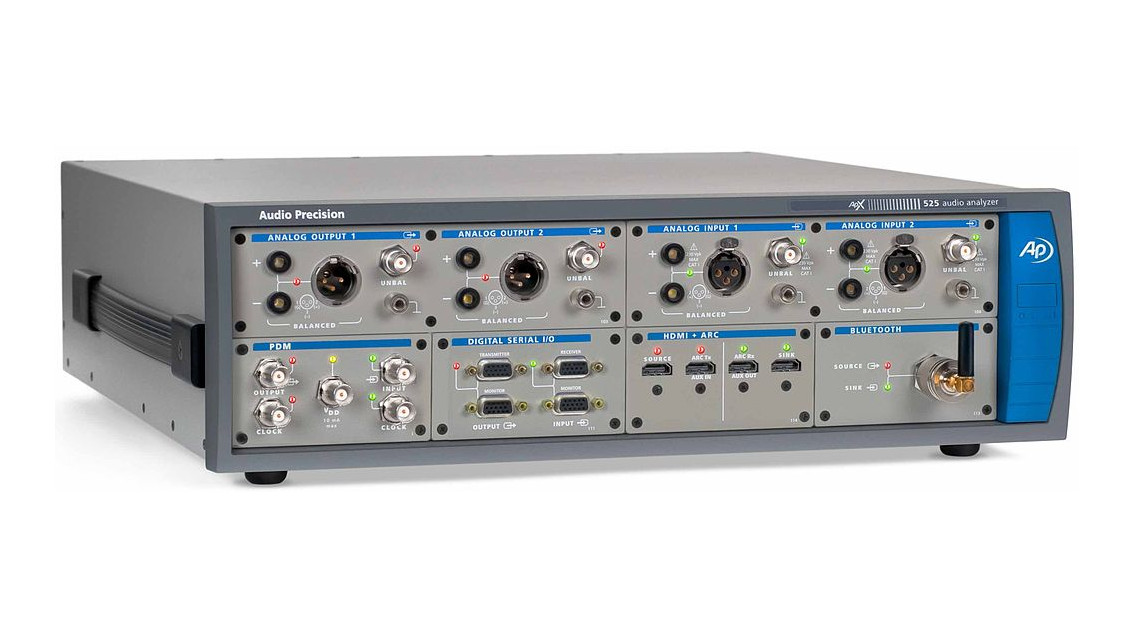
Sadly Hackaday is not an audio magazine, and if Mike bought me an Audio Precision he’d have to satisfy all the other writers’ test equipment desires too, and who knows where that would end! So there will be no Hackaday audio lab — for now. But that doesn’t mean I can’t play around with audio analysis.

Last month we carried a write-up of a Supercon talk from Kate Temkin and Michael Ossmann, in which they reminded us that we have a cracking general purpose DSP playground right under our noses; GNU Radio isn’t just for radio. Once I’d seen the talk my audio analysis horizons were opened up considerably. Maybe that audio analyser wouldn’t be mine, but I could do some of the same job with GNU Radio.

It’s important to stress at this point that anything I can do on my bench will not remotely approach the quality of a professional audio analyser. But even if I can’t measure infinitesimal differences between very high-end audio circuitry, I can still measure enough to tell a good audio product from a bad one.

Continue reading “Gold Cables Really Do Work The Best”

Fail Of The Week: How Not To Die Of Boredom During Isolation

They say you can’t actually die from boredom, but put a billion or so people into self-isolation, and someone is bound to say, “Hold my beer and watch this.” [Daniel Reardon]’s brush with failure, in the form of getting magnets stuck up his nose while trying to invent a facial touch reminder, probably wasn’t directly life-threatening, but it does underscore the need to be especially careful these days.

The story begins with good intentions and a small stack of neodymium magnets. [Daniel]’s idea for a sensor to warn one of impending face touches was solid: a necklace with magnetic sensors and wristbands studded with magnets. Sounds reasonable enough; one can easily see a compact system that sounds an alarm when a hand subconsciously crosses into the Danger Zone while going in for a scratch. Lacking any experience in circuits, though, [Daniel] was unable to get the thing working, so he started playing with the magnets instead. One thing led to another, and magnets were soon adorning his earlobes, and then his nostrils. Unfortunately, two magnets became locked on either side of his septum, as did two others meant to neutralize the pull of the first pair. So off [Daniel] went to the emergency department for a magnetectomy.

Of course it’s easy to laugh at someone’s misfortune, especially when self-inflicted. And the now-degaussed [Daniel] seems to be a good sport about the whole thing. But the important thing here is that we all do dumb things, and hackers need to be especially careful these days. We often work with sharp, pointy, sparky, toxic, or flammable things, and if we don’t keep our wits about us, we could easily end up in an ER somewhere. Not only does that risk unnecessary exposure to COVID-19, but it also takes medical resources away from people who need it more than you do.

By all means, we should be hacking away these idle hours. Even if it’s not in support of COVID-19 solutions, continuing to do what we do is key to our mental health and well-being. But we also need to be careful, to not stretch dangerously beyond our abilities, and to remember that the safety net that’s normally there to catch us is full of holes now.

Thanks to [gir.st] for the tip — you actually were the only one to send this in.

Empanada Becomes Impractical, Delicious Synth

Vegemite is an Australian staple – a rich, protein-filled sandwich spread with a strong salty flavor. It serves as a great way to add a little umami to any dish, which is the hottest open secret in Australian cuisine this decade. It also works as a servicable conductive paint, which [Alex] used to make this baked good into a musical device.

The basis of the device is a basic audio example sketch running on an Adafruit Circuit Playground Express. The code was tweaked to play a 7-note C major scale. The PCB was then attached to the empanada with toothpicks through each pad, with the baked good itself seemingly connected to the ground plane. The toothpicks through the pads were then coated with Vegemite, and another toothpick treated the same way and used as a stylus. By touching the toothpick to the empanada and one of the pads, the circuit is made, and a note is played.

It’s an impractical way to go about musical performance, sure. But it is an effective demonstration of foodstuffs used in electronics. Calvin Harris did much the same back in 2009, albeit with humans substituting for the delicious pastry. Video after the break.

Continue reading “Empanada Becomes Impractical, Delicious Synth”

Handheld 3D Scanning, Using Raspberry Pi 4 And Intel RealSense Camera

Raspberry Pi 4 (with USB 3.0) and Intel RealSense D415 depth sensing camera.

When the Raspberry Pi 4 came out, [Frank Zhao] saw the potential to make a realtime 3D scanner that was completely handheld and self-contained. The device has an Intel RealSense D415 depth-sensing camera as the main sensor, which uses two IR cameras and an RGB camera along with the Raspberry Pi 4. The Pi uses a piece of software called RTAB-Map — intended for robotic applications — to take care of using the data from the camera to map the environment in 3D and localize itself within that 3D space. Everything gets recorded in realtime.

This handheld device can act as a 3D scanner because the data gathered by RTAB-Map consists of a point cloud of an area as well as depth information. When combined with the origin of the sensing unit (i.e. the location of the camera within that area) it can export a point cloud into a mesh and even apply a texture derived from the camera footage. An example is shown below the break.
Continue reading “Handheld 3D Scanning, Using Raspberry Pi 4 And Intel RealSense Camera”

Using A Vending Machine Bill Acceptor With Arduino

We’ve all seen, and occasionally wrestled with, bill acceptors like the one [Another Maker] recently liberated from an arcade machine. But have you ever had one apart to see how it works? If not, the video after the break is an interesting peak into how this ubiquitous piece of hardware tells the difference between a real bill and a piece of paper.

But [Another Maker] goes a bit farther than just showing the internals of the device. He also went through the trouble of figuring out how to talk to it with an Arduino, which makes all sorts of money-grabbing projects possible. Even if collecting paper money isn’t your kind of thing, it’s still interesting to see how this gadget works on a hardware and software level.

As explained in the video, a set of belts are used to pull the bill past an array of IR LEDs. The hardware uses these to scan the bill and perform some dark magic to determine if it’s a genuine piece of currency. [Another Maker] notes that these readers actually need to receive occasional firmware updates to take into account new bill designs. In fact, the particular unit he has is so out of date that it won’t accept modern $5 bills; which may explain how he got it for free in the first place.

Years ago we saw one of these bill acceptors used to make a DIY Bitcoin ATM. Of course back then, a few bucks would get you a semi-reasonable amount of BTC. These days you would skip the paper currency and do it all digitally.

Continue reading “Using A Vending Machine Bill Acceptor With Arduino”

Perhaps August Dvorak Is More Your Type

One of the strangest things about human nature is our tendency toward inertia. We take so much uncontrollable change in stride, but when our man-made constructs stop making sense, we’re suddenly stuck in our ways — for instance, the way we measure things in the US, or define daytime throughout the year. Inertia seems to be the only explanation for continuing to do things the old way, even when new and scientifically superior ways come along. But this isn’t about the metric system — it’s about something much more personal. If you use a keyboard with any degree of regularity, this affects you physically.

Many, many people are content to live their entire lives typing on QWERTY keyboards. They never give a thought to the unfortunate layout choices of common letters, nor do they pick up even a whisper of the heated debates about the effectiveness of QWERTY vs. other layouts. We would bet that most of our readers have at least heard of the Dvorak layout, and assume that a decent percentage of you have converted to it.

Hardly anyone in the history of typewriting has cared so much about subverting QWERTY as August Dvorak. Once he began to study the the QWERTY layout and all its associated problems, he devoted the rest of his life to the plight of the typist. Although the Dvorak keyboard layout never gained widespread adoption, plenty of people swear by it, and it continues to inspire more finger-friendly layouts to this day.

Continue reading “Perhaps August Dvorak Is More Your Type”

Reverse Engineering A Ceiling Fan Remote

In the quest to automate everything in your home, you no doubt have things that aren’t made with home automation in mind. Perhaps your window AC unit, or the dimmer in your dining room. [Seb] has several ceiling fans that are controlled by remotes and wanted to connect them to his home automation system. In doing so, [Seb] gives a good overview of how to tackle this problem and how to design a PCB so he doesn’t have a breadboard lying around connected to the guts of his remote control.

There are several things [Seb] needs to figure out in order to connect his fans to Home Assistant, the home automation system he uses: He needs to determine if the circuit in the remote can be powered by 5 or 3.3 V, he needs to connect the circuit to an ESP32 board, and he needs to figure out if he can create a custom PCB that combines the circuit and the ESP32 into one. The video goes through each of these steps and shows the development of each along the way.

There’s a lot of info in the video, so it might need to be slowed down a bit to see all the details. There are some other reverse engineering of home automation gear on the site, here, or, you might want to build your own remote to control your automated devices.

Continue reading “Reverse Engineering A Ceiling Fan Remote”