Gear Up Your Gear Knowledge With Gears

Gears are fairly straightforward way to couple rotational motion, and the physics topics required to understand them are encountered in an entry level physics classroom, not a university degree. But to really dig down to the root of how gears transfer motion may be somewhat more complex than it seems. [Bartosz Ciechanowski] put together an astonishingly good interactive teaching tool on gears, covering the fundamentals of motion up through multi-stage gear trains.

Illustrating the distance traveled at different points on the disc

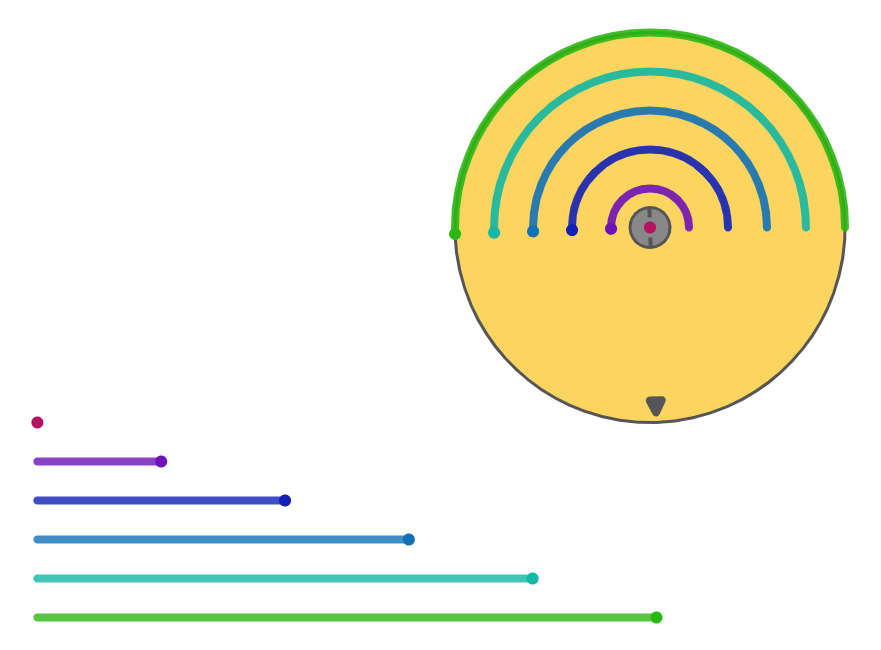
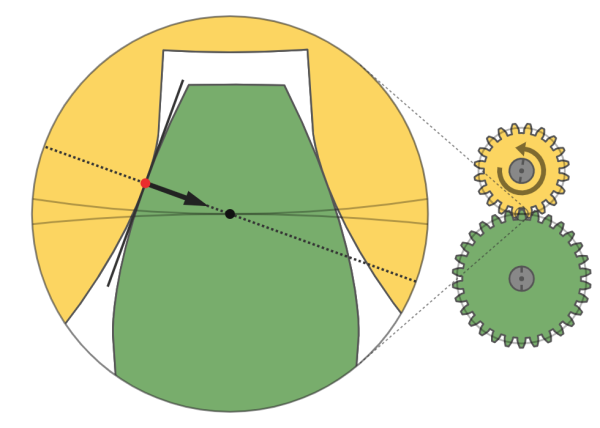
The post starts at the beginning – not “how to calculate a gear ratio” – but how does rotational motion work at all. The illustrations help give the reader an intuitive sense for how the rate of rotation is measured and what that measurement actually represents in the real world. From there [Bartosz] builds up to describing how two discs touching edge to edge transfer motion and the relationship of their size on that process. After explaining torque he has the fundamentals in place to describe why gears have teeth, and why they work at all.

Well written explanatory copy aside, the real joy in this post is the interactivity. Each concept is illustrated, and each illustration is interactive. Images are accompanied by a slider which lets you adjust what’s shown, either changing the speed of a rotating gear or advancing the motion of two teeth interlocking. We found that being able to move through time this way really helped form an intuitive understanding of the concepts being discussed. This feels like the dream of interactive multimedia textbooks come to life.

Star Wars Electrostaff Effect, Done With Spinning LEDs

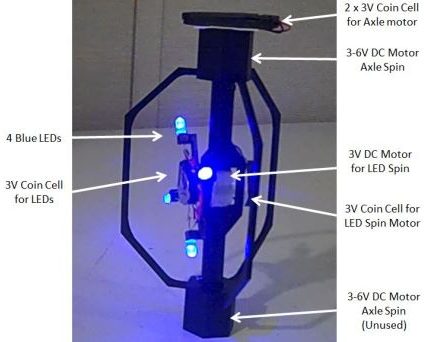
[Bithead] wanted to make a prop replica of an Electrostaff from Star Wars, but wasn’t sure how best to create the “crackling arcs of energy” effect at the business ends. After a few false starts, he decided to leverage the persistence of vision effect by spinning LEDs in more than one axis to create helical arcs of light and it seems that this method has some potential.

Many multi-axis persistence of vision devices use a component called a slip ring in order to maintain electrical connections across rotating parts, but [Bithead] had a simpler plan: 3D print a frame and give each axis its own battery. No centralized power source means a quicker prototype without any specialized parts, and therefore a faster proof of concept to test the idea.

[Bithead] already has improvements planned for a new version, but you can see the current prototype in action in the short video embedded after the break.

Continue reading “Star Wars Electrostaff Effect, Done With Spinning LEDs”

Soft Rotating Pneumatic Actuators

When we think of pneumatic actuators, we typically consider the standard varieties of pneumatic cylinder, capable of linear motion. These can be referred to as “hard” actuators, made of rigid components and capable of great accuracy and force delivery. However, “soft” actuators have their own complementary abilities – such as being able to handle more delicate tasks and being less likely to injure human operators when used in collaborative operations. The Whitesides Research Group at Harvard University has undertaken significant research in this field, and released a paper covering a novel type of soft pneumatic actuator.

The actuator consists of a series of soft, flexible sealed chambers which surround a wooden dowel in the center. By applying vacuum to these various chambers, the dowel in the center can be pulled into up to eight different positions. It’s a unique concept, and one we can imagine could have applications in various material processing scenarios.

The actuator was built by moulding elastomers around 3D printed components, so this is a build that could theoretically be tackled by the DIYer. The paper goes into great detail to quantify the performance of the actuator, and workshops several potential applications. Testing is done on a fluid delivery and stirring system, and a tethered robotic walker was built. The team uses the term cVAMS – cyclical vacuum actuated machine – to describe the actuator technology.

The world of soft robotics is a hot bed of development, and we look forward to further work in this field. It’s not just Harvard, either – we’ve seen interesting work from Yale and from the Hackaday community too!


Amplifier Controlled Motorized Display

It’s easy to get jaded by gadgets like the Chromecast or Sonos, which let the user control AV equipment remotely from a mobile device or computer. You can pick something to play from your phone and send it off to your speakers via the magic of Wi-Fi. But it’s still nice to have a display to look at for music visualizations and that sort of thing, at least occasionally.

To address this only occasional desire to have a display on your media setup, you could follow in the footsteps of [Steven Elliott] and create a DIY motorized display which only pops up when needed. Inspired by seeing videos of TVs rising out of cabinets and other such trickery, he decided to create his own version using an old computer monitor he had lying around.

The monitor is lifted with a beefy linear actuator, which has been placed inside of a square metal fence post to keep from rotating. It already had a power supply and control board with relays for extending and retracting, so [Steven] just needed to find a convenient way of firing them off.

The answer came from a somewhat unconventional source: his amplifier. [Steven] explains that many amplifiers feature a “Trigger Output”, which uses a standard stereo 3.5mm connector and sends a 12V pulse to connected device. This is generally used to turn on downstream devices when the amplifier switches to the respective input. It’s too short and not nearly powerful enough to close the actuators relays, but it’s easy enough to detect.

[Steven] uses a LeoStick microcontroller to wait for the pulse from the amplifier, and then use that to raise or lower the display depending on the selected input. There’s also a SPST momentary switch which can be used to trigger the actuator manually. Beyond the fact the linear actuator is a bit loud, he says the setup works very well and prevents him from having to start up his projector if he just wants to take a quick glance at what’s playing or program his DVR.

We don’t see many motorized display lifts like this anymore, not since wall mounted LCDs became popular anyway. But it’s still a cool effect, and today made quite a bit easier thanks to the fact that TVs and monitors no longer weigh as much as a small car.

[Thanks to Baldpower for the tip.]

Rotating Lithophane Box Turns With Time

If you wanted to make a rotating display box, what would you use to make it spin? A servo? A stepper motor? [ChrisN219] didn’t need his to move quickly by any means, and this opened up his options to something we probably wouldn’t have thought to use: a clock movement. Specifically, the hour minute part of the shaft.

Rotating lithophanes of your loved ones makes for a pretty cool project, and there isn’t a whole lot to this build to make it difficult. Much of it is 3D printed, including the tube in the center that the LED strip is wrapped around. The base is just big enough to hold the clock movement and the LED strip controller, so it would fit nicely on a desk or a mantel.

This is version two of [Chris]’ lithophane box, which gave him a chance to perfect the frame and design a thicker center post to withstand the heat from the LED strip. All the files are available if you want to print your own panels and take them for a spin. Since it’s so easy to change them out, you may end up with a big pile to choose from.

Remote controlled Billy from the Saw movies

Pi-Controlled Billy From The Saw Horror Flicks

[David0429] has made a very scary Raspberry Pi controlled puppet. Scary that is if you’ve seen the Saw movies where a serial killer uses one like it, called Billy, to communicate with his victims. If you haven’t, then it’s a pretty neat remote-controlled puppet-on-a-tricycle hack.

A stepper motor hidden under the front fender moves the trike by rotating the front wheel. It does this using a small 3D printed wheel that’s attached to the motor’s shaft and that presses against the trike’s wheel. Steering is done using a 3D printed gear mounted above the fender and attached to the steering column. That gear is turned by a servo motor through another gear. And another servo motor in the puppet’s head moves its mouth up and down.

All these servos and motors are wired to an Adafruit stepper motor HAT stacked on a Raspberry Pi hidden under the seat. Remote control is done from a webpage in any browser. The Flask python web framework runs on the Pi to both serve up the webpage and communicate with it in order to receive commands.

[David0429] took great care to make the puppet and tricycle look like the one in the movie. Besides cutting away excess parts of the trike and painting it, he also ran all the wires inside the tubular frame, drilling and grinding out holes where needed.  The puppet’s skeleton is made of wood, zip ties and hinges but with the clothes on, it’s pretty convincing. Interestingly, the puppet in the first movie was constructed with less sophistication, having been made out of paper towel rolls and papier-mâché. The only things [david0429] would like to do for next time are to quieten the motors for maximum creepiness, and to make it drive faster. However, the need for a drive system that could be hidden under the fender resulted one that could only work going slowly. We’re thinking maybe driving it using the rear wheels may make it possible provide both speed and stealth. Ideas anyone?

In any case, as you can see in the video below, the result is suitably creepy.

Continue reading “Pi-Controlled Billy From The Saw Horror Flicks”

Rotating Frame Will Change Your View Of Vertical Images

[Tim] was tired of compromising his portrait-oriented digital photos by shoehorning them into landscape-only frames. Unable to find a commercial solution, he built his own rotating digital photo frame from a 27″ LCD TV.

It uses a Raspi 3 to find [Tim]’s pictures on a giant SD card. He originally wanted to have the Pi pull pictures from Google Photos and display them randomly, but the API doesn’t work in that direction. Instead, a Python script looks at the pictures on the SD card and determines whether each is landscape or portrait-oriented. If a picture was taken in portrait-mode, the display will rotate 90 degrees. Rotation is handled with an Arduino, a stepper motor, and some 3D-printed herringbone gears. The first version was a bit noisy, so [Tim] re-printed the motor mount and the pinion gear out of flexible filament.

[Tim] designed the mount and frame himself and laser-cut the pieces out of birch plywood. We like that he accounted for the front-heaviness and that he covered the high voltage circuitry with acrylic to mitigate the risk of shock. All the code and design files are available on his project page. Make the jump to see a brief demonstration followed by a walk-through and stay for the six-minute slide show.

Continue reading “Rotating Frame Will Change Your View Of Vertical Images”