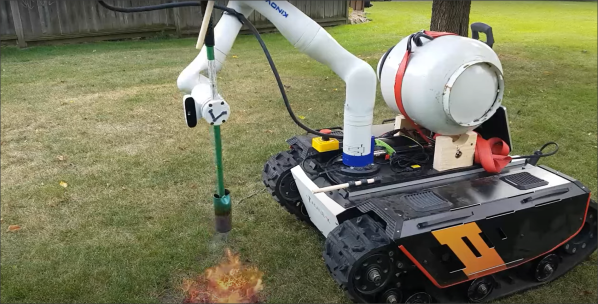
Battery Swap Gives Nissan LEAF New Lease On Life

It’s often said that one of the advantages of owning an electric vehicle is reduced maintenance costs, and for the most part, that’s true. That is, until the vehicle’s battery pack starts to show its age. Then you might be on the hook for a repair bill comparable to swapping out the engine on your old gas-burner. Depending on the age of the vehicle at that point, you might find yourself in the market for a new ride.

But in his latest video, [Daniel Öster] demonstrates that you can replace the battery in a modern electric vehicle without breaking the bank. While it’s not exactly an easy job, he manages to swap the pack in his 2012 Nissan LEAF from the comfort of his own garage using common tools and with the vehicle up on jack stands. The old battery wasn’t completely shot, so he was even able to recoup some of his costs by selling it; bringing the total price of the operation to approximately €2,122 ($2,500 USD).

Splicing on a new diagnostic connector.

While that wouldn’t be a bad deal even for a simple swap, the operation was actually an upgrade. The car was originally sold with a 24 kWh battery, but [Daniel] has replaced it with a 30 kWh pack intended for the 2017 LEAF. His car now has a greater range than it did the day it rolled off the assembly line, though as you might expect, the installation was more complex than it would have been with a contemporary battery.

[Daniel] has produced a kit that has all the adapters required to perform your own battery upgrade, including a module that translates the diagnostic signals from the newer battery into something the older vehicle can understand. With all the electrical bits simplified, all you’ve got to worry about is drilling the new battery mounting holes in the frame.

The battery pack is truly the heart and soul of an electric car, so its no surprise that mechanics and hackers alike are eager to learn as much about them as possible. They’ll have their work cut out for them, as the technology is only going to get more advanced with time.

Continue reading “Battery Swap Gives Nissan LEAF New Lease On Life”

Trick Or Yeet Cannon Will Give Them Candy Shell Shock

One of our favorite things about Halloween is the sheer number of hacks that come out of it each year. This year, hacking is almost a requirement to keep things physically distanced, but that doesn’t mean we can’t have fun. You want fun? How about a candy cannon that launches sweet projectiles at trick-or-treaters from fifty feet?

[Paul McCabe]’s cannon uses a sprinkler valve and an air compressor to launch a pair of fun size candy bars, each encased in a film canister shell. Each trick-or-treater stomps a foot switch fifty feet away at the end of the driveway, and as long as someone is there holding down the primary ignition, the cannon will fire with a nice retort that sounds like a large wind instrument playing a D note.

We were sad to learn that the parachute idea didn’t shake out, but the glow sticks are a great addition for night time. Check out the demo after the break, which is followed by a build video and then some more launches for the fun of it.  Don’t have enough time to build a cannon of this caliber? You could put a spooky six-foot slide together pretty quickly.

Continue reading “Trick Or Yeet Cannon Will Give Them Candy Shell Shock”

Cardboard Models Trace Design Process Of Vintage Tektronix Miniscopes

There aren’t many brands that inspire the kind of passion and fervency among its customers as Tektronix does. The venerable Oregon-based manufacturer of top-end test equipment has produced more collectible gear over the last 75 years than just about anyone else.

Over that time they have had plenty of innovations, and in the 1970s they started looking into miniaturizing their flagship oscilloscopes. The vintageTEK museum, run by current and former employees, has a review of the design process of the 200 series of portable oscilloscopes that’s really interesting. At a time when scopes were portable in the way a packed suitcase is portable, making a useful instrument in a pocketable form factor was quite a challenge — even for big pockets.

The article goes into great detail on the back-and-forth between the industrial designers, with their endless stream of models, and the engineers who would actually have to stuff a working scope into whatever case they came up with. The models from the museum’s collection are wonderful bits of history and show where the industrial designers really pushed for some innovative designs.

Some of the models are clearly derived from the design of the big bench scopes, but some have innovative flip-down covers and other interesting elements that never made it to production. Most of the models are cardboard, but some were made of aluminum in the machine shop and sport the familiar “Tek blue” livery. But the pièce de résistance of the collection is a working engineering model of what would become the 200-series of miniscopes, a handmade prototype with a tiny round CRT and crudely labeled controls.

The vintageTEK museum sounds like another bucket-list stop for computer and technology history buffs. Tek has been doing things their own way for a long time, and stopping by the museum is sure to be a treat.

Thanks to [Tanner Bass] for the tip.

Tracking Boats And Ships In Real Time At The Same Time

Software-defined radio came on the hacker scene in a big way less than a decade ago thanks to the discovery that a small USB-based TV tuner dongle could be used for receiving all kinds of radio transmissions. Two popular projects from that era are tracking nearby airplanes and boats in real time. Of course, these projects rely on different frequencies and protocols, but if you live in a major port city like [Ian] then his project that combines both into a single user interface might be of interest.

This project uses an RTL-SDR dongle for the marine traffic portion of the project, but steps up to a FlightAware Pro dongle for receiving telemetry from airplanes. Two separate antennas are needed for this, and all of the information is gathered and handled by a pair of Raspberry Pis. The Pis communicate with various marine and air traffic databases as well as handles the custom user interface that knits both sets of information together. This interface was custom-built from a previous project of his and was repurposed slightly to fit the needs of this one.

This is a great project that goes into a lot of interesting detail about how the web traffic moves and how the UI works, so even if you’re not into software-defined radio it might be worth a look. However, it’s also worth noting that it hasn’t been easier to set up a system like this thanks to the abundance and low price of RTL-SDR dongles and the software tools that make setting them up a breeze.

Digital Preservation For Old Batteries

The times they are a-changin’. It used to be that no household was complete without a drawer filled with an assortment of different sizes and types of batteries, but today more and more of our gadgets are using integrated rechargeable cells. Whether or not that’s necessarily an improvement is probably up for debate, but the fact of the matter is that some of these old batteries are becoming harder to find as time goes on.

Which is why [Stephen Arsenault] wants to preserve as many of them as possible. Not in some kind of physical battery museum (though that does sound like the sort of place we’d like to visit), but digitally in the form of 3D models and spec sheets. The idea being that if you find yourself in need of an oddball, say the PRAM battery for a Macintosh SE/30, you could devise your own stand-in with a printed shell.

The rather brilliantly named Battery Backups project currently takes the form of a Thingiverse Group, which allows other alkaline aficionados to submit their own digitized cells. The cells that [Stephen] has modeled so far include not only the STL files for 3D printing, but the CAD source files in several different flavors so you can import them into your tool of choice.

Like the efforts to digitally preserve vintage input devices, it’s not immediately clear how many others out there are willing to spend their afternoons modeling up antiquated batteries. But then again, we’ve long since learned not to underestimate the obscure interests of the hacker community.

A Linear Stencil Clock Built For Quiet Operation

We around the Hackaday shop never get tired of seeing new ways to mark the passage of time. Hackers come up with all manner of interesting timekeeping modalities using every imaginable material and method of moving the mechanism once per whatever minimum time unit the hacker chooses to mark.

But honestly, there are only so many ways to make a clock, and while we’re bound to see some repeats, it’s still nice to go over old ground with a fresh approach. Take this linear sliding stencil clock for instance. [Luuk Esselbrugge] has included some cool design elements that bear a closer look. The video below shows that the display is made up of four separate stepper motors, each driving a vertical stencil via a rack-and-pinion mechanism. There a simple microswitch for homing the display, and a Neopixel for lighting things up.

The video below shows that the stencils move very, very slowly; [Luuk] says that this is to keep the steppers as quiet as possible. Still, this means that some time changes take more than a minute to accomplish, which is a minor problem. The Neopixel also doesn’t quite light up just one digit, which should be a pretty easy fix for version 2. Still, even with these issues, we like the stately movements of this clock, and appreciate [Luuk]’s attempts to make it easier to live with.

Don’t let the number of clocks you see on these pages dissuade you from trying something new, or from putting your twist on an old design. Start with fridge magnets, an old oscilloscope, or even a bevy of steel balls, and let your imagination run wild. Just make sure to tell us all about it when you’re done.

Continue reading “A Linear Stencil Clock Built For Quiet Operation”

Pulse Oximetry Sensor Judges Your Coffee Roast

Breakout board for the MAX30101, which [Zach] used as the basis of his roast gauge. The sensor is at the top edge of the board.
Parts designed and marketed for a specific application can nevertheless still be useful in other ways, and whenever that happens, it’s probably the start of a pretty good hack. Using a sensor for something other than its intended purpose is exactly what [Zach Halvorson] did to make the Roast Vision device, which uses the MAX30101, a sealed optical sensor intended mainly for pulse oximetry and heart-rate monitoring.

[Zach] is instead using that sensor to measure the roast level of coffee beans, and assign a consistent number from 0 to 35 to represent everything from Very Dark to Very Light. Measuring a bean’s roast level is important to any roaster seeking accuracy and consistency, but when [Zach] found that commercial roast gauges could easily cost over a thousand dollars, he was sure he could do better.

[Zach] settled on using a Sparkfun MAX30101 breakout board to develop his device, and Sparkfun shared an informative blog post that demonstrates how making hardware and tools more accessible can help innovative ideas flourish. The Roast Vision device has a 3D printed enclosure, and a simple top-loading design with an integrated sample cup makes it easy to use. One simply puts about a teaspoon of finely-ground coffee into the sample cup, and the unit provides a measurement in a couple of seconds. Fortunately the sensor works just fine though an acrylic window which means the device can be sealed; a handy feature for a tool that will spend a lot of time around ground coffee.

The joys of fresh roasted coffee is something that is perfectly accessible to those making small batches at home. There are commercial options for small roasters of course, but should you wish to go the DIY route, check out our own Elliot Williams’ guide on making a low-cost DIY roaster.