Light Up The Night With A Tetrahedral LED Hat

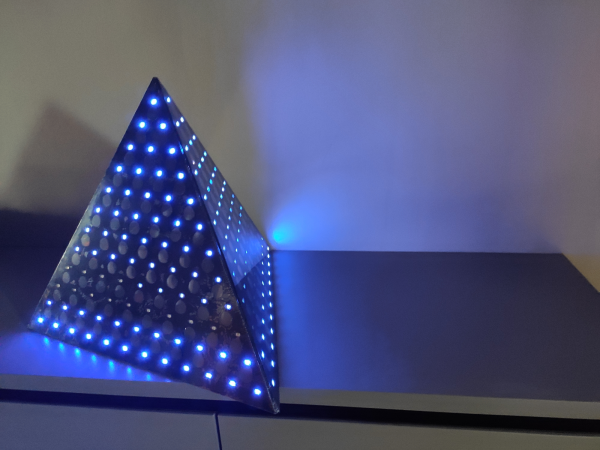
People get into electronics for all kinds of reasons, but we would guess that the ability to blink the blinkenlights is probably pretty high on the survey results. [Kuchbert] has been going to Deichkind shows for the last decade and has wanted to build one of the German techno-rap band’s signature tetrahedral LED hats for about as long.

Up inside the hat is an Arduino Nano driving WS2812B LEDs and a portable battery to power everything. Thanks to an HC-05 Bluetooth module, the show can be controlled with an Android app. The many, many holes in the acrylic panels were milled out, but they could just as easily be laser-cut, or if you have infinite patience, drilled by hand. The code is coming once it has been cleaned up a bit. Everything else you’d need is already there waiting. This helmet even has its own lil’ music video, which we’ve carefully beat-matched in after the break.

Naturally, this makes us think of all the Daft Punk helms that have blinked by on this blog over the years. This hand-soldered one might be the most meticulously made.

Continue reading “Light Up The Night With A Tetrahedral LED Hat”

A Levitating Lamp Without Magnets

If you think of levitating objects you probably think about magnets but this is not what [Aaron Hung] used to build his levitating LED lamp. To be fair, his lamp is not really levitating but merely generates the illusion through the principles of tensegrity. We have featured a number of tensegrity structures over the last months but this is maybe the first time somebody has used it to build a daily-use item.

In his instructable [Aaron Hung] points out that according to Earnshaw’s theorem magnetic levitation using static magnetic fields like those of permanent magnets is actually impossible. If you are interested, the Wikipedia article also explains why floating superconductors and the Levitron toy do not contradict this theorem. (TL;DR: they’re dynamic.)

Coming back to [Aaron Hung]’s tensegrity lamp, the construction is rather simple and only requires an Arduino Nano, a Neopixel ring, a 9 V battery some wood or cardboard, and fishing line. The tensegrity part of the lamp consists of two similar pieces of laser-cut wood which are held together by fishing line so that the top part seems to float in mid-air. Normally, tensegrity structures are very fragile so [Aaron Hung] added some extra lines for stability which allowed him to hang the lamp from the top section without collapsing the whole structure. After coding some animations for the Neopixel ring and adding a paper lampshade the project was finished.

We would like to see more tensegrity versions of classic DIY projects and it was fun to see that similar objects were already built from Lego.

[Video after the break].

Continue reading “A Levitating Lamp Without Magnets”

Surviving The Pandemic As A Hacker: Making A Mask Of Your Very Own

As the COVID-19 pandemic has continued along its way through the world, our community has responded as it always does, by designing and making things intended to solve the problems thrown up by the situation we find ourselves in. Much of this effort has gone into the production of PPE to plug the gap and many essential staff have been protected by maker-provided equipment, while the remainder of the effort has produced a wide array of clever designs for COVID-related items.

With curves flattened in many areas, Governments around the world are now encouraging the wearing of face masks in everyday social interactions. The purpose of mask for the general public is for droplet catching rather than virus filtering, and home made masks easily accomplish this. So let’s take a look at what you need to know about making a mast of your very own.

Continue reading “Surviving The Pandemic As A Hacker: Making A Mask Of Your Very Own”

Building An ESP32 Smart Power Strip From Scratch

Surely the most straightforward way of creating a smart power strip would be to take an existing model and hack in some relays that you could fire with a WiFi-enabled microcontroller. But where’s the fun in that? Instead of repurposing a commercial power strip for his recent project, [Md Raz] decided to just build the whole thing himself.

The project started with a 3D printed enclosure that could hold the electronics and three panel mount sockets. The use of heat-set inserts makes it a bit more robust for future upgrade work, but otherwise it’s a fairly simple rectangular design. Nobody ever said a power strip had to be pretty, right? In addition to the panel mount sockets, there’s also a AC-DC converter to step mains voltage down to 5 VDC for the ESP32.

In addition to the microcontroller, the custom PCB in the power strip holds a trio of MOSFETs connected to AQH2223 solid state relay (SSR) chips. Once the ESP32 toggles the line attached to each MOSFET, the indicator LED above the outlet goes on and the appropriate SSR is thrown to turn on the power. With a simple web interface running on the microcontroller, all three outlets can be independently controlled from any device with a web browser.

If you’d like to limit your interaction with mains voltages, then we’ve seen some projects that commandeer the low-voltage side of a commercial smart power strip. But remember, putting a Raspberry Pi inside of a power strip might seem suspicious to some folks.

The Seedy World Of Message Serialization

Look, I’ve been there too. First the project just prints debug information for a human in nice descriptive strings that are easy to understand. Then some tool needs to log a sensor value so the simple debug messages gain structure. Now your debug messages {{look like : this}}. This is great until a second sensor is added that uses floats instead of ints. Now there are sprinklings of even more magic characters between the curly braces. A couple days later and things are starting to look Turing complete. At some point you look up and realize, “I need a messaging serialization strategy”. Well you’ve come to the right place! Continue reading “The Seedy World Of Message Serialization”

Autonomous Sentry Gun Packs A Punch And A Ton Of Build Tips

What has dual compressed-air cannons, 500 roll-on deodorant balls, and a machine-learning brain with a bad attitude? We didn’t know either, until [Leo Fernekes] dropped this video on his autonomous robot sentry gun and saw it in action for ourselves.

Now, we’ve seen tons of sentry guns on these pages before, shooting everything from water to various forms of Nerf. And plenty of those builds have used some form of machine vision to aim the gun onto the target. So while it might appear that [Leo]’s plowing old ground here, this build is chock full of interesting tips and tricks.

It started when [Leo] saw a video on TensorFlow basics from our friend [Edje Electronics], which gave him the boost needed to jump into an AI project. The controller he ended up with looks for humans in the scene and slews the turret onto target, where the air cannons can do their thing. The hefty ammo is propelled by compressed air, which is dumped into the chamber using a solenoid valve with an interesting driver that maximizes the speed at which it opens. Style points go to the bacteriophage T4-inspired design, and to the sequence starting at 1:34 which reminded us of the factory scene from RoboCop.

[Leo] really put a ton of work into this project, and the results show. He is hoping to get an art gallery or museum to show it as an interactive piece to comment on one possible robot-human future, presumably after getting guests to sign a release. Whatever happens to it, the robot looks great and [Leo] learned a lot from it, as did we.

Continue reading “Autonomous Sentry Gun Packs A Punch And A Ton Of Build Tips”

STM32 Blue Pill Turned GPG Security Token

Feeling the cost of commercial options like the YubiKey and Nitrokey were too high, [TheStaticTurtle] started researching DIY alternatives. He found an open source project allows the STM32F103 to act as a USB cryptographic token for GNU Privacy Guard, which was a start. All he had to do was build a suitable device to install it on.

Blue Pill proof of concept

The first step was to test the software out on the popular “Blue Pill” development board, which [TheStaticTurtle] documents in the write-up should anyone want to give it a try themselves. The ST-Link V2 was already a supported target, so it only took some relatively minor tweaks to get running and add support for a simple push button. The output of gpg --card-status showed the device was working as expected, so with the software sorted, it was time to take a closer look at the hardware.

To create his “TurtleAuth” dongle, [TheStaticTurtle] started with the basic layout of the Blue Pill and added in a TTP223E touch control IC. The original Micro USB port was also swapped for a male USB-A connector so the device could be plugged directly into a computer. An upper PCB, containing the status LEDs and touch pad, was then designed so it would fit over the main board as an enclosure of sorts. While the sides are still open, the device looks robust enough to handle life in a laptop bag at least.

While it’s not exactly a common project, this isn’t the first time we’ve seen somebody spin up their own hardware token. More evidence of what the dedicated individual can accomplish these days on a relatively limited budget.