An Off-The-Grid Instant Messaging Plattform

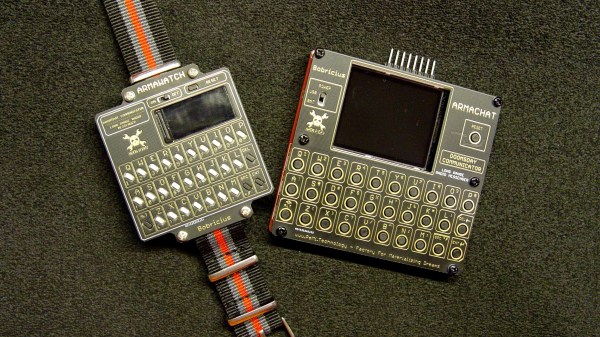
Having an open-source communication device that is independent of any network and works without fees sounds like a hacker’s dream come true. Well, this is exactly what [bobricius]’ is aiming at with his Armawatch and Armachat devices.

Recently, [bobricius] built a LoRa based instant messaging device named Armachat. The gadget is controlled by a SAMD21 MCU with native USB and includes a QWERTY keyboard and an LCD display. Communication is based on an RFM95 LoRa transceiver which can reach a range of up to 2 km under ideal conditions. [bobricius] is a wiz when it comes to PCB design and one thing that makes his projects look so good is how he often uses PCBs as enclosures.

Armachat came in two form factors a large desktop and a smaller pocket version. The new Armawatch is another downsized version that perfectly fits on your arm by using a smaller display and keyboard. [bobricius] also did a lot of work on the firmware which now features a message delivery confirmation and the possibility to automatically resend undelivered messages. Future improvements will include message encryption, a store-and-forward function, and GPS position parsing. [bobricius] is also working on completing his portfolio of communicators with a credit-card-sized version.

LoRa is the go-to technology for off-the-grid communication devices and there are already other ongoing projects for using it to construct a mesh network.

Review: Calculator Kit Is Just A Few Hacks From Greatness

While most people are satisfied with a calculator application on their smartphone these days, there’s still something to be said for the old fashioned desk calculator. Maybe it’s the fact the batteries last long enough that you can’t remember the last time you changed them, or the feel of physical buttons under your fingers. It could even be the fact that it keeps your expensive smartphone from needing to sit out on the workbench. Whatever the reason, it’s not uncommon to see a real-life calculator (or two) wherever solder smoke tends to congregate.

Which is precisely the idea behind this DIY calculator kit. Available from the usual overseas retailers for about $15 USD, it has some hobbyist-oriented features such as the ability to decode resistor color bands, convert hexadecimal numbers, and calculate resistor values for driving LEDs. If you’re going to keep a knock-around calculator on your bench, why not build the thing yourself?

Given the dual nature of this product, a DIY electronics kit and a functional desk calculator for electronic hobbyists, it seems only appropriate to review both aspects of it individually. Which is good, since there may be more to this product than just the sum of its parts.

Continue reading “Review: Calculator Kit Is Just A Few Hacks From Greatness”

AVR Multi-Tool Learns The Latest Tricks

Like many of us who fiddle with microcontrollers, [Mike] and [Brian] often found themselves using an ISP programmer and a USB-to-serial adapter. But when they started working on the latest generation of ATtiny chips, they found themselves in need of a Unified Program, and Debug Interface (UPDI) programmer as well. So they decided to wrap all three functions into one handy open hardware gadget.

They call their creation the AVR General Purpose Programmer, or AVRgpp for short. It runs on an ATmega328P with a Pro Mini bootloader, which means that the programmer itself is fully compatible with the Arduino IDE. USB-to-serial capability is provided by a CH330N, and a MC14053 digital switch IC is used to select between talking to the AVRgpp’s onboard MCU or the target device.

A 128 x 32 I2C OLED and two push buttons are used to select the device’s current mode, and there’s a physical switch to select between 5 V or 3.3 V power for the target. There’s also a ST662 12 V regulator, as UPDI targets occasionally need a high voltage pulse to switch into programming mode. Everything is packaged up in a pocket-sized laser cut enclosure that you can easily toss in your bag.

[Mike] and [Brian] say they are considering putting the AVRgpp into small scale production if there’s enough interest, so let them know if you’d like to get one without having to build it yourself.

Inputs Of Interest: X-Bows Ergo-Mechanical Keyboard

Okay, let’s just get this out of the way up front, shall we? This ergonomic mechanical keyboard was a free sample offered to me by X-Bows. They contacted me after I expressed interest in trying one in the comments of my post about the Kinesis Advantage. I had my doubts about this keyboard as far as my own personal ergonomic needs go, which are admittedly on the extreme side. TL;DR: I won’t be abandoning my curvy girls anytime soon. But I will say that I’m definitely impressed by the X-Bows.

X-Bows was founded by a doctor who saw a lot of RSI issues in programmers and writers and decided to take matters into his own hands. The keyboard was born on Kickstarter in 2017 and now comes in three models. They sent me the mid-range model called The Knight, which retails for $249, but seems to be on permanent sale for $199. The top-of-the-line Knight Plus has a magnetic, detachable 10-key that can attach to either side. Continue reading “Inputs Of Interest: X-Bows Ergo-Mechanical Keyboard”

PHONK – A Hacker’s Fun Shortcut To Android Programming

As the common myth goes, the average human utilizes only about 10% of the true potential their smartphone is capable of. Especially when it comes to electronics projects, it seems that we often overlook how we can integrate and take advantage of their functionality here. Maybe that’s not a big surprise though — while it isn’t rocket science, getting into mobile development certainly has its hurdles and requires a bit of commitment. [Victor Diaz] figured there had to be a better way, so he went on and created PHONK, the self-contained creative scripting toolbox for Android.

PHONK is installed like any other app, and allows rapid prototyping on your Android device via JavaScript by abstracting away and simplifying the heavily boilerplated, native Java parts. So instead of setting up an app from scratch with all the resources defining, UI design, activity and application lifecycle management — not to mention the Android development environment itself — PHONK takes care of all that behind the curtain and significantly reduces the amount of code required to achieve the task you’re actually interested in. In case you’re worrying now that you have to actually program on your phone, well, you can, which can definitely come in handy, but you don’t have to.

Once the app is opened, a web server is started, and connecting to it from any modern browser within the same WiFi network presents you the PHONK development environment with everything you need: editor, file browser, console, and API documentation. You can write your code in the browser, and pressing the run button will execute it straight on the device then. As everything is self-contained within the app itself, no additional software is required, and you can start right away by exploring the set of provided examples that showcase everything supported so far: sensor interaction, BLE server and client, communication protocols like MQTT or WebSockets, OpenStreetMap maps, and even integration with Pure Data and Processing. Attach a USB OTG cable and you can program your Arduino, have serial communication, or interface a IOIO board. You can even connect a MIDI controller.

This is really impressive work done by [Victor], and a lot of attention to detail went into the development. If you have an old Android phone collecting dust somewhere, this would be a great opportunity to revive it and build something with it. And as [Victor] writes on the project’s GitHub page, he’s always curious what people will come up with. If you’re thinking about building a mobile sensor lab, or want to learn more about the sensors inside your phone, have a look at the 36C3 talk about phyphox.

Number Crunching GPS For The DIYer

Many of us have had cause to add GPS to a project, whether it’s because we need an accurate timebase or just want to know where the bloody thing is. Normally, this consists of plugging in a cheap module and making sure the antenna has a good view of the sky. [Mike] wanted to dig deeper, however, and figure out just what goes into decoding a GPS signal and calculating a location fix.

[Mike]’s investigation combined several avenues of investigation. In terms of decoding live radio signals, he selected a KiwiSDR software defined radio. Combined with a Digilent Nexys 2 FPGA, it was now possible to get live data off the air and into the PC quickly for decoding. In concert with this, [Mike] used a sample of raw GPS data captured in Nottingham, UK in order to test his code. After much experimentation, [Mike] was able to get the data decoded with 700 lines of C code. Decoding three minutes worth of data took all night, but further development allowed things to be sped up over 200 times. For the curious, the code is up on Github to convert raw ADC samples into actual location fixes.

Armed with the wealth of resources online and the right hardware, [Mike] was sucessfully able to achieve his goal, and figure out just precisely where his house is, to boot. As a bonus, the whole project was inspired by a similar project posted in these very pages back in 2013! If you’re working on your own satellite-based projects, be sure to drop us a line.

Merlin Pi Camera Is A Photographic Wizard

[Mister M] was quite excited to mess around with the new high-quality Raspberry Pi camera and build a project around it. Unfortunately, lockdown forced him to rummage through old tech on hand rather than hunting down a fresh eye-catching enclosure out in the wild. We spent many hours playing with one of these Merlin toys whenever six AA batteries could be spared to feed the matrix of hungry 1970s LEDs, so we would argue that [Mister M] should explore his personal stores more often.

Before we forget — it’s cool; this one was already broken. The Merlin Pi camera’s wizardry works on two levels — [Mister M] can take still pictures and record video through the GUI he built for the touchscreen, or go retro and use the little push buttons nestled in the Merlin control panel. [Mister M] worked a Dropbox uploader into the GUI, so he doesn’t have to worry about filling up the SD card with backyard bird movies in the middle of filming them.

[Mister M] says he accidentally warped the Merlin’s battery cover while trying to soak away the sticker and had to use a piece of acrylic. Although it’s unfortunate, we think it may have been for the better given the huge hole necessitated by the camera lens. Check out the build video after the break.

If you hadn’t heard about this beefy new camera module until now, our own [Jenny List] brought it into focus a couple months back and more recently had a go at hacking with it herself.

Continue reading “Merlin Pi Camera Is A Photographic Wizard”