You Don’t Need To Be Tony Stark To Afford This Hand Controller

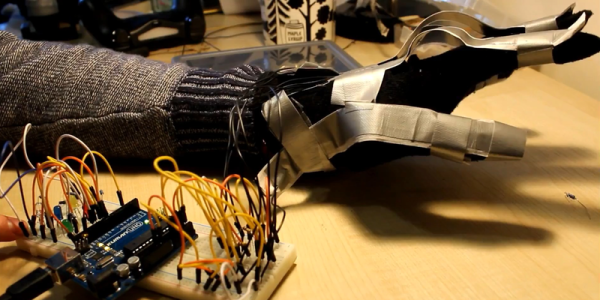
Proving that duct tape really can do anything, [StudentBuilds] uses it to make a workable controller out of a glove. To be fair, there are a few more bits too, including paper coated with pencil graphite and tin foil, which forms a variable resistor you can read with an Arduino analog input. You can see the entire thing in the video below.

The source code is simple at this point — eventually, he plans to control a robotic hand with the controller, but that’s later. However, there’s no promised link to the code in the description, so you’ll have to freeze frame and type. However, it is pretty simple — just read the analog pin values to determine the specific values for each finger.

Continue reading “You Don’t Need To Be Tony Stark To Afford This Hand Controller”

3D Printering: Print Smoothing Tests With UV Resin

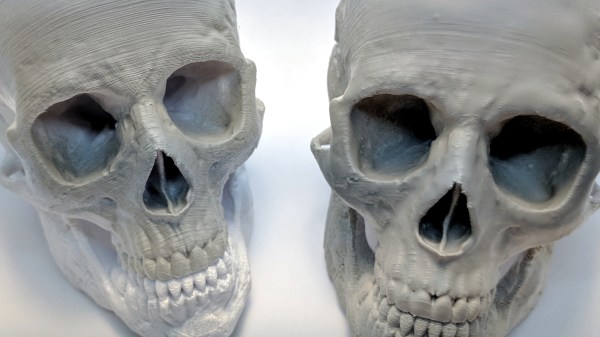
Smoothing the layer lines out of filament-based 3D prints is a common desire, and there are various methods for doing it. Besides good old sanding, another method is to apply a liquid coating of some kind that fills in irregularities and creates a smooth surface. There’s even a product specifically for this purpose: XTC-3D by Smooth-on. However, I happened to have access to the syrup-thick UV resin from an SLA printer and it occurred to me to see whether I could smooth a 3D print by brushing the resin on, then curing it. I didn’t see any reason it shouldn’t work, and it might even bring its own advantages. Filament printers and resin-based printers don’t normally have anything to do with one another, but since I had access to both I decided to cross the streams a little.

The UV-curable resin I tested is Clear Standard resin from a Formlabs printer. Other UV resins should work similarly from what I understand, but I haven’t tested them.

Continue reading “3D Printering: Print Smoothing Tests With UV Resin”

Road Apology/Gratitude Emitter Car LED Sign

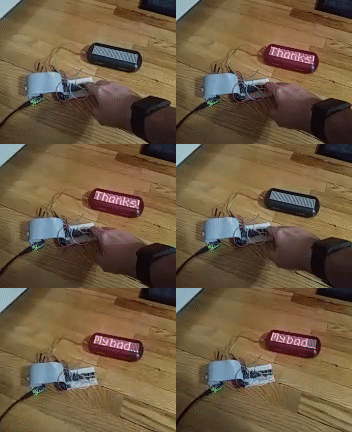
Sometimes, when you’re driving, a simple wave when someone lets you in can go unnoticed and sometimes you make a mistake and a simple wave just isn’t enough. [Noapparentfunction] came up with a nice project to say ‘Thanks’ and ‘My Bad’ to his fellow drivers.

The display uses four Max 7219 LED matrix displays, so the total resolution is 32 by 8. [Noapparentfunction] came up with an inspired idea: using a glasses case to hold the LED matrices and Raspberry Pi. It’s easy to get into if necessary, stays closed, and provides a nice finished look. Having little knowledge of electronics and no programming skills, [Noapparentfunction] had to rely on cutting and pasting Python code as well as connecting a mess of wires together, but the end result works, and that’s what matters.

A network cable runs from the glasses case suction cupped to the rear window to another project box under the dashboard. There, the network cable is connected to two buttons and the power. No network information is passed, the cable is just a convenient collection of wires with which to send signals. Each of the buttons shows a different message on the display.

Depending on where you live, this might not be legal, and we’re sure many of our readers (as well as your author) could come up with some different messages to display. However, this is a cool idea and despite [Noapparentfunction]’s admitted limitations, is a nice looking finished product. Also, its name is Road Apology Gratitude Emitter. Here are some other car mod articles: This one adds some lighting to the foot well and glove compartment and this one on the heinousness of aftermarket car alarms.

Henrietta Lacks And Immortal Cell Lines

In early 1951, a woman named Henrietta Lacks visited the “colored ward” at Johns Hopkins hospital for a painful lump she found on her cervix. She was seen by Dr. Howard W. Jones, who indeed found a tumor growing on the surface of her cervix. He took a tissue sample, which confirmed Henrietta’s worst fears: She had cancer.

The treatment at the time was to irradiate the tumor with radium tubes placed in and around the cervix. The hope was that this would kill the cancerous cells while preserving the healthy tissue. Unbeknownst to Henrietta, a biopsy was taken during her radium procedure. Slivers of her tumor and of healthy cervix cells were cut away. The cancer cells were used as part of a research project. Then something amazing happened: the cancerous cells grew and continued to grow outside of her body.

As Henrietta herself lay dying, the HeLa immortal cell line was born. This cell line has been used in nearly every aspect of medical research since the polio vaccine. Millions owe their lives to it. Yet, Henrietta and her family never gave consent for any of this. Her family was not informed or compensated. In fact, until recently, they didn’t fully grasp exactly how Henrietta’s cells were being used.

Continue reading “Henrietta Lacks And Immortal Cell Lines”

Final Project For Better Sleep

It’s that time of year again, and students around the world are scrambling (or have already scrambled) to finish their final projects for the semester. And, while studying for finals prevents many from sleeping an adequate amount, [Julia] and [Nick] are seeking to maximize “what little sleep the [Electrical and Computer Engineering] major allows” them by using their final project to measure sleep quality.

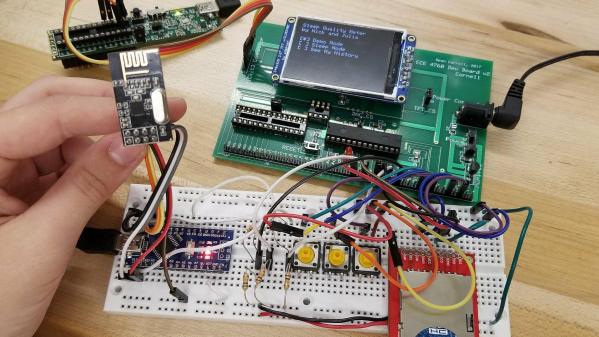
To produce a metric for sleep quality, [Julia] and [Nick] set out to measure various sleep-related activities, specifically heart rate, motion and breath frequency. During the night, an Arduino Nano mounted to a glove collects data from the various sensors mounted to the user, all the while beaming the data to a stationary PIC for analysis and storage. When the user awakes, they can view their sleep report on a TFT display at the PIC base station. Ideally, users would use this data to test different habits in order to get the best nights sleep possible.

Interestingly, the group chose to implement their own heart rate sensor. With an IR transmitter, IR phototransistor and an OP amp, the group illuminates user’s fingers and measure reflection to detect heartbeats. This works because the amount of IR reflected from the user’s finger changes with blood pressure and blood oxygen level, which also happen to change when the heart is beating. There were some bumps along the road when it came to the heartbeat sensor (the need to use a finger instead of the wrist forced them to use a glove instead of a wristband), but we think it’s super cool and totally worth it. In addition to heart rate, motion is measured by an accelerometer and breath is measured by a flex sensor wrapped around the user’s chest.

With all of their data beamed back by a pair of nRF24L01s, the PIC computes the sleep “chaos” which is exactly what it sounds like: it describes just how chaotic the user slept by looking for acyclic and sudden movement. Using this metric, combined with information from breathing and heart rate, the PIC computes a percentage for good sleep where 100% is a great night and 0% means you might have been just as well off pulling an all-nighter. And, to top it all off, the PIC saves your data to an SD card for easy after-the-fact review.

The commented code that powers the project can be found here along with a parts list in their project write-up.

This device assumes that sleeping is the issue, but if waking up if your problem, we’ve already got you covered, aggressive alarm clock style. For those already on top of their sleep, you might want some help with lucid dreaming.

Video of the project explained by [Julia] and [Nick] after the break.

Continue reading “Final Project For Better Sleep”

Your Next Wearable May Not Need Electricity

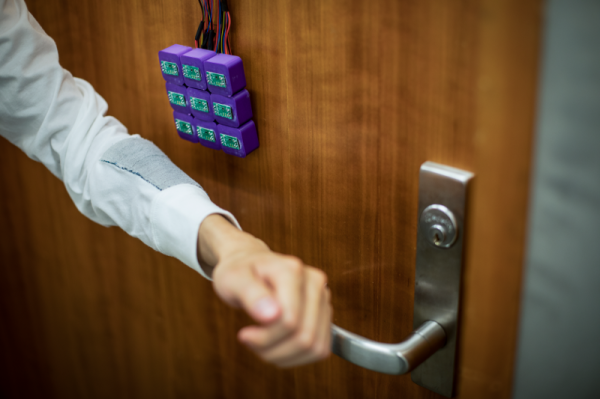
What if you could unlock a door with your shirtsleeve, or code a secret message into your tie? This could soon be a thing, because researchers at the University of Washington have created a fabric that can store data without any electronics whatsoever.  The fabric can be washed, dried, and even ironed without losing data. Oh, and it’s way cheaper than RFID.

By harnessing the ferromagnetic properties of conductive thread, [Justin Chen] and [Shyam Gollakota] have  proved the ability to store bit strings and 2D images through magnetization. The team used an embroidery machine to lay down thread in dense strips and patches, and then coded in ones and zeros by rubbing the threads with N and S neodymium magnets.

They didn’t use anything special, either, just this conductive thread, some magnets, and a Nexus 5 to read the data. Any phone with a magnetometer (so, most of them) could decode this type of binary data. The threads stay reliably magnetized for about a week and then begin to weaken. However, their tests proved that the threads can be re-magnetized over and over.

The team also created 2D images with magnets on a 9-patch made of conductive fabric. The images can be decoded piecemeal by a single magnetometer, or all at once by an array of them. Finally, the team made a glove with a magnetized patch of thread on the fingertip. They were able to get the phone to recognize six unique gestures with 90% accuracy, even with the phone tucked away in a pocket. See it in action in their demo video after the break.

Magnetic memory is certainly not a new concept. But for the wearable technology frontier, it’s a novel one.

Continue reading “Your Next Wearable May Not Need Electricity”

DIY Barometer: It’s For Your Health!

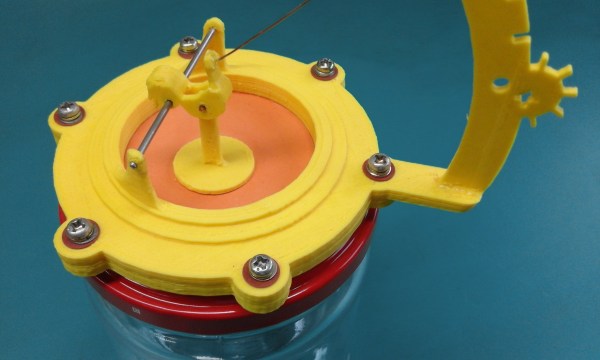
[Taciuc Marius] and his colleague noticed that days with low atmospheric pressure plus caffeine in their system meant a spike in blood pressure. Considering how this might impact his cardiovascular health, he decided to make a relative pressure barometer out of a jar to help him decide whether he should really have another cup of coffee.

Aside from a 3D printer, you’ll need to assemble a small jar with a lid, some screws, lock washers, nuts, and a flexible membrane — a piece of a rubber glove or balloon will do nicely. [Marius] details the build process on his project page, advising others to print the parts at 0.2 resolution — potentially even upping the extrusion multiplier to 1.1 — to prevent gaps in the print that would compromise the airtight seal needed for the barometer to work properly.

Additionally, thick glue or epoxy is recommended for the rest of the assembly process — it doesn’t have to be pretty, but it does need to be sealed! The final product can be easily tested by simply holding the jar.

While this barometer helps one make healthy choices, not all are created equal. This one tells you flat out how you should consider getting to work, while others have been tricked into behaving like touch sensors.