Suspense Courtesy Of Arduino, Mess Of Wires

The ticking clock on the bomb is a Hollywood trope that simply refuses to die. Adding to the stress levels of the bomb squad and creating great suspense for the watcher, it’s always interesting to wonder why the average bomb maker is so courteous as to supply this information to law enforcement. Regardless, if you’d like to build a dramatic prop and are mature enough to do so responsibly, [Giorgio] has the guide you need.

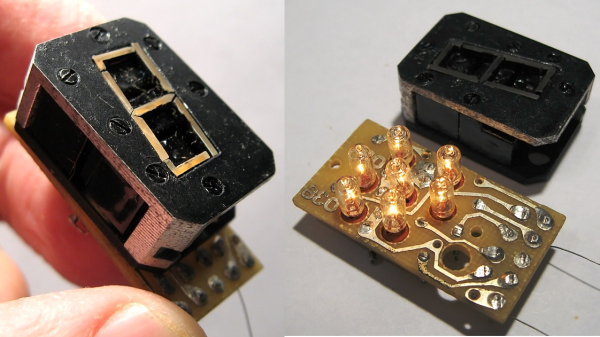
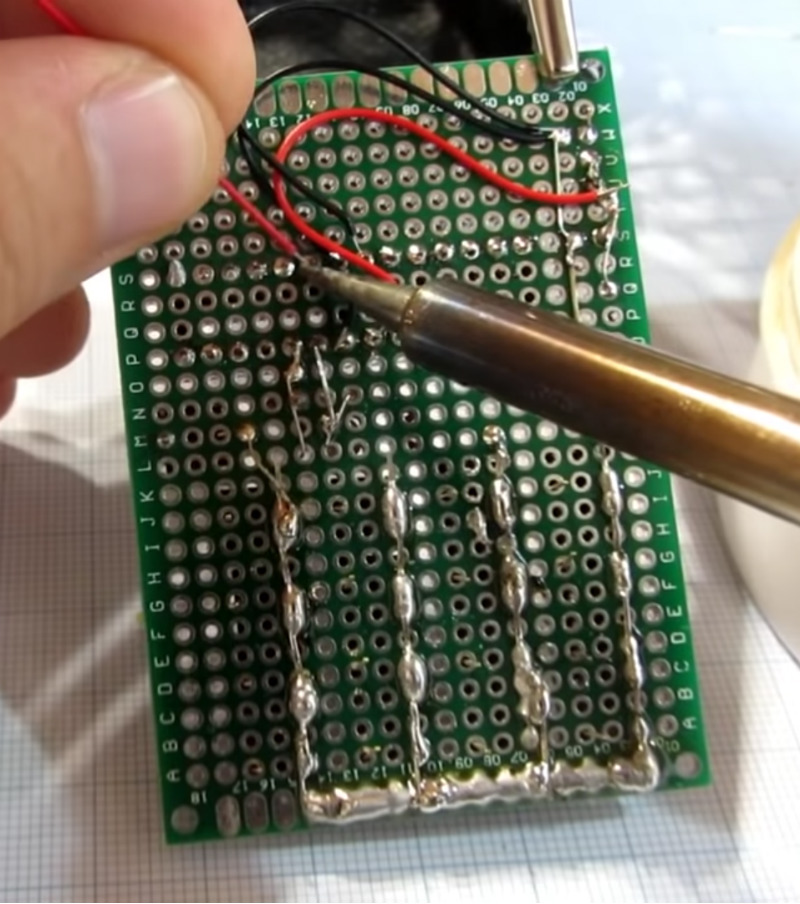
The build is a straightforward one, relying on an Arduino to run the show. This is hooked up to a classic 7-segment LED display, upon which the countdown is displayed. For extra flair, an MP3 player is fitted to play the Mission Impossible theme. It all adds to the tension as you wipe the sweat from your brow, trying to decide if you’re cutting the right wire.

It’s a build that would be an excellent prop for a film production or a fun game at a holiday party. However, it’s also a build that could easily be mistaken for the real thing by those less technically inclined. Even the most innocuous homebrew projects have caused problems for innocent hackers in the past. Fake bombs can be incredibly dangerous, just like the real thing, so it’s important to be careful.

We’ve seen other takes on this kind of build before, too. As always, build responsibly.

Add Nest Functionality To Your Thermostat For $5

The Nest Thermostat revolutionized the way that people control the climate in their homes. It has features more features than even the best programmable thermostats. But, all of the premium features also come at a premium price. On the other hand, for only $5, a little coding, and the realization that thermostats are glorified switches, you can easily have your own thermostat that can do everything a Nest can do.

[Mat’s] solution uses a Sonoff WiFi switch that he ties directly into the thermostat’s control wiring. That’s really the easy part, since most thermostats have a ground or common wire, a signal wire, and a power wire. The real interesting work for this build is in setting up the WiFi interface and doing the backend programming. [Mat’s] thermostat is controlled by software written in Node-RED. It can even interface with Alexa. Thanks to the open source software, it’s easy to add any features you might want.

[Mat] goes through a lot of detail on the project site on how his implementation works, as far as interfacing all of the devices and the timing and some of the coding problems he solved. If you’ve been thinking about a Nest but are turned off by the price, this is a great way to get something similar — provided you’re willing to put in a little extra work. This might also be the perfect point to fall down the home automation rabbit hole, so be careful!

Continue reading “Add Nest Functionality To Your Thermostat For $5”

Soviet-Era 7-Segment Display, Built Like A Tank

In a way, all 7-segment displays are alike; at least from the outside looking in. On the inside it can be quite another story, and that’s certainly the case with the construction of this Soviet-era 7-segment numerical display. From the outside it may look a bit sturdier than usual, but it’s still instantly recognizable for what it is. On the inside is an unusual mixture of incandescent bulbs and plastic light guides.

The black-coated blocks of plastic on the left (shown from the rear) act as light guides. The holes are for nesting the incandescent bulbs. Note the puzzle-like arrangement of the uniquely shaped pieces.

The rear of the display is a PCB with a vaguely hexagonal pattern of low-voltage incandescent bulbs, and each bulb mates to one segment of the display. The display segments themselves are solid blocks of plastic, one for each bulb, and each a separate piece. These are painted black, with the only paint-free areas being a thin segment at the top for the display, and a hole in the back for the mating bulb.

The result is that each plastic piece acts as a light guide, ensuring that a lit bulb on the PCB results in one of the seven thin segments on the face being lit as well. An interesting thing is that the black paint is the only thing preventing unwanted light from showing out the front, or leaking from one segment to another; usually some kind of baffle is used for this purpose in displays from this era.

More curiously, each plastic segment is a unique shape apparently unrelated to its function. We think this was probably done to ensure foolproof assembly; it forms a puzzle that can only fit together one way. The result is a compact and remarkably sturdy unit that shows how older and rugged tech isn’t necessarily bulky. Another example of small display tech from the Soviet era is this tiny 7-segment display of a completely different manufacture, which was usually used with an integrated bubble lens to magnify the minuscule display.

A Clay Oven For Perfect Pizza Every Time

Perhaps your taste for pizza has never taken you beyond your local fast-food chain or a frozen pizza from the supermarket, but there are some people for whom only the most authentic will do. A wood-fired clay oven and nothing less is their pre-requisite, and lesser methods of pizza preparation simply aren’t good enough.

[Jan] is one of these pizza perfectionists, and his wood-fired oven is an interesting one because it eschews the traditional dome for a cylinder. His very detailed write-up gives us an interesting insight into its construction. He’s taken the bottom half of an oil drum as his base, and built and fired the clay oven itself around a wooden former. We see his early attempts at a former which distorted under the weight of clay, and we hear about how the clay required reinforcement with chicken wire and straw. Finally, we see the structure being dried out, before an impressive display when firing for the first time. The oven receives a coat of Rockwool insulation but [Jan] has a way to go to learn the oven’s characteristics. Still, this is an oven that will last to refine the perfect morsel given a bit of time.

We like the cylindrical design as an alternative to domed ovens, which can be a bit tricky to build. An oven may be a bit low-tech compared to some of Hackaday’s usual fare, but they can be no less difficult to get right. We’re no stranger to novel flame-based cookery, perhaps you might like to also take a look at this rocket grill.

Supercon Badge Hackers Racing The Clock

At the end of Hackaday Superconference weekend, we hold a badge hacking ceremony on the main stage where anyone who has done anything with their badge is invited to come on stage and show off their work. Yes, even if it’s just a blinking LED! It was a tremendous pleasure to see not only people taking us at our word and presented blinking LEDs, but that the community in the room welcomed these inductees to hardware hacking with cheers. Before the ceremony, though, there was a lot of frantic work by badge hackers armed with soldering irons and fueled by caffeine. It’s always amazing how much people can accomplish in a single focused weekend.

Continue reading “Supercon Badge Hackers Racing The Clock”

Pocket Sized Arduino Calculator Makes A Great First Project

We’ve all got calculators on our phones, in our web browsers, and even in the home “assistant” that’s listening in on your conversations all day on the off chance you blurt out a math question is can solve for you. The most hardcore among us might even still have a real calculator kicking around. So in that light, building your own DIY calculator might not seem too exciting. But we can’t deny this Arduino calculator project by [Danko Bertović] would look good sitting on the bench.

In the video after the break, [Danko] walks us through the creation of the calculator, from placing all the through-hole components to writing the code that pulls it all together. Special attention is given to explaining the wiring, making this is a good project for those just getting started on their digital hacking journey. It also helps that the whole thing is put together on perfboard with jumper wires; no PCB fabrication required for this one.

For the user interface, [Danko] is using an array of 17 tactile switches for the keyboard and a very crisp 128×32 I2C OLED display. Beyond the battery, a crystal, and a handful of passive components, that’s about all the support hardware it takes to put this project together. You don’t even need an enclosure: a second piece of perfboard and some standoffs are used to sandwich the battery and fragile wiring inside.

Of course, the star of the show is the ATmega328P microcontroller, which is mounted in a place of honor right under the OLED screen. The chip gets programmed in an Arduino Uno and then transplanted into the calculator, a neat trick if you don’t have a dedicated programmer handy. Given how cheap Arduino clones can be had online, this is becoming a more common practice.

The construction of this calculator reminds us a bit of the DIY Sinclair scientific calculator we looked at over the summer. But if you want to see the peak of homebrew calculator technology, this Raspberry Pi powered build is tough to beat.

Continue reading “Pocket Sized Arduino Calculator Makes A Great First Project”

Warnings Are Your Friend – A Code Quality Primer

If there’s one thing C is known and (in)famous for, it’s the ease of shooting yourself in the foot with it. And there’s indeed no denying that the freedom C offers comes with the price of making it our own responsibility to tame and keep the language under control. On the bright side, since the language’s flaws are so well known, we have a wide selection of tools available that help us to eliminate the most common problems and blunders that could come back to bite us further down the road. The catch is, we have to really want it ourselves, and actively listen to what the tools have to say.

We often look at this from a security point of view and focus on exploitable vulnerabilities, which you may not see as valid threat or something you need to worry about in your project. And you are probably right with that, not every flaw in your code will lead to attackers taking over your network or burning down your house, the far more likely consequences are a lot more mundane and boring. But that doesn’t mean you shouldn’t care about them.

Buggy, unreliable software is the number one cause for violence against computers, and whether you like it or not, people will judge you by your code quality. Just because Linus Torvalds wants to get off Santa’s naughty list, doesn’t mean the technical field will suddenly become less critical or loses its hostility, and in a time where it’s never been easier to share your work with the world, reliable, high quality code will prevail and make you stand out from the masses.

Continue reading “Warnings Are Your Friend – A Code Quality Primer”