We often take for granted how easy it is to get information in today’s modern, Internet-connected world. Especially around electronics projects, datasheets are generally a few clicks away, as are instructions for building almost anything. Not so in the late 80s where ordering physical catalogs of chips and their datasheets was generally required.
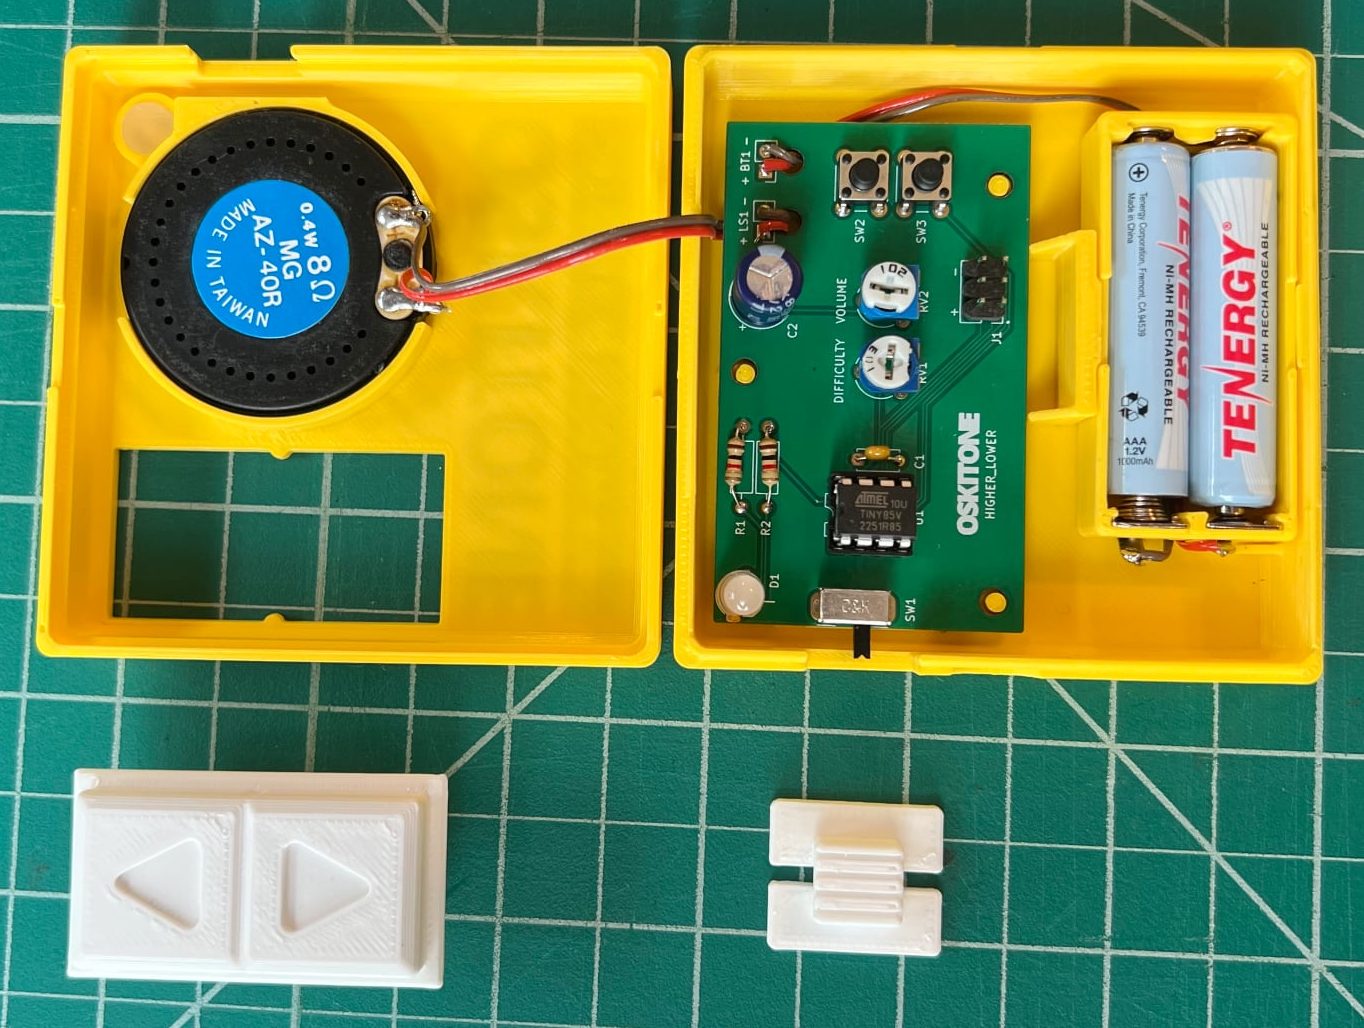
[Tommy] has a great write-up about designing and building a minimalistic handheld electronic game called “Higher Lower”. It’s an audio-driven game in which the unit plays two tones and asks the player to choose whether the second tone was higher in pitch, or lower. The game relies on 3D printed components and minimal electronics, limiting player input to two buttons and output to whatever a speaker stuck to an output pin from an ATtiny85 can generate.
Fastener-free enclosure means fewer parts, and on the inside are pots for volume and difficulty. We love the thoughtful little tabs that hold the rocker switch in place during assembly.
Gameplay may be straightforward, but working with so little raises a number of design challenges. How does one best communicate game state (and things like scoring) with audio tones only? What’s the optimal way to generate a random seed when the best source of meaningful, zero-extra-components entropy (timing of player input) happens after the game has already started? What’s the most efficient way to turn a clear glue stick into a bunch of identical little light pipes? [Tommy] goes into great detail for each of these, and more.
In addition to the hardware and enclosure design, [Tommy] has tried new things on the software end of things. He found that using tools intended to develop for the Arduboy DIY handheld console along with a hardware emulator made for a very tight feedback loop during development. Being able to work on the software side without actually needing the hardware and chip programmer at hand was also flexible and convenient.
We’ve seen [Tommy]’s work before about his synth kits, and as usual his observations and shared insights about bringing an idea from concept to kit-worthy product are absolutely worth a read.
You can find all the design files on the GitHub repository, but Higher Lower is also available as a reasonably-priced kit with great documentation suitable for anyone with an interest. Watch it in action in the video below.
These days even a lowly microcontroller can easily trade blows with – or surpass – desktop systems of yesteryear, so it is little wonder that DIY handheld gaming systems based around an MCU are more capable than ever. A case in point is the GK handheld gaming system by [John Cronin], which uses an MCU from relatively new and very capable STM32H7S7 series, specifically the 225-pin STM32H7S7L8 in TFBGA package with a single Cortex-M7 clocked at 600 MHz and a 2D NeoChrom GPU.
Coupled with this MCU are 128 MB of XSPI (hexa-SPI) SDRAM, a 640×480 color touch screen, gyrometer, WiFi network support and the custom gkOS in the firmware for loading games off an internal SD card. A USB-C port is provided to both access said SD card’s contents and for recharging the internal Li-ion battery.
As can be seen in the demonstration video, it runs a wide variety of games, ranging from DOOM (of course), Quake, as well as Command and Conquer: Red Alert and emulators for many consoles, with the Mednafen project used to emulate Game Boy, Super Nintendo and other systems at 20+ FPS. Although there aren’t a lot of details on how optimized the current firmware is, it seems to be pretty capable already.
With today’s technology, emulating video game consoles from the 90s or before is trivial. A Raspberry Pi and a controller of some sort is perhaps the easiest and simplest way to go to get this job done, but to really impress the masses some extra effort is required. This handheld from [Eli] called the Game Bub not only nails the appearance and feel of the first three generations of Nintendo handhelds but, thanks to its FPGA, can play not only ROMs but the original game cartridges as well.
As [Eli] notes, the FPGA is not strictly necessary for emulation, but does seem to be better at interfacing with physical hardware like controllers and game cartridges. For this task an Xilinx XC7A100T with integrated memory was chosen, with a custom PCB supporting the built-in controller, speaker, a rechargeable lithium battery, and a 480×320 display (that had to be rotated out of portrait mode). An SD Card reader is included for any ROM files, and there’s also a ESP32-S3 included to give the handheld WiFi and Bluetooth capabilities, with future plans to support the communications protocol used by the Game Boy Advance Wireless Adapter.
There are a few other features with the Game Bub as well, including the ability to use an authentic link cable to communicate with the original Game Boy and Game Boy Color, and a Switch-like dock that allows the Game Bub to be connected to an external monitor. It’s also open source, which makes it an even more impressive build. Presumably it doesn’t include the native ability to dump cartridges to ROM files but you don’t need much more than a link cable to do that if you need to build your ROM library.
Generally speaking, writing your own games for retro consoles starts with C code. You’ll need to feed that through a console-specific tool-chain, and there’s certainly going to be some hoops to jump through, but if everything goes as expected, you should end up with a ROM file that can be run in an emulator or played on real hardware if you’ve got the necessary gadgetry to load it.
But NESFab takes things in a slightly different direction. While the code might look like C, it’s actually a language specifically tailored for developing games on the Nintendo Entertainment System (NES). The documentation claims that this targeted language not only compiles into considerably faster 6502 assembly than plain C on GCC or LLVM, but is designed to work around the strengths (and weaknesses) of the NES hardware.
Looking deeper into the example programs and documentation, NESFab offers quite a few quality of life features that should make developing NES games easier. For one thing, there’s integrated asset loading which automatically converts your image files into something the console can understand. One just needs to drop the image file into the source directory, open it in the code with the file function, and the build system will take care of converting it on the fly as the ROM is built. The nuances of bank switching — the organization of code and assets so they fit onto the physical ROM chips on the NES cartridge — are similarly abstracted away.
The obvious downside of NESFab is that, as with something like GB Studio, you’re going to end up putting effort into learning a programming environment that works for just one system. So before you get started, you really need to decide what your goals are. If you’re a diehard NES fan that has no interest in working on other systems, learning a language and build environment specifically geared to that console might make a certain degree of sense. But if you’d like to see your masterpiece running on more than just one system, working in straight C is still going to be your best bet.
If you’re unfamiliar, the Unnamed SDVX Clone is basically a community-built game that’s inspired by the original Konami titles. [Luke] decided to build a handheld console for playing the game, which is more akin to the arcade experience versus playing it on a desktop computer.
[Luke’s] build relies on a Raspberry Pi 4B, which donates its considerable processing power and buckets of RAM to the project. The Pi was installed into a 3D-printed case with a battery pack, touchscreen, and speakers, along with multiple arcade buttons and rotary encoders for controlling the game. Booting the Pi and clicking the icon on the desktop starts up the Unnamed Sound Voltex Clone. The game itself will be fairly familiar to any rhythm game player, though it’s a tough more sophisticated than Audiosurf. [Luke] demonstrates the gameplay on YouTube, and the finished project looks great.
[Neil] from The Cave, a computer and console gaming museum in the UK, has a treat for vintage computing and computer gaming enthusiasts. They received an important piece of game dev history from [Richard Costello], who coded ports of Gauntlet 2, Mortal Kombat, and Primal Rage for Atari ST and Amiga home computers. [Richard] brought them his non-functional Atari Mega ST in the hopes that they could get it working again, and demonstrate to visitors how game development was done back in the 80s — but sadly the hardware is not in the best shape.
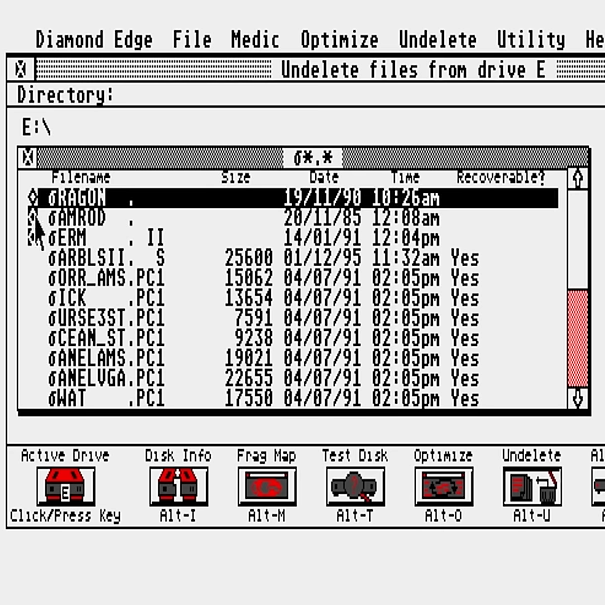
The Atari ST flagged deleted files for overwriting but didn’t actively wipe them, allowing an undelete utility to work.
That doesn’t stop [Neil], however. The real goal is seeing if it’s possible to re-create the development environment and access the game assets on the SCSI hard drive, and it’s not necessary to revive every part of the hardware to do that. The solution is to back up the drive using a BlueSCSI board which can act as a host, scan the SCSI bus, and dump any device it finds to an SD card. The drive didn’t spin up originally, but some light percussive maintenance solved that.
With the files pulled off the drive, it was time to boot it up using an emulator (which begins at the 16:12 mark). There are multiple partitions, but not a lot of files. There was one more trick up [Neil]’s sleeve. Suspecting that deleting everything was the last thing [Richard] did before turning the machine off decades ago, he fired up a file recovery utility. The Atari ST “deleted” files by marking them to be overwritten by replacing the first letter of the filename with a ‘bomb’ character but otherwise leaving contents intact. Lo and behold, directories and files were available to be undeleted!
[Neil] found some fascinating stuff such as mixed game and concept assets as well as what appears to be a copy of Ramrod, a never-released game. It’s an ongoing process, but with any luck, the tools and environment a game developer used in the 80s will be made available for visitors to experience.
Of course, modern retro gaming enthusiasts don’t need to create games the classic way; tools like GB Studio make development much easier. And speaking of hidden cleverness in old games, did you know the original DOOM actually had multi-monitor support hidden under the hood?