Add Scroll Wheels And Buttons To Smartphones With 3D-Printed Widgets Read By Accelerometer

The first LED digital wristwatches hit the market in the 1970s. They required a button push to turn the display on, prompting one comedian to quip that giving one to a one-armed man would be in poor taste. While the UIs of watches and other wearables have improved since then, smartphones still present some usability challenges. Some of the touch screen gestures needed to operate a phone, like pinching, are nigh impossible when one-handing the phone, and woe unto those with stubby thumbs when trying to take a selfie.

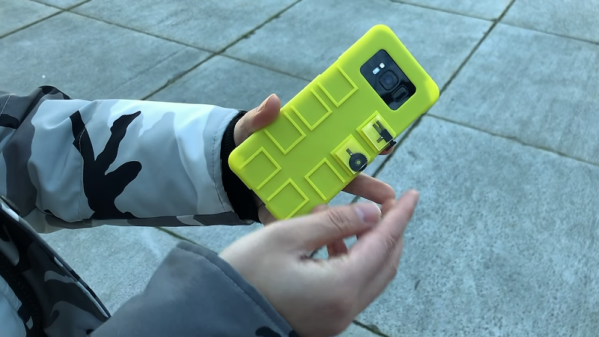
You’d think that the fleet of sensors and the raw computing power on board would afford better ways to control phones. And you’d be right, if the modular mechanical input widgets described in a paper from Columbia University catch on. Dubbed “Vidgets” by [Chang Xiao] et al, the haptic devices are designed to create characteristic acceleration profiles on a phone’s inertial measurement unit (IMU) when actuated. Vidgets take various forms, from push buttons to scroll wheels, each of a similar size and shape and designed to dock into one of eight positions on the back of a 3D-printed phone case. Once trained, the algorithm watches for the acceleration signature caused by actuating a Vidget, and sends commands to the phone to mimic the corresponding gestures. The video below demonstrates a couple of use cases, of which the virtual saxophone is our favorite.

This is really clever stuff, and ventures deep into “Why didn’t I think of that?” territory. Need to get ahead of the curve on IMUs to capitalize on what they can do? You could start with [Al Williams]’ primer on micro-electromechanical systems, or MEMS.

Continue reading “Add Scroll Wheels And Buttons To Smartphones With 3D-Printed Widgets Read By Accelerometer”

Mac Plus Becomes A Vector Display

The vintage Macintosh all-in-one computers were a design icon, as well as being highly useful machines in the 80s and 90s. In the decades since, they’ve been used for everything from web servers to aquariums, but that’s not all. [Arcade Jason] decided to grab an old Macintosh Plus and turn it into a vector display.

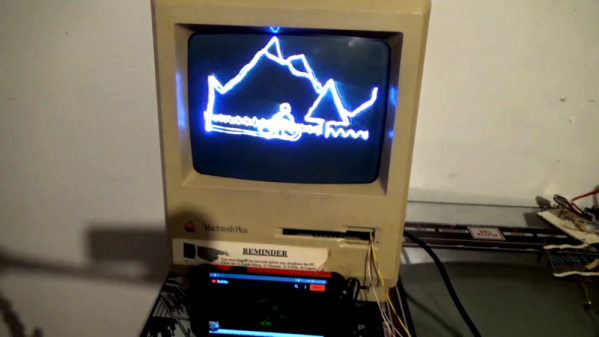
The hack starts with the opening of a Macintosh, which naturally requires a long screwdriver with the right tip. Setting the stage for things to come, this is achieved by soldering together a couple of existing tools to get the reach he needs. [Jason] then proceeds to install a brightness control for the main electron gun, as well as deflection drivers and a spot killing circuit. Everything is done with the intention of the hack being reversible, as [Jason] didn’t wish to sacrifice a good Macintosh Plus just for the sake of having some fun.

For those unfamiliar with vector cathode-ray displays and the manner in which they are driven, [Arcade Jason] does a great job explaining the basics. A set of magnetic coils is used to alter the trajectory of an electron fired at the screen. If you aim those electrons in ordered lines from left-to-right, top-to-bottom you’ve created a raster display. If you instead guide the electrons to follow the shapes you want to appear on the screen you’ve created a vector display.

We can’t help but feel this would be a hilarious way to troll at a demoscene meetup. We’ve seen [Jason]’s vector work before, too — like this impressive color Asteroids hack.

Play Dough Simplifies Interferometer Build

An interferometer sounds like something complicated, and in a way, it is. But it is also pretty easy to build one with some common materials. [Let’s Innovate] has instructions for how to make an interferometer using a green laser pointer, some mirrors, and a CD case. one of the most mundane parts, though, might be the most important: Play Dough.

The very sensitive device needs very precise alignment of the mirrors that reflect the beam. Using Play Dough it is easy to adjust the mirrors to the spot that is just right and then have it stay there.

For the best result, the mirrors really need to be first surface mirrors and not the more common kind with the reflective part on the back. Apparently, a green laser gives better results than a red one, too. If you don’t want to hack up a CD jewel case, a DVD player may give up a beam splitter.

So what do you use it for? Well, most of us use it to see the pretty patterns. But the instrument actually has wide-ranging applications to measure very small distances in fields as diverse as astronomy, optics, and photomicroscopy. To do anything really practical, you might need to add a detector of some sort.

If you want a more robust build, this one is similar. If you have a well-stocked test bench, you might be able to get by with even less.

Building A Mag Lev Optical Table

When you’re talking about optics, things are often happening on a nanometer scale. This means that even the slightest amount of vibration can spoil delicate work. [The Thought Emporium] is working on a long-scale project to produce chocolate holograms, and needed a stable surface to set up some optical components. Thus, he decided to build a magnetically levitated laser table.

The build starts with a series of eight machined delrin bushings, each mounting a strong neodymium ring magnet. Four are placed on the base, with a thin steel rod protruding upwards. The other four bushings are then placed such that the poles of the magnets are opposite one another, causing them to levitate. An acrylic plate is then lowered on top, being supported by the levitating magnets.

It’s a very simple way to create a magnetically levitated table, and in a basic interferometry test, appears to do a decent job of isolating the table from vibrations. We also wonder if there’s scope for further improvement through the use of some kind of eddy current damper. It should make an excellent platform for further experiments, and we look forward to seeing some chocolate holograms in the near future.

It turns out that [The Thought Emporium] was inspired by an earlier chocolate optics project. Video after the break.

Continue reading “Building A Mag Lev Optical Table”

Simulating The Enigma’s Oddball Cousin

Even if you wouldn’t describe yourself as a history buff, you’re likely familiar with the Enigma machine from World War II. This early electromechanical encryption device was used extensively by Nazi Germany to confound Allied attempts to eavesdrop on their communications, and the incredible effort put in by cryptologists such as Alan Turing to crack the coded messages it created before the end of the War has been the inspiration for several books and movies. But did you know that there were actually several offshoots of the “standard” Enigma?

For their entry into the 2019 Hackaday Prize, [Arduino Enigma] is looking to shine a little light on one of these unusual variants, the Enigma Z30. This “Baby Enigma” was intended for situations where only numerical data needed to be encoded. Looking a bit like a mechanical calculator, it dropped the German QWERTZ keyboard, and instead had ten buttons and ten lights numbered 0 through 9. If all you needed to do was send off numerical codes, the Z30 was a (relatively) small and lightweight alternative for the full Enigma machine.

Creating an open source hardware simulator of the Z30 posses a rather unique challenge. While you can’t exactly order the standard Enigma from Digi-Key, there are at least enough surviving examples that they’ve been thoroughly documented. But nobody even knew the Z30 existed until 2004, and even then, it wasn’t until 2015 that a surviving unit was actually discovered in Stockholm.

Of course, [Arduino Enigma] does have some experience with such matters. By modifying the work that was already done for full-scale Enigma simulation on the Arduino, it only took a few hours to design a custom PCB to hold an Arduino Nano, ten buttons with matching LEDs, and of course the hardware necessary for the iconic rotors along the top.

The Z30 simulator looks like it will make a fantastic desk toy and a great way to help visualize how the full-scale Enigma machine worked. With parts for the first prototypes already on order, it shouldn’t be too long before we get our first good look at this very unique historical recreation.

A Laser Cut Gingerbread Cathedral

One of the more disappointing news stories of 2019 was the fire at the Notre Dame cathedral. Widely considered a building of great historical importance and architectural merit, it was heavily damaged and will take significant time and resources to repair. Fundamentally though, if you’re reading this, that’s probably someone else’s job. Instead, why not just build your own Notre Dame out of gingerbread at home? [Scott Hasse] did just that.

The stained glass windows are the real party piece of the build.

The project began by using an existing papercraft model. This had to be heavily modified to account for the thickness of gingerbread and the fact that it can’t easily be folded around corners. The modified geometry was then lasercut at the Sector 67 hackerspace, as they’re experienced with the material.

With parts cut out, royal frosting was used as a mortar to help stick parts together during assembly. Significant development time was also spent in perfecting the stained glass windows, made from colored sugar. After much experimentation, a process involving melting the sugar on silicone sheets proved to be most successful. To complete the look, a series of RGB LEDs were also installed during the construction process.

The final results are nothing short of stunning. The build is instantly recognisable as the famous French cathedral, and the back-lit stained glass is absolutely breathtaking. We wouldn’t want to be going up against [Scott]’s family at the county fair baking contest, that’s for sure!

Continue reading “A Laser Cut Gingerbread Cathedral”

Exquisite Craftsmanship Elevate Vic’s Creations Above The Rest

This booth was easy to miss at Maker Faire Bay Area 2019 amidst tall professional conference signage erected by adjacent exhibitors. It showcased the work of [Dr. Victor Chaney] who enjoys his day job as a dentist and thus feels no desire to commercialize his inventions — he’s building fun projects for the sake of personal enjoyment which he simply calls Vic’s Creations. Each project is built to his own standards, which are evidently quite high judging by the perfect glossy finish on every custom wood enclosure.

Some of these creations were aligned with his musical interests. The Backpacking Banjo was built around a (well cleaned) cat food can to satisfy the desire for a lightweight instrument he can take camping. His Musical Laser Rainbow Machine (fully documented in Nuts & Volts) was created so little bands formed by independent artists like himself can have a visual light show to go with their live performances. The Music Kaleidoscope is another execution along similar lines, with an LED array whose colors are dictated by music. Venturing outside the world of music, we see a magnetically levitated Castle In The Clouds which also receives power wirelessly to illuminate LEDs

The largest and most complex work on display is an epic electromechanical masterpiece. Par One is a rolling ball sculpture featuring the most convoluted golf course ever. Several more rolling ball sculptures (also called marble machines or marble runs) are on display at Dr. Chaney’s office which must make it the coolest dentist’s lobby ever. The lifelike motions he was able to get from the automatons he built into the sculpture are breathtaking, as you can see below.

Continue reading “Exquisite Craftsmanship Elevate Vic’s Creations Above The Rest”