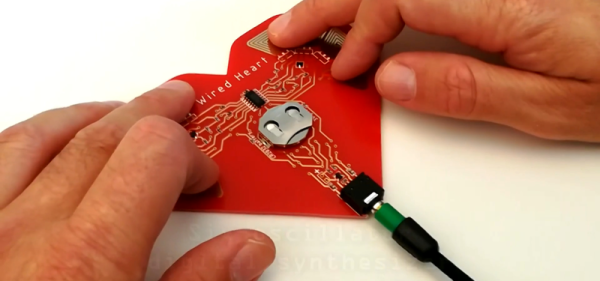
Drawing Lines In The Sand: Taking Beach Graffiti To The Next Level

When strolling down the beach, there’s always an urge to draw in the sand – it seems compulsory to make your mark by inscribing something. But there’s a dilemma: how do you go about physically drawing it? You could opt to remain standing and attempt to deploy a toe, but that requires a level of dexterity few possess. The only other option is to bend down and physically use your hands. Ultimately, there’s no way to draw anything in the sand without losing your dignity.

The solution? A robot, of course – the brainchild of [Ivan Miranda]. The idea is simple and elegantly executed: make a large linear actuator, place it on wheels, and attach a servo which can position an etching tool to be either in the sand or above it. The whole contraption moves forward one column at a time, making a vertical pass with the marker being engaged or disengaged as required. The columns are quite thin, giving relatively high-resolution text, though this does mean it take a while. Adding another servo and marking two adjacent columns at the same time would be an easy way to instantly double the speed.

The wheels are big and chunky, to ensure the horizontal distance travelled does not change between the top and the bottom. Of course, when making big parts like these it always helps if you’ve already built a giant custom 3D printer. If you want to read more of [Ivan]’s large scale 3D printing antics, checkout his tank with suspension, or plus-sized seven-segment clock.

Continue reading “Drawing Lines In The Sand: Taking Beach Graffiti To The Next Level”

The A To Z Of Building Your Own Keyboard

We’ve featured a number of people who’ve taken the plunge and created their own customized keyboard; at this point it’s safe to say that there’s enough information and source code out there that anyone who’s looking to build their own board won’t have much trouble figuring out how to do so. That being said, it’s nice to have a comprehensive at a process from start to finish. Why sift through forum posts and image galleries looking for crumbs if you don’t have to?

That’s precisely what makes this write-up by [Maarten Tromp] so interesting. He walks the reader through every step of the design and creation of his customized keyboard, from coming up with the rather unique layout to writing the firmware for its AVR microcontroller. It’s a long read, filled with plenty of tips and tricks from a multitude of disciplines.

After looking at other custom boards for inspiration, [Maarten] used OpenSCAD to create a 3D model of his proposed design, and had it printed at Shapeways. His electronics are based around an Atmel ATMega328P using vUSB, and Microchip MCP23017 I/O expanders to connect all the keys. He wrapped it all up by designing a PCB in gEDA PCB and having it sent off for production. As a testament to his attention to detail, everything mated up on the first try.

[Maarten] is happy with the final product, but mentions that in a future revision he would like to add RGB lighting and use a microcontroller that has native USB support. He’d also like to drop the I/O expanders and switch over to Charlieplexing for the key matrix.

From uncommon layouts to diminutive technicolor beauties, it seems there’s no end of custom keyboards in sight. We aren’t complaining.

Using AI to see through walls

Using An AI And WiFi To See Through Walls

It’s now possible to not only see people through walls but to see how they’re moving and if they’re walking, to tell who they are. We finally have the body scanner which Schwarzenegger walked behind in the original Total Recall movie.

Seeing through walls: real life, poses, skeletonsThis is the work of a group at the MIT Computer Science and Artificial Intelligence Laboratory (CSAIL). The seeing-through-the-wall part is done using an RF transmitter and receiving antennas, which isn’t very new. Our own [Gregory L. Charvat] built an impressive phased array radar in his garage which clearly showed movement of complex shapes behind a wall. What is new is the use of neural networks to better decipher what’s received on those antennas. The neural networks spit out pose estimations of where people’s heads, shoulders, elbows, and other body parts are, and a little further processing turns that into skeletal figures.

They evaluated its accuracy in a number of ways, all of which are detailed in their paper. The most interesting, or perhaps scariest way was to see if it could tell who the skeletal figures were by using the fact that each person walks with their own style. They first trained another neural network to recognize the styles of different people. They then pass the pose estimation output to this style-recognizing neural network and it correctly guessed the people with 83% accuracy both when they were visible and when they were behind walls. This means they not only have a good idea of what a person is doing, but also of who the person is.

Check out the video below to see some pretty impressive side-by-side comparisons of live action and skeletal versions doing all sorts of things under various conditions. It looks like the science fiction future in Total Recall has gotten one step closer. Now if we could just colonize Mars.

Continue reading “Using An AI And WiFi To See Through Walls”

Load Bank Teardowns Show Danger

[Syonyk] has been acquiring some large load banks to test power supplies and battery packs. These devices consist of a big current sink, a measurement device, and a fan. He picked up two similar-looking boards from the usual Chinese sources, both rated for 150W, both for about $30. Upon closer examination, though, he found that one was really a bargain and the other was likely to blow up.

The loads are rated for 60V and as you can see from the photos, appear virtually identical at a glance. They offer a configurable cut-off voltage and even use 4-wire measurement to avoid problems with voltage drop through the power cables.

Continue reading “Load Bank Teardowns Show Danger”

OpenDeck Makes Spinning Your Own MIDI Controller Easy

These days, MIDI controllers are just plain cool. There are a million of them out there, and they’re all dressed to the nines in flashing LEDs and sporting swag like USB MIDI interfaces and sliders that just feel right. With our italics budget running out, I should get to the point – you can make your own, and the OpenDeck platform makes it easy.

The OpenDeck board. Readily apparent is the fact that it has tons of IO.

In its most refined form, the OpenDeck is a board covered in pin headers. To these, you may connect an absolute truckload of buttons, encoders, sliders, and LEDs. The OpenDeck handles all of the inputs and outputs, while you get to have fun attaching your various gizmos to the control surface/keytar/birthday cake you happen to be building. It saves you reinventing the wheel as far as reading switches and potentiometers goes, allowing you to focus on the creative side of your project. All configuration is handled through a simple web interface.

Boards are available on Tindie,  but it’s also possible to take the code and run it on various Arduinos and the like, as it’s wonderfully opensource. This gives you the power to take things to a higher level once you’re good and ready.

We’ve seen a rather cool OpenDeck build already, and if you’ve got more, you know where to reach us.


Driftwood Binary Clock Is No Hollow Achievement

It’s about time we had another awesome clock post around here. [Mattaw] has liked binary clocks since he was 0 and decided to make one in stunning fashion by using driftwood, nature’s drillable, fillable enclosure.

That beautiful wiring job on the RGB LEDs was done in 18g copper. To keep the LEDs aligned during soldering, he drilled a a grid of holes just deep enough to hold ’em face down. There’s an IR remote to set the time, the color, and choice of alarm file, which is currently set to modem_sound.mp3.

Under the wood, there are a pair of Arduino Nanos, an mp3 decoder board, and an RTC module. Why two Nanos, you ask? Well, the IR interrupts kept, uh, interrupting the LED timing. The remote feature was non-negotiable, so [mattaw] dedicated one Nano to receive remote commands, which it streams serially to the other. Here’s another nice touch: there’s an LDR in one of the nooks or crannies that monitors ambient light so the LEDs are never too bright. Don’t wait another second to check it out—we’ve got 10 videos of it after the break.

Believe it or not, this isn’t the first binary clock we’ve seen.  This honey of a clock uses RGB LEDs to tell the time analog style.

Continue reading “Driftwood Binary Clock Is No Hollow Achievement”

Video Quick-Bit: The Things That Move Robots

Magenta Strongheart returns for a look at some of the coolest robotic entries from this year’s Hackaday Prize. Each of these answered the challenge for modular designs that will help supercharge new robot projects.

We think that cheap and abundant motor designs are poised to revolutionize robotics and several of the entries thought along those same lines. [Masahiro Mizuno] came up with a great 3D printed servo design based around a 6mm DC motor. Also in this ballpark, a team of two — Giovanni Leal and Jonathan Diaz — used 3D printing to turn some tiny metallic servos into linear actuators.

Picking stuff up is a difficult thing for a machine to do. We’ve long enjoyed seeing jamming grippers which do it with an inflatable bladder around a granular material (watch the video… it’s amazing). Two of these were demonstrated as part of the challenge. The Universal Jamming Gripper focuses on the entire mechanism, while Programmable Air took aim at the pneumatic actuation system and can adapt to other soft-robotics uses.

Rounding out this update, make sure to take a peek at the PCB stepper motor [Bobricius] built after being inspired by [Carl Bugeja’s] PCB motor. You’ll also want to see the entry that is taking on industrial farming. Imaging slow-rolling behemoths that use computer vision and spinning tillers to take care of weeds, cutting down on herbicide use.

Right now we’re in the thick of the Power Harvesting Challenge. Show us how you’re getting power from an interesting source and you’ll be on the way to the finals. Twenty power harvesting entries will get that honor, along with a $1,000 cash prize. The five top entries of the 2018 Hackaday Prize will split $100,000!