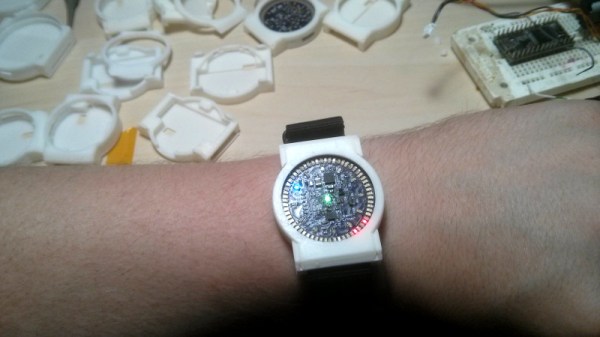
The microcontroller running the watch is an STM32, chosen for its easy programmability. It’s running the LEDs in an emulation of the dial of an analog clock, hence the high part count. Naturally, it’s no simple task to cram 73 LEDs and all the necessary connections into the confines of a watch-sized PCB. [Kevin] goes into great detail about the challenges involved, from routing the traces to a tricky power draw problem caused by some odd blue LEDs.
While quadcopters seem to attract all the attention of the moment, spare some love for the rotary-wing aircraft that started it all: the helicopter. Quads may abstract away most of the aerodynamic problems faced by other rotorcraft systems through using software, but the helicopter has to solve those problems mechanically. And they are non-trivial problems, since the pitch of the rotors blades has to be controlled while the whole rotor disk is tilted relative to its axis.
The device that makes this possible is the swashplate, and its engineering is not for the faint of heart. And yet [MonkeyMonkeey] chose not only to build a swashplate from scratch for a high school project, but since the parts were to be cast from aluminum, he had to teach himself the art of metal casting from the ground up. That includes building at least three separate furnaces, one of which was an electric arc furnace based on an arc welder with carbon fiber rods for electrodes (spoiler alert: bad choice). The learning curves were plentiful and steep, including getting the right sand mix for mold making and metallurgy by trial and error.
With some machining help from his school, [MonkeyMonkeey] finally came up with a good design, and we can’t wait to see what the rest of the ‘copter looks like. As he gets there, we’d say he might want to take a look at this series of videos explaining the physics of helicopter flight, but we suspect he’s well-informed on that topic already.
As we all know, sometimes the projects we plan simply never materialize. You have an idea, maybe even buy some of the parts you need, and then…nothing. Maybe you changed your mind, or maybe the idea was never that good to begin with. In any event, time marches on, the parts pile up, and the ideas come and go. Such is the life of the hacker.
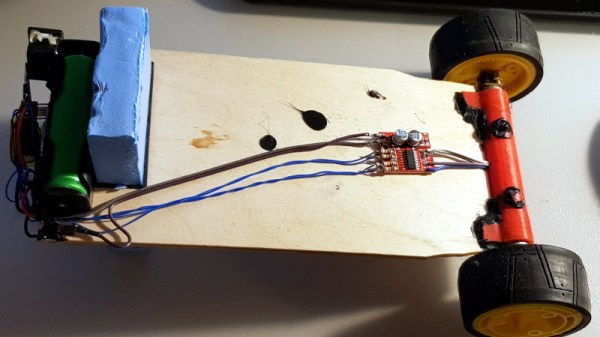
[Andrius Mikonis] writes in to tell us how his graveyard of abandoned projects ended up providing exactly what he needed to embark on a project he’s been fascinated with for years: the two-wheel self balancing robot. He started with a motor and wheel set that was originally intended to be part of a rover, added an accelerometer, and tied the whole thing together with an ESP-01 he had lying around. The final result certainly looks the part, and goes to show that projects don’t always need to be 1000 hour labors of love to accomplish their goals.
The construction of this little bot is simple in the extreme. A piece of plywood makes up the primary structure, with the wheels glued to the bottom and the electronics taking up residence in the top. It’s powered by two lithium battery cells that were salvaged out of an old laptop, with a DC-DC buck converter to provide a stable 3.3 VDC for the ESP-01 and MPU6050 accelerometer. To control the motors themselves, [Andrius] is using a cheap L293 controller that he found on eBay.
For interactive control, [Andrius] is making use of the ESP’s Wi-Fi to provide a web-based interface. This lets you control the bot from essentially any device that has a browser, rather than having to use a dedicated hardware transmitter.
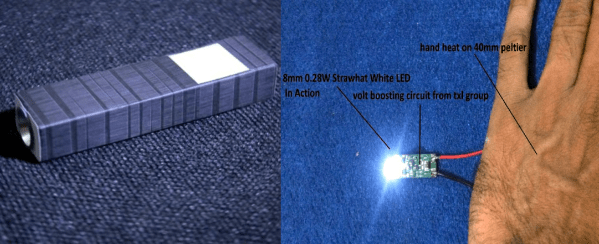
We are smack-dab in the middle of our Energy Harvesting Challenge, and [wasimashu] might have this one in the palm of his hand. Imagine a compact flashlight that doesn’t need batteries or bulbs. You’d buy a 10-pack and stash them everywhere, right? If there’s nothing that will leak or break or expire in your lifetime, why not have a bunch of them around?
Infinity uses nothing but body heat to power a single white LED. It only needs a five-degree temperature difference between the air and your hand to work, so it should be good in pretty much any environment. While it certainly won’t be the brightest light in your collection, it’s a whole lot better than darkness. Someday, it might be the only light around that works.
As you might expect, there’s a Peltier unit involved. Two of them, actually. Both are embedded flush on opposite sides of the hollow aluminum flashlight body, which acts as a heat sink and allows air to pass through. After trying to boost the output voltage with a homemade feedback oscillator and hand-wound transformers, [wasimashu] settled on a unipolar boost converter to reach the 5V needed to power the LED.
[wasimashu] has made it his personal mission to help humanity through science. We’d say that Infinity puts him well on the way, and can’t wait to see what he does next.
When we need actuators for a project, a servo from the remote-control hobby world is a popular solution. Though as the number of servos go up, keeping their wires neat and managing their control signals become a challenge. Once we start running more servos than we have fingers and toes, it’s worth considering the serial bus variety. Today we’ll go over what they are and examine three products on the market.
Congratulations and thank you go to Theodore Yapo for authoring the first paper to complete the peer review process for the Hackaday Journal. You can read the standalone paper here; it will be included in the first volume of the Hackaday Journal officially released later this year.
The Hackaday Journal is an open access, peer reviewed journal that seeks to ensure hard-won domain knowledge is preserved and made available for the benefit of all. Before jumping into Ted’s topic, please take a moment to consider submitting your own paper for the journal.
Paper Submissions Wanted
We have other submissions in the pipleline now but we still need more papers to round out the first volume of the Hackaday Journal. Please consider authoring a paper on any creative research, engineering, or entertaining discovery in the areas of interest to the Hackaday community. The full name of our journal is the Hackaday Journal of What You Don’t Know — it will be a tome of infinite appeal to any who seek to broaden their minds in the engineering space. But for that to happen we need you to share your knowledge.
We are in an age of unparalleled opportunity for individuals and small teams to make interesting discovery. You should not need to be working on a degree to have your findings published, but of course students and faculty are encouraged to submit their papers. Do not hesitate to get in touch with us about topics you want to write about.
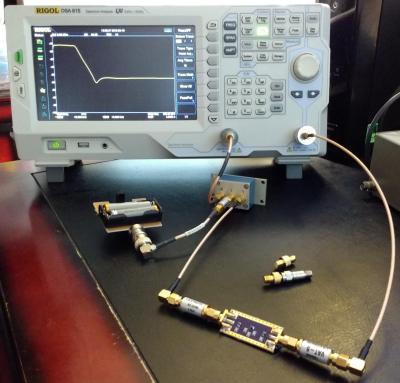
Scalar Network Analyzer Leakage Correction by Theodore Yapo
Low-pass filter being tested by a Rigol DSA-815 using the phase shifting correction technique
The title of Ted’s paper is a mouthful and the subject material wades into radio frequency knowledge with gusto. We applaud him, and the peer reviewers, for the attention to detail while moving toward publication.
In his work, Ted finds an interesting opportunity to get more performance out of relatively inexpensive bench equipment used to characterize RF components. This task is often reserved for Vector Network Analyzers (VNA) but with a heafty price tag these tools aren’t available to everyone. Spectrum Analyzers with Tracking Generators (SA/TG) have come onto the market, but especially with early versions, there is a leakage problem that causes inaccuracy. Ted found a simple technique that can correct for the leakage.
The solution is based on phase shifting the measurement. Starting with a properly calibrated machine, Ted uses a small board he built to electronically shift the phase of the Tracking Generator where the leakage is a problem. The signal is first measured, then measured again with a phase shift of 180 degrees. This effectively cancels out the error while preserving the signal being measured.
This paper goes into great technical detail in the RF domain. It is worth noting that the Hackaday Journal is open to discovery on multiple topics and levels of complexity. Don’t let what you think is a simple, useful idea go unpublished. We’re interested in a wide range of the simple, the obscure, and the frighteningly technical as long as the ideas of both novel and well supported.
This is Your Journal
You, yes you reading this right now, embody a movement of inventive and curious people working both inside and outside of formal academic structures. This is our time to contribute to the knowledge base of humanity. Pour yourself a refreshing beverage, saddle up your headphones, crack those knuckles, and let the writing process begin. Let us now what we don’t know. Submit your paper now.
Assuming you have a child and it’s no longer womb-bound, there’s a fairly high chance they’ve already had some experience with the glowing beauty that is the LCD display; babies of only a few months old are often given a tablet or smartphone to keep them occupied. But as the child gets to the age where they are capable of going outside or doing something more constructive, staring slack-jawed and wide-eyed at their tablet becomes a concern for many parents.
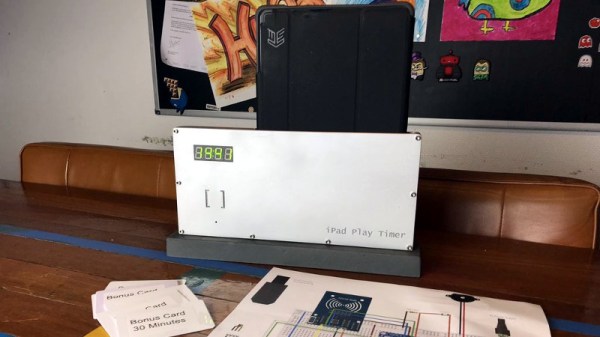
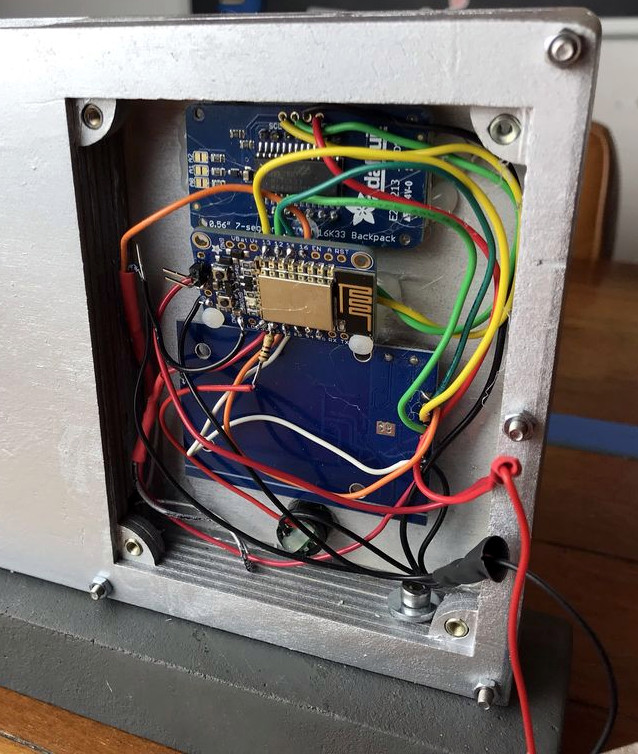
[Richard Garsthagen] is one such parent. He wanted a way to monitor and control how much time his children were using their iPad, so he came up with an automated system based on the ESP8266. Not only does it keep track of how long the tablet is being used, it even includes a reward system which allows the parent to add extra usage time for good behavior.
At the most basic level, the device is a sort of “holster” for the child’s tablet. When the tablet is placed in the slot, it presses a microswitch at the bottom of the cavity which stops the timer. When the switch is open, the LED display on the front of the device counts down, and the ESP8266 pushes notifications about remaining time to the child’s device via IFTTT.
Time can be added to the clock by way of RFID cards. The cards are given out as a reward for good behavior, completion of chores, etc. The child only needs to pass the card in front of the system to redeem its value. Once the card has been “spent”, the parent can reset it with their own special card.
It’s a very slick setup, making perfect use of the ESP8266. Reading the RFID cards, updating the timer, and using IFTTT’s API keeps the little board quite busy; [Richard] says it’s completely maxed out.
You might be wondering what happens when the clock reaches zero. Well, according to the video after the break…nothing. Once the time runs out, a notification simply pops up on the tablet telling them to put it away. Some might see this as a fault, but presumably it’s the part of the system where humans take over the parenting and give the ESP8266 a rest.