Transistor Logic Clock Gets Stacked Up

A couple years back we covered a very impressive transistor logic clock which was laid out so an observer could watch all of the counters doing their thing, complete with gratuitous blinkenlights. It had 777 transistors on 41 perfboards, and exactly zero crystals: the clock signal was extracted from the mains frequency of 50 Hz. It was obviously a labor of love and certainly looked impressive, but it wasn’t exactly the most practical timepiece we’d ever seen.

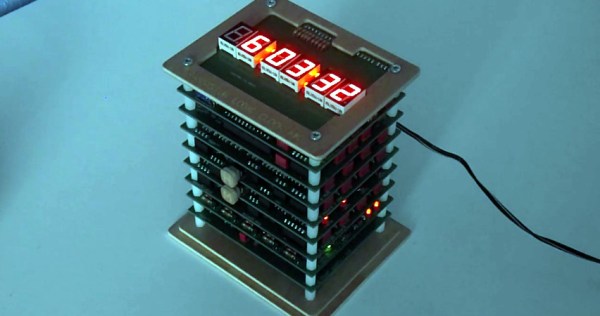
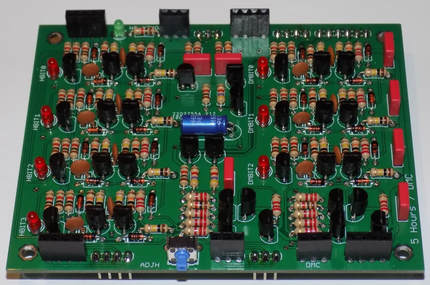
Creator [B Brett] recently wrote in to share news that the second version of his transistor logic clock has been completed, and we can confidently say it’s a triumph. He’s dropped the 41 perfboards in favor of 9 professionally fabricated PCBs, which this time around are stacked vertically to make it a bit more desktop friendly. The end goal of a transistor logic clock that you can take apart to study is the same, but this “MkII” as he calls it is a far more refined version of the concept.

In addition to using fewer boards, the new MkII design cuts the logic down to only 283 transistors. This is thanks in part to the fact that he allowed himself the luxury of including an oscillator this time. The clock uses a standard watch crystal at 32.768 KHz, the output of which is converted into a square wave through a Schmitt trigger. This is then fed into a divider higher up the stack which uses flip flops to produce 1Hz and 2Hz signals for use throughout the rest of the clock.

In addition to the original version of this project, we’ve also seen a beautiful single-board wall mounted version, and even a “dead bug” style one built from scraps.

Continue reading “Transistor Logic Clock Gets Stacked Up”

Count To F Easily With This DIY Calculator

Some of the greatest electronic calculators of all time, including the venerable HP-16C, included functionality to convert numbers between different bases. 3735928559 might not mean much in base 10, but convert that to hex, and you’ll offend vegetarians. If the great calculators of yore had a way to convert between number bases, that means someone must make a standalone device to do the same, right? That’s what [leumasyerrp] is doing for their entry into the Hackaday Prize, anyway.

The Base Convert project is a simple desktop calculator designed to convert between hexadecimal, decimal, and binary. To do this, there’s an 8×8 key matrix for the numbers 0 through F. There are sixteen single LEDs, four seven-segment LEDs for the hex display, and six seven-segment LEDs for the decimal display.

While this is really just a project [leumasyerrp] came up with to learn the MSP430 microcontroller, this looks like a fantastic project given it’s great use of milled PCB for a front panel, careful selection of standoff height, and everything is tucked away into a package that looks about as professional as you can expect from a device made entirely from PCBs. Of course, the Base Convert calculator works as expected, and can easily change between number bases.

Sometimes it’s not about building the hardest or most complex project, but instead simply putting the most amount of polish into a simple project. This is a project that does that well, and we’re happy to have this in the running for the Hackaday Prize.

How To Add UART To Your FPGA Projects

Being able to communicate between a host computer and a project is often a key requirement, and for FPGA projects that is easily done by adding a submodule like a UART. A Universal Asynchronous Receiver-Transmitter is the hardware that facilitates communications with a serial port, so you can send commands from a computer and get messages in return.

Last week I wrote about an example POV project that’s a good example for learn. It was both non-trivial and used the board’s features nicely. But it has the message hard coded into the Verilog which means you need to rebuild the FPGA every time you want to change it. Adding a UART will allow us to update that message.

The good news is the demo is open source, so I forked it on GitHub so you can follow along with my new demo. To illustrate how you can add a UART to this project I made this simple plan:

Continue reading “How To Add UART To Your FPGA Projects”

One Square Inch Expanded In The Time Dimension

No, we’re not talking about spooky feats of General Relativity. But you should know that the Return of the Square Inch Project just got its deadline extended.

If you missed the call the first time around, our favorite user-contributed contest on Hackaday.io is up and running again. Hackaday.io tossed in some good money for prizes, and folks started thinking about what functionality they could cram inside a 25.4 mm x 25.4 mm square. But while one constraint can help bring out creativity, adding a tight deadline to a tight squeeze caused a number of our entrants to ask for an extension.

If you’re working on the Square Inch Project, you’ve got until October 1st to get your boards ready. Breathe a quick sigh of relief and then get back to soldering! We’re looking forward to seeing all the great entries.

Fail Of The Week: How Not To Design An RF Signal Generator

We usually reserve the honor of Fail of the Week for one of us – someone laboring at the bench who just couldn’t get it together, or perhaps someone who came perilously close to winning a Darwin Award. We generally don’t highlight commercial products in FotW, but in the case of this substandard RF signal generator, we’ll make an exception.

We suppose the fail-badge could be pinned on [electronupdate] for this one in a way; after all, he did shell out $200 for the RF Explorer signal generator, which touts coverage from 24 MHz to 6 GHz. But in true lemons-to-lemonade fashion, the video below he provides us with a thorough analysis of the unit’s performance and a teardown of the unit.

The first step is a look at the signal with a spectrum analyzer, which was not encouraging. Were the unit generating a pure sine wave as it should, we wouldn’t see the forest of spikes indicating harmonics across the band. The oscilloscope isn’t much better; the waveform is closer to a square wave than a sine. Under the hood, he found a PIC microcontroller and a MAX2870 frequency synthesizer, but a conspicuous absence of any RF filtering components, which explains how the output got so crusty. Granted, $200 is not a lot to spend compared to what a lab-grade signal generator with such a wide frequency range would cost. And sure, external filters could help. But for $200, it seems reasonable to expect at least some filtering.

We applaud [electronupdate] for taking one for the team here and providing some valuable tips on RF design dos and don’ts. We’re used to seeing him do teardowns of components, like this peek inside surface-mount inductors, but we like thoughtful reviews like this too.

Continue reading “Fail Of The Week: How Not To Design An RF Signal Generator”

Ask Hackaday: Managing Inspiration

For most of us, hacking is a hobby, something to pass a few idle hours and satisfy our need to create. Precious few of us get to live the dream of being paid to tinker; most of us need some kind of day job to pay the bills and support our hacking habits. This necessarily creates an essential conflict, rooted in the fact that we all only have 24 hours to spread around every day: I need to spend my time working so I can afford to hack, but the time I spend working to earn money eats away at my hacking time. That’s some catch, that Catch-22.

From that primary conflict emerges another one. Hacking is a hugely creative process, and while the artist or the author might not see it that way, it’s true nonetheless. Unless we’re straight-up copying someone else’s work, either because they’ve already solved the same problem we’re working on and we just need to get it done, or perhaps we’re just learning a new skill and want to stick to the script, chances are pretty good that we’re hitting the creative juices hard when we build something new. And that requires something perhaps even more limiting than time: inspiration. How you manage inspiration in large part dictates how productive you are in your creative pursuits.

Continue reading “Ask Hackaday: Managing Inspiration”

ZPB30A1 Electronic Load Gets An Open Firmware

Importing cheap equipment and test gear is something of a mixed blessing. It allows you to outfit your lab without emptying your bank account, but on the other hand there’s usually a reason it’s cheap. Of course, the retail price of a piece of hardware shouldn’t be the metric by which we measure its quality, but there’s got to be a few corners cut someplace when they are selling this stuff for a fraction of what the name brands are charging.

A perfect example is the ZHIYU ZPB30A1 electronic load, available from various online importers for about $30 USD. While the price is right for an adjustable load that can handle up to 110 W, it’s got some pretty glaring shortcomings. In an effort to address at least some of those issues, [Luca Zimmermann] has been working on an open source replacement firmware for the load’s STM8S microcontroller.

[Luca] quickly discovered that the device’s STM8S005K6 chip is write protected, so unfortunately you can’t just flash a new firmware to it. If you want to unlock additional features, you need to perform a brain transplant. Luckily these chips are quite cheap, and you can probably add a couple of them to your cart when you order he ZPB30A1.

With the new GPLv3 licensed firmware installed, the device gains constant power and resistances modes (stock firmware can only do constant current), serial logging, and support for adjusting the value of the shunt resistor. There’s even a basic menu system to shuffle through the new modes. There’s still a couple features that haven’t been implemented, such as automatic shutdown, but it’s already a considerable upgrade from the stock software. Now we just need some details on the slick custom enclosure that [Luca] has put his upgraded ZPB30A1 into.

If this looks too easy, you can always go the DIY Arduino route for your load testing needs, or build a monster than can sink up to 1 kW.

[Thanks to Benik3 for the tip.]