An image of the surface of Europa. The top half of the sphere is illuminated with the bottom half dark. The surface is traced with lineae, long lines across its surface of various hues of grey, white, and brown. The surface is a brown-grey, somewhat like Earth's Moon with the highest brightness areas appearing white.

Evidence For Water Vapor Plumes On Europa Vanishes In Re-Analysis

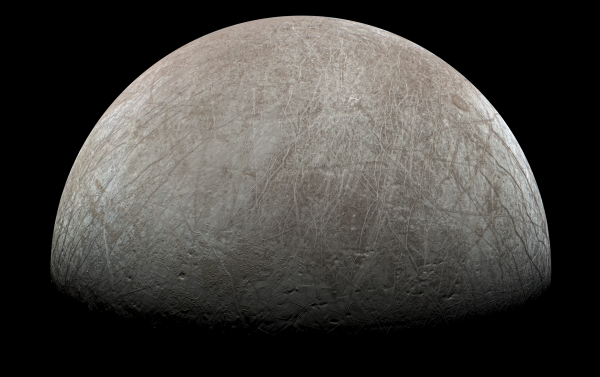
Unlike on Mars where for decades we have had dozens of orbital and ground-based platforms zipping and scurrying about to prod at every bit of emitted radiation, rock type and twitch of dust devils in its thin atmosphere, for other planets and their moons we have to do a lot more speculative interpretation of data. Such was the case with the presumed existence of water plumes on Jupiter’s moon Europa. These now appear to have been a statistical fluke, per research by [L. Roth] et al. in Astronomy & Astrophysics.

As succinctly summarized in the article on this by [Javier Barbuzano] of Sky and Telescope, the original 2013 finding of said water plumes by the same team was based on faint UV emissions from Europa’s southern hemisphere as captured by the Hubble Space Telescope. However, in more recent captures these emissions were not detected again, leading them to reexamine their original analysis of the 2013 data.

One of the main flaws was in the assumption of where Europe was located on Hubble’s 1,000 x 1,000 resolution detector, with the re-analysis showing that they were off by a couple of pixels. A second flaw was quite understandable as since 2013 we have learned that Europa has a thin hydrogen exosphere which interacts with the Sun’s UV radiation. The resulting scattering induces a UV glow which could be mistaken for UV radiation emanating from the moon’s surface.

Even with this one intriguing feature turning out to be a mirage, it doesn’t make Europa any less interesting as it’s still assumed to have vast liquid water oceans. Along with Uranus’ moon Miranda this makes it very worth it to experience more of the sights and sounds of these alien worlds, whether in person or via our robotic friends.

Mechanical Stability For Your Coils

If you work with radio, the chances are that before too long you’ll be winding an inductor. At radio frequencies these won’t be big chunky transformer style chokes, but often air-cored affairs supported by their own rigidity. As grizzled old radio amateurs will tell you though, relying on such a coil for stability is a fool’s errand. It will shift inductance from the slightest movement, thermal expansion, or even sound. Luckily [SolderSmoke] is here to remind us of the trusty fix, in the form of Q-dope, or a polystyrene solution that dries to form a rigid low-dielectric coating.

Where this is being written it wasn’t on the market so it was more usual to use nail lacquer, but reading the piece it seems American hams swore by the stuff. That’s in the past tense because it seems it’s no longer on the market. Even there though help is at hand, because dissolving packaging polystyrene in solvent yields an acceptable substitute. There’s even an 11-year-old how-to video linked from the SolderSmoke post, should you fancy making some of your own. We suggest you proceed with caution though, polymers dissolved in solvents sounds a lot like home-made napalm, and probably puts out fumes you don’t want to breathe.

Meanwhile should you fancy experiments of your own with inductors, we’ve got you covered.

3D Printed Hose Sprayer Sets Phasers To Suds

The weather is warming up, and for many of us that means more time spent working out in the yard. You probably won’t find any new life or new civilizations out there, but if you’ve spent the last few months indoors on your computer, the garden may as well be a strange new world. In that case, you’d do well to equip the members of your landing party with this Star Trek: The Original Series hose sprayer designed by [Curt Turner].

If you’re wondering how [Curt] managed to 3D print a functional hose sprayer, the short answer is that he didn’t. Once assembled, the printed parts cleverly attach to the top of a standard sprayer, specifically the model 56516 “Pro Flo” from Orbit. Without the design constraints that would have come from trying to make the thing actually contain pressurized water, [Curt] was free to focus on the aesthetics, and it shows.

Even with a garden variety — no pun intended — sprayer strapped to the bottom, it’s remarkable how much the “Sprayser” looks like the real thing. Well, not real, but you know what we mean.

[Curt] has also done an excellent job documenting this project for others that want to imagine they’re fighting off Romulans in their backyard. He’s got assembly diagrams that break down which color each of the principle components is to be printed in, as well as a build video that we’ve embedded below.

We’ve seen a fair number of Star Trek props built over the years, some of which have packed in considerably more functionality than anything they would have had back on the set. These days you can even by an officially licensed tricorder that can actually do some of the things the fictional versions were capable of.

Continue reading “3D Printed Hose Sprayer Sets Phasers To Suds”

The Merits Of Comment-Driven Development As Counterweight To TDD

The world of software has seen many paradigms come and go, all of which were supposed to revolutionize its development. Still, one of the basic tenets in engineering of there being no shortcuts to just doing the work properly also rings true in the field of software engineering: trying to skip ‘nice to haves’ like proper documentation, code formatting, and proper testing inevitably results in developers nervously trying to ignore the looming avalanche of technical and other project debts as they keep piling up.

While Test-Driven Development (TDD) once got praised as the silver bullet, the principle of writing tests before writing code merely postpones the inevitable project collapse. The elephant in the room is that you cannot pass on the basics in engineering and expect to come out fine on the other end. There’s a reason why phrases like “all tests green, successfully failed in production” have become common.

This is where the concept of Comment-Driven Development (CDD) comes into play. What started as a bit of a joke many years ago stuck in my mind and led me to my current approach in software development that tries to effectively mirror solid engineering principles.

Continue reading “The Merits Of Comment-Driven Development As Counterweight To TDD”

A boiling flask is mounted in a heating manted, with a tube leading from it to a U-shaped tube. From here, the tube continues to a bottle of yellow fluid, from which another tube emerges. A flame is emitted from this last tube.

Building A Desktop Catalytic Cracker

Although crude oil contains a vast diversity of hydrocarbons, a comparatively small number of these make up the bulk of demand for oil. Cracking solves this mismatch: most of the demand is for light, short-carbon-chain molecules, so a cracker breaks down long-chain hydrocarbons into lighter, more commercially-valuable chemicals. This is usually done in massive industrial plants, but as [Markus Bindhammer] showed, it’s possible even in a tabletop apparatus.

There are several methods of cracking, but [Markus] used catalytic fluid cracking: a feedstock high in alkanes (hydrocarbons containing fully saturated carbon-carbon bonds) is heated in the presence of a catalyst, whereupon its long alkane chains split to form alkenes (hydrocarbons with a carbon-carbon double bond) with the loss of a hydrogen molecule. In [Markus]’s setup, a heating mantle heated a boiling flask containing paraffin oil and an amorphous silica-alumina catalyst. Vapors from this flask passed through a condenser tube and a bottle of bromine water, then escaped through a flashback arrestor. Bromine reacts far more readily with alkenes than with alkanes, so the disappearance of its characteristic yellow color would visually indicate the production of alkenes.

To avoid unwanted oxidation, [Markus] purged the cracker with argon before using it. While running the cracker, a flammable mixture of light hydrocarbons and hydrogen escaped from the flask of bromine water. The yellow color of bromine disappeared, and two phases formed: one aqueous, and a lighter phase of hydrocarbons and brominated hydrocarbons. The hot side of the reactor did not survive well; the catalyst turned black with coke, and the heating mantel’s cover fused to the boiling flask. However, the reaction undoubtedly succeeded: while a pool of normal paraffin oil wouldn’t ignite, the cracked oil lit easily.

To go the other way, from small molecules to larger hydrocarbon chains, [Markus] has also used the Fischer-Tropsch process.

Continue reading “Building A Desktop Catalytic Cracker”

AI The Truly Environmentally Friendly Way

A common complaint about the rise of commercial AI services is that they are power-hungry and thus damage the environment. If this concerns you then [Squeezlabs] has the solution, in the form of an AI powered by a handcrank.

The guts of the system is a Raspberry Pi 5 running llama.cpp and appropriate speech conversions, but it and the Large Language Model (LLM) side are not the most interesting part of this system. The power comes from a hand crank charger of the type you’ll see for sale on the likes of AliExpress, designed for USB charging. That in itself is not enough to power the Pi though, as upticks in the processing can cause brownouts that crash the machine. Thus there’s a custom-made capacitor board to take up the strain, and even with that the handle resistance varies significantly depending on the computing load.

We can see that this is not the ideal way to experience an LLM, but maybe that’s not the point. It does however point towards a future in which the power demands of processing decrease and less effort is required. Meanwhile, this is by no means the first hand cranked project we’ve seen.

Process 4 Billion Pixels Per Second From 16 DIY Cameras For The Best V-Tubing Rig Ever

[Dennis] is on YouTube with his channel “Made By Dennis,” but for the record he is a maker, not a V-tuber. On the other hand, his latest project– creating a profesisonal-level tracking rig with DIY IR cameras and a whole lot of moxie–does mean he’s now equipped to make the move to the prestigious, high-status world of pretending to be an anime girl.

That is of course not why he did it. Like most projects around here, the motivation was more a case of “I wonder if I can…”– in this case [Dennis] wondered what it would take for him to pull off the same sort of optical motion capture, or MoCap, that is used in Hollywood studios. Optical mocap has the advantage of being very precise, able to track things at high speeds, and not being in any way limited to the human form like the slew of AI-assisted methods hitting the market right now. The disatvantage is that you need to place markers on any part of your subject you want tracked, film them from all angles, and process a whole lot of pixels. In [Dennis]’s case, it ended up being about four billion. Keeping in mind that actually locating those points in 3D space is dependent on knowing exactly where your cameras are: if you want sub-millimeter precision, your cameras need to be fixed with sub-millimeter tolerance. It’s a big project, hence a long video, which is embedded below.

The DIY cameras use a AR0234 MIPI camera on a custom PCB with M12 lenses and IR filters. To improve the signal-to-noise ratio on optical MoCap, it’s standard to use near-IR light. The camera boards, as you might expect given the MIPI interface, hook into Raspberry Pi compute modules– the cheapest CM4 should work, though he’s using CM5s. The compute modules sit on custom boards that provide PoE, and some other niceties– like a small microcontroller driven by the pulse-per-second pin to help trigger the cameras in sync.

Each camera gets a ring light of near-IR LEDs that pulse at 160 W, which would be way more than PoE is specced to provide, but since the LEDs are only on when the camera is taking a frame, the average power is well within allowable limits. With 16 cameras each having their own ring light, that’s a lot of near-IR photons. Don’t forget your safety squints!

Rather than process the images with OpenCV, he has his own custom solution optimized for this use-case that [Dennis] reports is 300x faster. Luckily, he’s put his implementation on GitHub, along with the rest of the project. Even if you don’t have any v-tubing ambitions, this project is very impressive and worth checking out in its entirety.

Optical MoCap isn’t the only game in town, of course. If you want to do this cheap and easy, you can strap a bunch of IMU sensors to yourself– just don’t expect the same precision.

Thanks to [Dennis] for the tip!

Continue reading “Process 4 Billion Pixels Per Second From 16 DIY Cameras For The Best V-Tubing Rig Ever”