Repair Job Fixes Compressor, Gets It Online

We’ll never cease to be amazed at the things people try to put on the Internet of Things. Some are no-brainers, like thermostats, security cameras, and garage door openers. Others, like washing machines and refrigerators, are a little on the iffy side, but you can still make a case for them. But an IoT air compressor? What’s the justification for such a thing?

As it turns out, [Boris van Galvin] had a pretty decent reason for his compressor hacks, and it appears that the IoT aspect was one of those “why not?” things. Having suffered the second failure of his compressor’s mechanical pressure switch in a year, and unwilling to throw good money after the $120 that went into replacing the first contactor, [Boris] looked for a cheaper and more interesting way to control the compressor. An ESP8266 dev board made interfacing the analog pressure sensor a snap, and while he was at it, [Boris] added a web interface with a nice graphical air pressure gauge and some on-off controls. Now he can set the pressure using his phone and switch it off in the middle of the night without going outside. That’s an IoT win right there.

No air compressor? No worries — build your own from an old fridge. The non-IoT kind, preferably.

Measuring Airflow In An HVAC System

[Nubmian] wrote in to share his experiments with measuring airflow in an HVAC system. His first video deals with using with ultrasonic sensors. He found an interesting white paper that described measuring airflow with a single-path acoustic transit time flow meter. The question was, could he get the same effects with off-the-shelf components?

[Nubmian] created a rig using a pair of typical ultrasonic distance sensors. He detached the two transducers from the front of the PCB. The transducers were then extended on wires, with the “send” capsules together pointing at the “receive” capsules. [Nubmian] set the transducers up in a PVC pipe and blew air into it with a fan.

Continue reading “Measuring Airflow In An HVAC System”

Teardown With A Twist: 1975 Sinclair Scientific Calculator

When writing a recent piece about Reverse Polish Notation, or RPN, as a hook for my writing I retrieved my Sinclair Scientific calculator from storage. This was an important model in the genesis of the scientific calculator, not for being either a trailblazer or even for being especially good, but for the interesting manner of its operation and that it was one of the first scientific calculators at an affordable price.

I bought the calculator in a 1980s rummage sale, bodged its broken battery clip to bring it to life, and had it on my bench for a few years. Even in the early 1990s (and even if you didn’t use it), having a retro calculator on your bench gave you a bit of street cred. But then as life moved around me it went into that storage box, and until the RPN article that’s where it stayed. Finding it was a significant task, to locate something about the size of a candy bar in the storage box it had inhabited for two decades, among a slightly chaotic brace of shelves full of similar boxes.

The Sinclair's clean design still looks good four decades later.
The Sinclair’s clean design still looks good four decades later.

Looking at it though as an adult, it becomes obvious that this is an interesting machine in its own right, and one that deserves a closer examination. What follows will not be the only teardown of a Sinclair Scientific on the web, after all nobody could match [Ken Shirriff]’s examination of the internals of its chip, but it should provide an insight into the calculator’s construction, and plenty of satisfying pictures for lovers of 1970s consumer electronics.

The Sinclair is protected by a rigid black plastic case, meaning that it has survived the decades well. On the inside of the case is a crib sheet for its RPN syntax and scientific functions, an invaluable aid when it comes to performing any calculations.

It shares the same external design as the earlier Sinclair Cambridge, a more humble arithmetic calculator, but where the Cambridge’s plastic is black, on the Scientific it is white. The LED display sits behind a purple-tinted window, and the blue-and-black keyboard occupies the lower two-thirds of the front panel. At 50 x 111 x 16 mm it is a true pocket calculator, with an elegance many of its contemporaries failed to achieve and which is certainly not matched by most recent calculators. Good industrial design does not age, and while the Sinclair’s design makes it visibly a product of the early 1970s space-age aesthetic it is nevertheless an attractive item in its own right.

Continue reading “Teardown With A Twist: 1975 Sinclair Scientific Calculator”

How To Build An Airplane In A Month And A Half

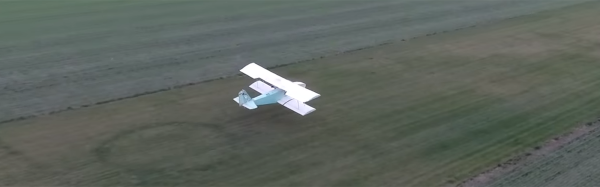
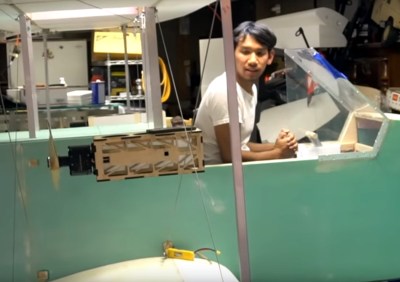
For the last few weeks, RC pilot extraordinaire [Peter Sripol] has been working on his biggest project to date. It’s effectively a manned RC plane, now legally a Part 103 ultralight. Now all that work is finally bearing fruit. [Peter] is flying this plane on some short hops down a grass runway. He’s flying it, and proving that you can build a plane in a basement, in under two months, constructed almost entirely out of insulation foam.

[Peter] has been documenting this build on his YouTube channel, and although the materials for this plane are mostly sourced from either Home Depot or Lowes, the construction is remarkably similar to what you would expect to find in other homebuilt aircraft. This thing has plywood gussets, the foam is wearing a thin layer of fiberglass, and the fasteners are from Aircraft Spruce.

The power system is another matter entirely. The engines (all two of them!) are electric and are designed for very large RC aircraft. These engines suck down power from a massive battery pack in the nose, and the twin throttles are really just linear potentiometers hacked onto servo testers. There’s a surprising amount of very important equipment on this plane that is just what [Peter] had sitting around the workshop.

As far as the legality of this ultralight experiment is concerned, [Peter] is pretty much above-board. This is a Part 103 ultralight, and legally any moron can jump in an ultralight and fly. There are some highly entertaining YouTube videos attesting this fact. However, in one of [Peter]’s livestreams, he flew well after sunset without any strobes on the plane. We’re going to call this a variant of go-fever, technically illegal, and something that could merit a call from the FAA. We’re going to give him a pass on this, though.

This build still isn’t done, though. The pitot tube is held onto the windshield with duct tape. The plane was slightly nose heavy, but shifting the batteries around helped with that. [Peter] is running the motors on 12S batteries, and the prop/motor combo should be run on 14S batteries — $1200 of batteries are on order. The entire plane needs a paint job, but there’s no indication that will ever be done. With all that said, this is a functional manned aircraft built in a basement in less than two months.

With the plane complete and ground tests quickly moving on to flight tests, it’s only fitting to mention [Peter]’s GoFundMe page for a parachute. [Peter] is going to fly this thing anyway, and this is a great way to deflect Internet concern trolls. [Peter]’s just short of the $2600 needed for a parachute, but if the funds received go over that amount by a few hundred, a ballistic parachute will save [Peter] and the plane.

Quick And Easy Solar Hot Air Balloon

[Becky Stern] likes to harness the power of the Sun. Most of us will immediately think of solar cells and other exotic solar energy techniques. But [Becky] shows how to make a hot air balloon using nothing but tape and garbage bags.

The idea is quite simple. You form a large envelope from black trash bags and fill it with air. Becky does that by just running with it, tying it off, and topping off with a little manual blowing. Once the sun heats the black bag, it floats.

Continue reading “Quick And Easy Solar Hot Air Balloon”

Get Down To The Die Level With This Internal Chip Repair

Usually, repairing a device entails replacing a defective IC with a new one. But if you’ve got young eyes and haven’t had caffeine in a week, you can also repair a defective chip package rather than replace it.

There’s no description of the incident that resulted in the pins of the QFP chip being ablated, but it looks like a physical insult like a tool dropped on the pins. [rasminoj]’s repair consisted of carefully grinding away the epoxy cap to expose the internal traces leading away from the die and soldering a flexible cable with the same pitch between the die and the PCB pads.

This isn’t just about [rasminoj]’s next-level soldering skills, although we’ll admit you’ve got to be pretty handy with a Hakko to get the results shown here. What we’re impressed with is the wherewithal to attempt a repair that requires digging into the chip casing in the first place. Most service techs would order a new board, or at best solder in a new chip. But given that the chip sports a Fanuc logo, our bet is that it’s a custom chip that would be unreasonably expensive to replace, if it’s even still in production. Where there’s a skill, there’s a way.

Need more die-level repairs? Check out this iPhone CPU repair, or this repair on a laser-decapped chip.

[via r/electronics]

The Early Bird Repairs A Slug

When faced with a problematic Bird slug, [Robert Meister] didn’t give up. He pecked away at the slug and brought us all along for the ride. If that sentence didn’t make sense to you, read on!

Anyone who’s been to a hamfest has seen a Bird meter. The Bird Model 43 watt meter is the defacto standard for measuring transmitter power in-line. Bird meters don’t just work from DC to light though. In fact, the model 43 itself is just a bit of transmission line and a meter movement.  The magic happens inside the swappable measurement element. These elements, affectionately called “slugs” are calibrated for a frequency band and power range. An example would be the model 4410-6, which works from 50 – 200 MHz, at up to 1 kW. Most hams have a collection of these slugs to go with the bands they transmit on.

[Robert]’s problem child was a model 100E element, good for 100 watts on 400 – 1000 MHz. The meter output seemed erratic though. A bit of troubleshooting with a second meter and a known good slug isolated the problem to the 100E. The problem was isolated to the slug, but how to fix it?

Slugs are sealed brass containers, each of which is calibrated to 5% accuracy at the factory. They are the closest thing you’ll find in the ham world to “no user serviceable parts inside”. Still, [Robert] had nothing to lose. He soaked the slug in a bit of Xylene solvent to loosen the glue holding the metal label on. Behind that were a painted screw and a hole for a calibration pot. We’re guessing the paint is Bird’s idea of tamper detection.

Pulling the screw out, and removing the nylon cover on the back of the slug revealed the real story. The slug contained a calibrated sensing loop, a diode, the calibration pot, and a terminating resistor. In [Robert]’s case, all he had to do was clean the contacts on the slug, and things worked fine.

For 11 years, anyway. After that, the slug started acting up again. Cleaning didn’t fix the problem this time. [Robert] ended up replacing the calibration potentiometer with a similar model from Digi-key. He re-calibrated the slug against his known good meter. It may not be a lab quality calibration, but this slug should be good for another few decades in his shack.