Cook Up A Yoke In Five Minutes

When it comes to flight simulators, we’ve seen people go all-out with their immersive setups, with all kinds of hyper-realistic control systems and monitors as far as the eye can see. But for those gaming on a budget this can seem a little overwhelming and daunting. We all have to start somewhere, though, so if you’re looking for your first semi-realistic flight simulator control mechanism take a look at this yoke which can be cobbled together for almost no money or time.

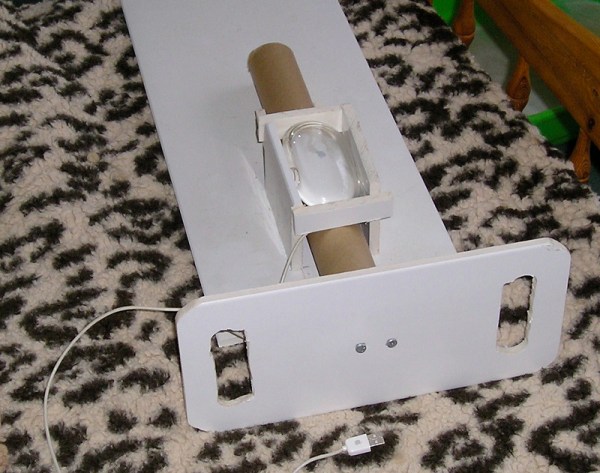
The yoke can be built around any optical mouse that happens to be lying around. A custom housing for it is constructed from cardboard, which lets it sit above a cardboard tube which functions as the control interface. This mechanism rests in a cardboard box it uses as a frame, with a yoke-styled control interface built out of packing foam at the front. One optional modification to the device allows it to have more realistic control throw, and another replaces the cardboard tube with a wooden dowel to give the device a little more strength.

While relatively quick and easy to build, it works as a fully-functional yoke in flight simulator programs like FlightGear almost effortlessly, mostly thanks to the fact that it is based on a nearly unmodified mouse. Assuming you have a mouse in your parts drawer and have access to some sort of cardboard, it’s estimated to take not much longer than five minutes to put together. But if you’re looking for something DIY that’s a little more substantial, it’s not too much of a step up to another DIY yoke we’ve featured before which is centered around an Arduino and a few 3D-printed parts.

Thanks to [Stephen] for the tip!

Solenoid Keyboard Sounds Very Much Like A Typewriter

Mechanical keyboards are muchly adored things. For many of us, they take us back to that loud clickity-clack that was so common before consumer keyboards went to membrane switches. For others, it’s just for the pure joy of the finger-powered symphony. The solenoid edition of the Red Herring keyboard from [Ming-Gih Lam] understands the beauty of this sound intimately. It can be nearly silent if you so desire, or it can clack away with the best of them (via Hackster.io).

It all comes down to the switches used in the design. [Lam] selected the Silent Alpacas from Durock, noted for their quiet operation, particularly when lubricated. You get just a faint slide-and-click noise from the keyboard under regular use.

The joy of the solenoid edition is in, you guessed it, the solenoid. It fires away with every keypress when enabled, creating a sound more akin to a real typewriter than any mechanical keyboard we’ve ever heard. Click-clack fans will love it, while those with sensitive ears will scream at any cube neighbours that dare to buy one and switch it on.

Files are available on Github for the curious. We’ve seen some other great keyboards over the years, like this nifty split-board design. Video after the break.

Continue reading “Solenoid Keyboard Sounds Very Much Like A Typewriter”

two USBValve devices on a table, both with a USB cable plugged in. The top one with a long narrow OLED display and the bottom one with a 128x64 OLED display.

Sleuth Untrusted USB Communication With USBValve

USB devices are now ubiquitous and, from an information security standpoint, this is a terrifying prospect as malicious software can potentially be injected into a system by plugging in a compromised USB stick. To help get some piece of mind, [Cesare Pizzi] created USBValve to help expose suspicious USB activity on the fly.

The idea behind USBValve is to have the onboard microcontroller advertise itself as a storage device, pretending to have a filesystem with some common files available. When an unknown USB device is first inserted into the USB port on the USBValve tool, USBValve displays usage information, via the attached OLED screen, on whether the USB device is accessing files it shouldn’t be or immediately trying to write to the filesystem, which is a clear sign of malicious behavior.

The USBValve hardware is a straight forward composition of a Raspberry Pi Pico, an tiny I2C OLED screen and an optional PCB carrier board with a 3D printed spacer. The software uses Adafruit’s Tiny USB library along with the SSD1306AsciiWire library to drive the OLED display. And it’s all open source, including the code and PCB design files.

There’s a lot of security fun to be had with USB, from DIY dirt cheap Rubber Duckies to open source hardware Rubber Duckies, to discussions on the BadUSB exploits. The simplicity of the USBValve project allows it to be low cost, easy to use and can provide concise, critical information for a variety of real world threats.

After the break, be sure to check out [Cesare Pizzi]’s talk about USBValve at the SCC Insomnihack conference which has a wealth of information on how it fares against some known malware attacks, discussions on some of its shortcomings and potential avenues for improvement.

Thanks to [watchdog] for the tip!

Continue reading “Sleuth Untrusted USB Communication With USBValve”

Students 3D Print Low Cost Braille Keypad

Numerical keypads are common entry devices for everything from home security systems to phones and more. Unfortunately, a great deal of them are difficult to use if you’re visually impaired. This high-contrast Braille keypad aims to solve those issues with simple design choices.

The keypad was developed as a school project by students [Nicholas Nguyen] and [Daniel Wang]. It uses a regular layout, with 1 at the top left and 9 at the bottom right. The keypad itself is 3D printed with large buttons for easier use. Each button has its numeral inlaid on the face which allows it to be easily filled in with paint for high-contrast readability.

The real neat feature, though, is that each individual button features its relevant number in Braille. The pips are directly 3D printed into the shape of each button. For those that familiar with the tactile writing system, this makes the keypad much easier to use. It obviates the need to guess at the keypad’s orientation, and we’re honestly surprised we don’t see this on more devices out in the wild.

We’ve featured a variety of neat Braille hacks over the years, including this neat tactile display.

Continue reading “Students 3D Print Low Cost Braille Keypad”

Taking Mechanical Keyboard Sounds To The Next Level

When it comes to mechanical keyboards, there’s no end to the amount of customization that can be done. The size and layout of the keyboard is the first thing to figure out, and then switches, keycaps, and then a bunch of other customizations inside the keyboard like the mounting plate and whether or not to add foam strips and other sound- and vibration-deadening features. Of course some prefer to go the other direction with it as well, omitting the foam and installing keys with a more noticeable click, and still others go even further than that by building a separate machine to make their keyboard activity as disruptive as it could possibly be.

This started as a joke among [ac2ev] and some coworkers, who were already teasing about the distinct sound of the mechanical keyboard. This machine, based on a Teensy microcontroller, sits between any USB keyboard and its host computer, intercepting keystrokes and using a small solenoid to tap on a block of wood every time a keystroke is detected. There’s also a bell inside that rings when the enter key is pressed, similar to the return carriage notification for typewriters, and as an additional touch an audio amplifier with attached speaker plays the Mario power-up sound whenever the caps lock key is pressed.

[ac2ev] notes that this could be pushed to the extreme by running a much larger solenoid powered by mains electricity, but since this was more of a proof-of-concept demonstration for some coworkers the smaller solenoid was used instead. The source code for the build can be found on the project’s GitHub page and there’s also a video of this machine in action here as well. Be careful with noisy mechanical keyboards, though, as the sounds the keys produce can sometimes be decoded to determine what the user is typing.

A Faulty Keyboard From A Single LED

When the chance arrived to buy a mechanical keyboard for not a lot, naturally, [Hales] jumped at it. Then it started having odd intermittent problems with some keys appearing stuck, which led to a teardown and some fault finding. The culprit was a white LED — but why this was the case is a fascinating story.

Stripping it down there didn’t seem to be an obvious culprit, but eventually, the trail led to a lack of diodes in the matrix. This keyboard had an extremely clever yet rather cursed design in which it used LEDs as both illumination and as a diode in the keyboard matrix circuit, and the faulty LED had a reverse breakdown condition that could be triggered under certain operational conditions.

More unexpectedly, it would sometimes hold on to its reverse breakdown state even after power off. Just when you think you understand a component’s properties, there’s always room for surprise. And we can safely say we’ve learned something about the design of cheaper keyboards in reading the account. It’s clear that when it comes to ‘boards, it’s best to take no chances.

An ESP32 Dev Board As A Framework Laptop Module

The Framework laptop will no doubt already have caught the eye of more than one Hackaday reader, as a machine designed for upgrade and expansion by its users. One of its key features is a system of expansion modules. The modules are USB-C devices in a form factor that slides into the expansion bays on the Framework Laptop. Framework encourages the development of new modules, which is something [Spacehuhn] has taken on with an ESP32-S3 development board.

The board itself is what you’d expect, the ESP is joined by a multicolor LED and one of those Stemma/Quiik connectors for expansion. The case is handily provided by Framework themselves, and all the files for the ESP32 module can be found in a GitHub repository. We’re guessing it will find application in experimenting with WiFi networks rather than as a standalone microcontroller. Either way, it shows the route for any Framework owners into making their own add-ons. Take a look, we’ve placed the video below the break.

As you might expect we’ve given a lot of coverage to the Framework laptop since its launch, in particular, our colleague [Arya Voronova] is a fan and has shown us many alternative uses for the parts.

Continue reading “An ESP32 Dev Board As A Framework Laptop Module”