A Virus For The BBC Micro

If you work at all with British software or hardware engineers, you’ll find that there’s an entire generation perhaps now somewhere between their mid-40s and mid-50s, who stand slightly apart from their peers in their background and experience. These were the lucky teenagers who benefited from the British government’s 1980s push to educate youngsters in computing, and who unlike those before or who followed, arrived at university engineering courses fresh from school fully conversant with every facet of a computer from the hardware upwards.

[Alan Pope] is from that generation, and he relates a tale from his youth that wasn’t so out of place back in those days, of how he wrote what we’d now call a simple virus for the BBC Micro. Better still, he’s re-created it.

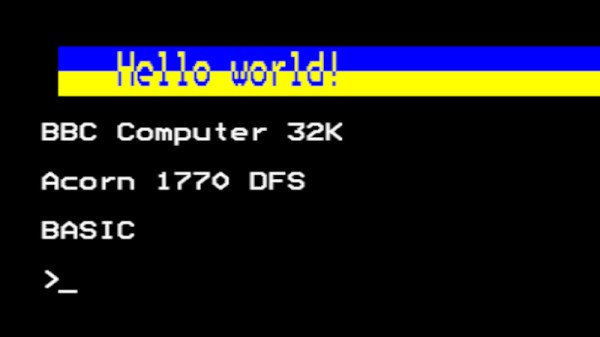
The post is as much a delightful trip back through that era of microcomputing, including an entertaining aside as he shared an airline journey with BBC Micro designer Chris Turner, and it serves as a reminder of how the BBC Micro’s disk operating system worked. There was a !boot file, which was what would be run from the disk at startup, and his bit of code would subvert that and hide itself in the machine’s so-called sideways RAM. The payload was pretty simple, every 32 soft reboots it would print a “Hello world” message, but it seems that was enough back in 1989 to get him into trouble. The 2023 equivalent works, but we’re guessing no teacher will come for him this time.

If you can’t find a real BBC Micro but still want one on hardware, we’ve brought you an FPGA version in the past.

Book8088 Slows Down To Join The Demoscene

As obsolete as the original IBM Model 5150 PC may appear, it’s pretty much the proverbial giant’s shoulders upon which we all stand today. That makes the machine worth celebrating, so much so that we now have machines like the Book8088, a diminutive clamshell-style machine made from period-correct PC chips; sort of a “netbook that never was.”

But the Book8088 only approximates the original specs of the IBM PC, making some clever hardware hacks necessary to run some of the more specialized software that has since been developed to really stretch the limits of the architecture. [GloriousCow]’s first steps were to replace the Book8088’s CPU, an NEC V20, with an actual 8088, and the display controller with a CGA-accurate Motorola MC6845. Neither of these quite did the trick, though, at least not on the demanding 8088MPH demo, which makes assumptions about CPU speed based on the quirky DRAM refresh scheme used in the original IBM PC.

Knowing this, [GloriousCow] embarked on a bodge-fest aimed at convincing the demo that the slightly overclocked Book8088 was really just a 4.77-MHz machine with a CGA adapter. This involved cutting a trace on the DMA controller and reconnecting it to the machine’s PIO timer chip, with the help of a 74LS74 flip-flop, a chip that made an appearance in the 5150 but was omitted from the Book8088. Thankfully, the netbook has plenty of room for these mods, and with the addition of a little bit of assembly code, the netbook was able to convince 8088MPH that it was running on the correct hardware.

We thoroughly enjoyed this trip down the DMA/DRAM rabbit hole. The work isn’t finished yet, though — the throttled netbook still won’t run the Area 5150 demo yet. Given [GloriousCow]’s recent Rust-based cycle-accurate PC emulation, we feel pretty good that this will come to pass soon enough.

Clock Hack Gives DEC Rainbow A New Lease On Life

In retrocomputing circles, it’s often the case that the weirder and rarer the machine, the more likely it is to attract attention. And machines don’t get much weirder than the DEC Rainbow 100-B, sporting as it does both Z80 and 8088 microprocessors and usable as either a VT100 terminal or as a PC with either CP/M or MS-DOS. But hey — at least it got the plain beige box look right.

Weird or not, all computers have at least a few things in common, a fact which helped [Dr. Joshua Reichard] home in on the problem with a Rainbow that was dead on arrival. After a full recapping — a prudent move given the four decades since the machine was manufactured — the machine failed to show any signs of life. The usual low-hanging diagnostic fruit didn’t provide much help, as both the Z80 and 8088 CPUs seemed to be fine. It was then that [Joshua] decided to look at the heartbeat of the machine — the 24-ish MHz clock shared between the two processors — and found that it was flatlined.

Unwilling to wait for a replacement, [Joshua] cobbled together a temporary clock from an Arduino Uno and an Si5351 clock generator. He connected the output of the card to the main board, whipped up a little code to generate the right frequency, and the nearly departed machine sprang back to life. [Dr. Reichard] characterizes this as a “defibrillation” of the Rainbow, and while one hates to argue with a doctor — OK, that’s a lie; we push back on doctors all the time — we’d say the closer medical analogy is that of fitting a temporary pacemaker while waiting for a suitable donor for a transplant.

This is the second recent appearance of the Rainbow on these pages — [David] over at Usagi Electric has been working on the graphics on his Rainbow lately.

Atari Introduces A New Old Console

Readers of a certain age no doubt remember the Atari 2600 — released in 1977, the 8-bit system helped establish the ground rules for gaming consoles as we know them today, all while sporting a swanky faux wood front panel designed to make the system look at home in contemporary living rooms.

Now, nearly 50 years later, the Atari 2600 is back. The new system, imaginatively named the 2600+, looks exactly like the original system, albeit at around 80% scale. It will also work the same way, as the system will actually be able to play original Atari 2600 and 7800 cartridges. This is something of a surprise when compared to the previously released retro consoles from the likes of Sony and Nintendo, as they were all limited to whatever games the company decided to pack into them. Of course, this probably has something to do with the fact that Atari has been selling newly manufactured 2600 games for some time now.

Although it will play original cartridges, it’s still an emulated console at heart. There aren’t a lot of technical details on the product page, but it does say the 2600+ is powered by a Rockchip 3128 SoC with 256 MB of DDR3 RAM and 256 MB eMMC flash. Some quick searching shows this to be a pretty common board for set-top gadgets, and wildly overpowered considering the meager requirements for emulating a game console from 1977. We wouldn’t be surprised to find it’s running some kind of minimal Linux install and using one of the existing open source emulators.

While the 2600+ sports the same 9-pin D-sub controller connectors as the original console, it thankfully embraces modern display technology and outputs over HDMI. Each console will come with a “10-in-1” cartridge that contains some of the console’s most popular titles, as well as a modernized version of the original single-button joystick. (Unlike the original, the 2600+ comes with only a single joystick — the other is sold separately.)

Atari won’t start shipping the 2600+ until this fall, but they’re currently taking preorders for the $130 system. We’re eager to see somebody pull it apart, as the earlier “mini” consoles ended up being ripe for hacking.

Continue reading “Atari Introduces A New Old Console”

An 8-bit ISA card with VGA, HDMI and composite video connectors

Upgraded Graphics Gremlin Adds HDMI Video To Vintage PCs

Although new VGA-equipped monitors can still be bought, the old standard is definitely on its way out by now, being replaced by high-speed digital interfaces like HDMI and DisplayPort. It therefore makes sense to prepare for a VGA-less future, as [Yeo Kheng Meng] is doing. He designed an 8-bit ISA display card with an HDMI output that enables even the very first generation of PCs to talk to a modern monitor.

The design is based on the Graphics Gremlin by [Tube Time], which is an 8-bit ISA display card that aims to be software compatible with the obsolete MDA and CGA display formats while outputting a clean VGA signal. [Yeo Kheng Meng] modified the board by adding a TFP410 HDMI bus driver and replacing the rarely-used 9-pin RGBI connector with an HDMI version. He also updated the HDL code for the Lattice FPGA, which forms the heart of the graphics card, to account for the new digital output. While he was at it, he also added a few features he was missing in the original product, such as the option to select the color displayed in MDA mode and the ability to output both HDMI and composite video at the same time.

The video below shows the updated card in action in an IBM 5155 Portable PC. The HDMI port connects to a modern monitor, while the composite video output is routed to the 5155’s internal CRT as well as a small color monitor on top. The IBM thereby joins a small list of retro computers that have received an HDMI upgrade — the Amiga 500 and PlayStation 2 being other examples. HDMI might be a lot more complex to work with than VGA, but luckily there are open-source implementations that do much of the work for you.

Continue reading “Upgraded Graphics Gremlin Adds HDMI Video To Vintage PCs”

A Pi Pico on a breakout board inside a Busch 2090 educational computer

Pi Pico Becomes SRAM For 1981 Educational Computer

Ever since the Raspberry Pi Pico was introduced in early 2021 we’ve seen the tiny Pi being used for an astonishing variety of applications. It has powered countless clocks, gadgets, games, and accessories for all kinds of computers old and new. [Michael Wessel] has recently added an interesting new application in the “old computer” category, by turning a Pico into a 2114 SRAM emulator for his Busch 2090, an educational computer system from 1981.

The pinout of the classic 2114 SRAM chip is quite simple: ten address lines, four data lines, Write Enable and Chip Select. Since the 3.3 V Pico is more or less 5V tolerant, you could directly connect these signals to its GPIO ports, but [Michael] considered it more reliable to use level shifters between the two voltage domains. He experimented with a few standard level shifter circuits, but quickly realized he had to take the 33 kΩ pulldown resistors on the Busch 2090’s address bus into account. By just adding a couple of resistors to the Pico’s ports he could make completely passive level shifters, which worked just fine since the system’s clock frequency is only 500 kHz.

[Michael] demonstrates his RAM replacement in the video below, with a neat set of blinkenlights showing the data being shuttled around in real time. He has plans to make a proper PCB for his project, as well as to enable all kinds of neat features by modifying the system’s RAM in real time. This is of course not limited to the Busch 2090: the 2114 chip was widely used in the 1980s, so the PicoRAM can probably be used in many other systems of the era. Code for the Pi is available on GitHub if you’re interested in trying this for yourself. If you’d like to find out what programming a Busch 2090 feels like, you can emulate one using an Arduino.

Continue reading “Pi Pico Becomes SRAM For 1981 Educational Computer”

The motherboard of a Mattel Aquarius, with a small daughterboard mounted on top

Adding Composite Video To The Mattel Aquarius

In the home computer market of the 1980s, there were several winners that are still household names four decades later: the Commodore 64, the Apple II and the Sinclair Spectrum, to name a few. But where there are winners, there are bound to be losers as well – the Mattel Aquarius being a good example. A price war between the bigger players, combined with a rather poor hardware design, meant that the Aquarius was discontinued just a few months after its introduction in 1983. However, this makes it exactly the type of obscure machine that [Leaded Solder] likes to tinker with, so he was happy to finally get his hands on a neat specimen listed on eBay. He wrote an interesting blog post detailing his efforts to connect this old beast to a modern TV.

The main issue with the Aquarius is that it only has an RF video output, which results in a rather poor rendition of its already very limited graphics capabilities. Luckily, there is a fix available in the form of a composite A/V adapter that’s an almost plug-and-play upgrade. The only thing you need to do, as [Leaded Solder] illustrates in his blog post, is open up the computer, desolder the RF modulator and solder the A/V adapter in its place. Getting to that point was a bit tricky due to heavy EMI shields that were fixed in place with lots of solder, requiring liberal use of a desoldering iron. Continue reading “Adding Composite Video To The Mattel Aquarius”